Your wholesale buyers often need time to pay, and chasing invoices by hand is slow. WooCommerce Wholesale Payments lets them pay on terms through Stripe, with deposits, instalments, and Net 30, 60, or 90 plans. This guide takes you from the plugins you need to your first payment plan.
Here’s what this guide covers:
- Requirements: the plugins and the account you need first
- What Wholesale Payments does: an overview of the plugin
- Connect to Stripe: link Wholesale Payments to your Stripe account
- Payment instalment plans: offer Net 30, 50% upfront, or your own custom plan
- Role-based payment plans: limit a plan to wholesale roles or to named customers
- Payment section title: change the heading customers see above the payment options at checkout
- Invoice management: view and manage Stripe invoices
Requirements
Before you set up Wholesale Payments, make sure your store has these:
- WooCommerce: installed and active.
- WooCommerce Wholesale Prices: the free WooCommerce Wholesale Prices plugin, installed and active.
- A Stripe account: Wholesale Payments takes every payment through Stripe.
If WooCommerce or WooCommerce Wholesale Prices is missing, Wholesale Payments does not load. Instead, it shows a notice in your dashboard with a link to install or activate the missing plugin.
You don’t need WooCommerce Wholesale Prices Premium to use Wholesale Payments. The free plugin gives you one wholesale role. Premium lets you add more wholesale roles, which you can then use to limit payment plans, and lets you choose which payment gateways each wholesale role can use.
What Wholesale Payments does
Wholesale Payments takes every payment through Stripe. Stripe creates the invoices for each order, and your buyers pay those invoices through Stripe.
Your buyers can pay a small deposit now and the rest later. Stripe handles each payment, so you spend less time on manual invoicing.
What you can do with Wholesale Payments
Wholesale Payments also has these tools for offering and collecting B2B payments on terms:
- Payment plans and Net terms: offer Net 30, 60, or 90, or a custom plan such as 50% upfront. Create payment plans.
- Automatic payment collection: auto-charge a saved card when each instalment is due. Set up auto-charge.
- Overdue restrictions: hold or block new orders when a customer has unpaid invoices. Restrict overdue customers.
- Credit limits: cap how much a customer can owe at once, globally or per role. Set credit limits.
- Email reminders: remind customers before and after a payment is due. Set up email reminders.
- ACH bank payments: accept US bank transfers alongside cards (US Stripe accounts). Accept ACH payments.
Connect Wholesale Payments to Stripe
After you install and activate Wholesale Payments, connect it to your Stripe account:
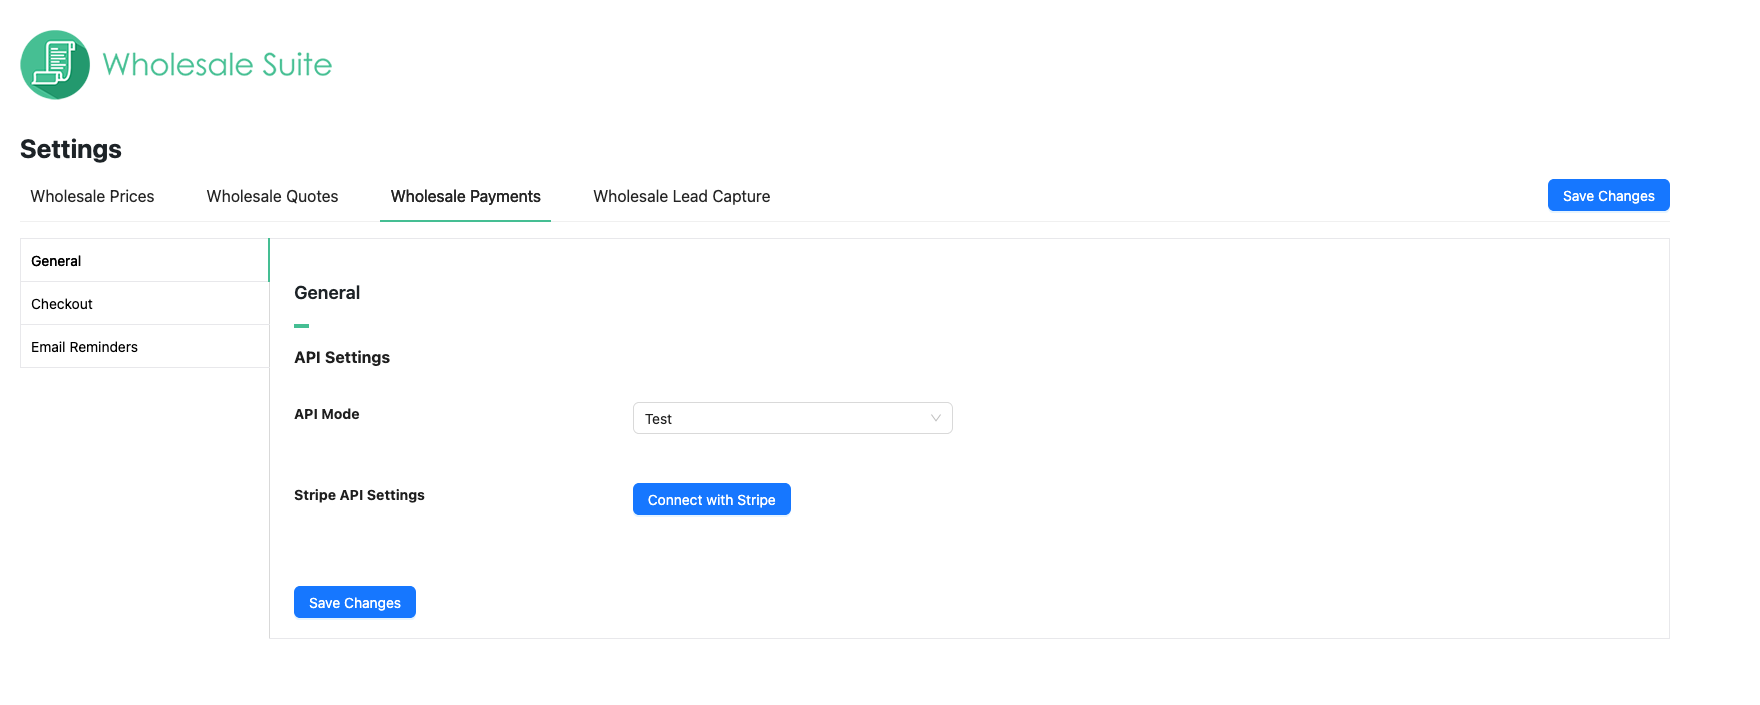
- Go to Wholesale > Settings.
- Click the Wholesale Payments tab. The General tab opens on the API Settings section.
- Click Connect with Stripe.
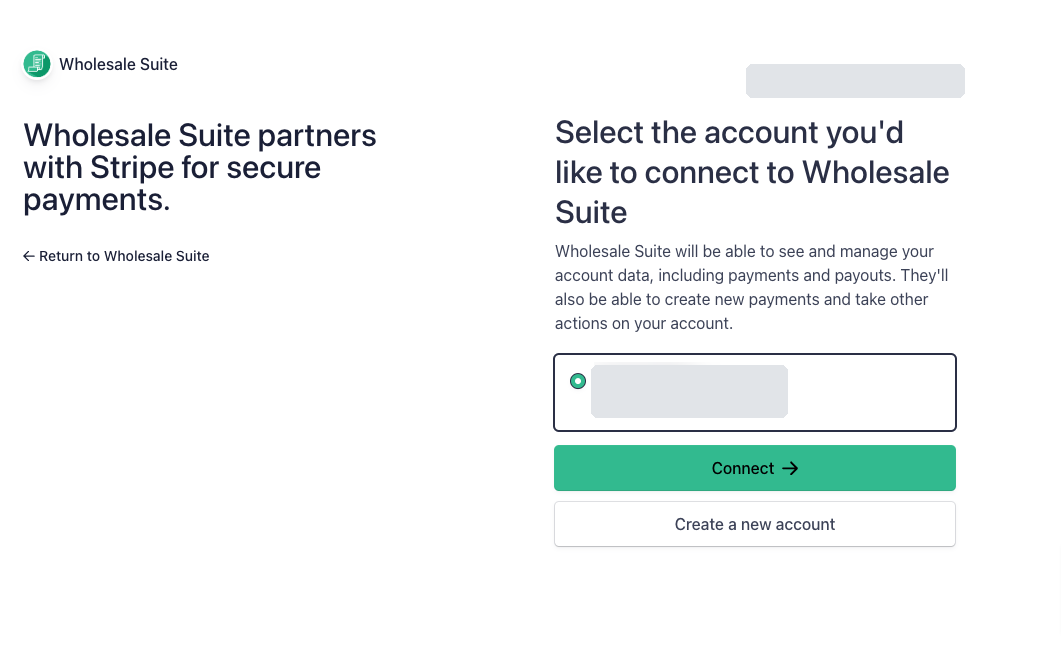
- Sign in to Stripe and finish the Stripe steps. Stripe sends you back to your WordPress admin when you’re done.
Finishing setup and fixing common stalls
Connecting Stripe is the first step, not the last. A few things commonly stall setup before your first real payment: a Stripe connection that didn’t finish, your account still in test mode, or your license not yet activated.
If your store isn’t taking real payments yet, work through Troubleshooting Wholesale Payments setup and Stripe connection. For the full connection walkthrough from scratch, see How to set up Stripe for wholesale payments.
Payment instalment plans
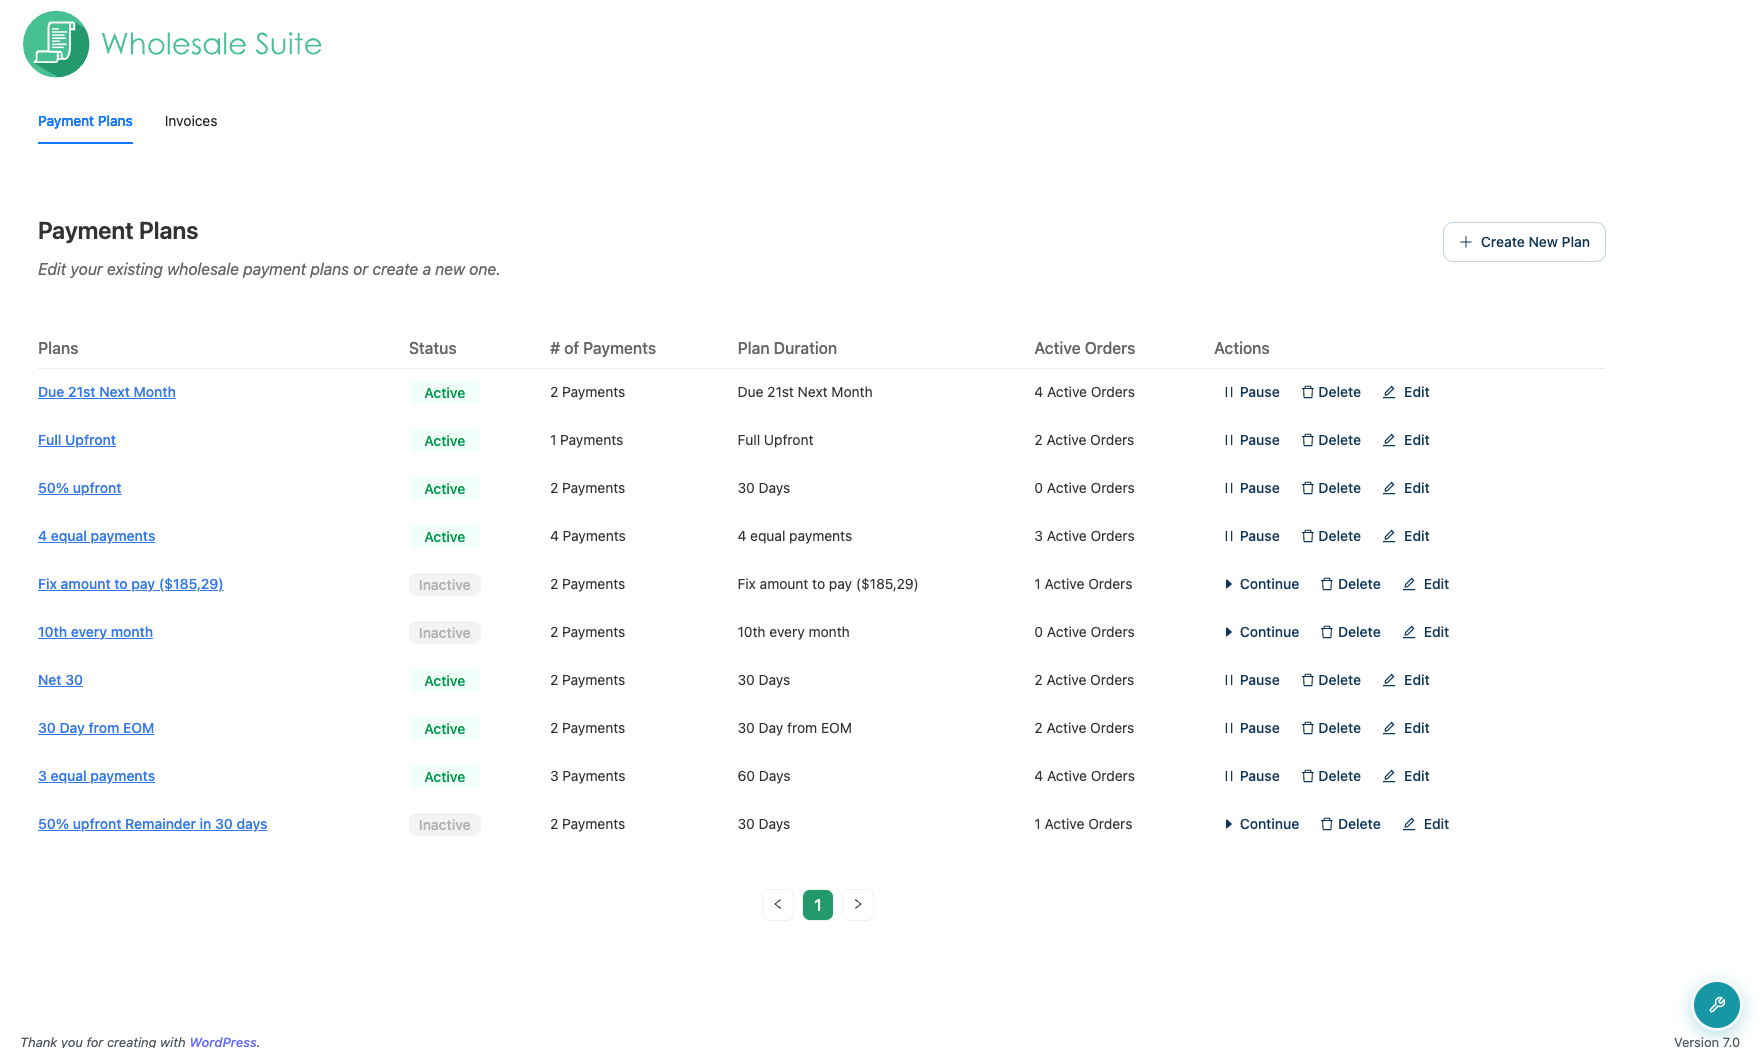
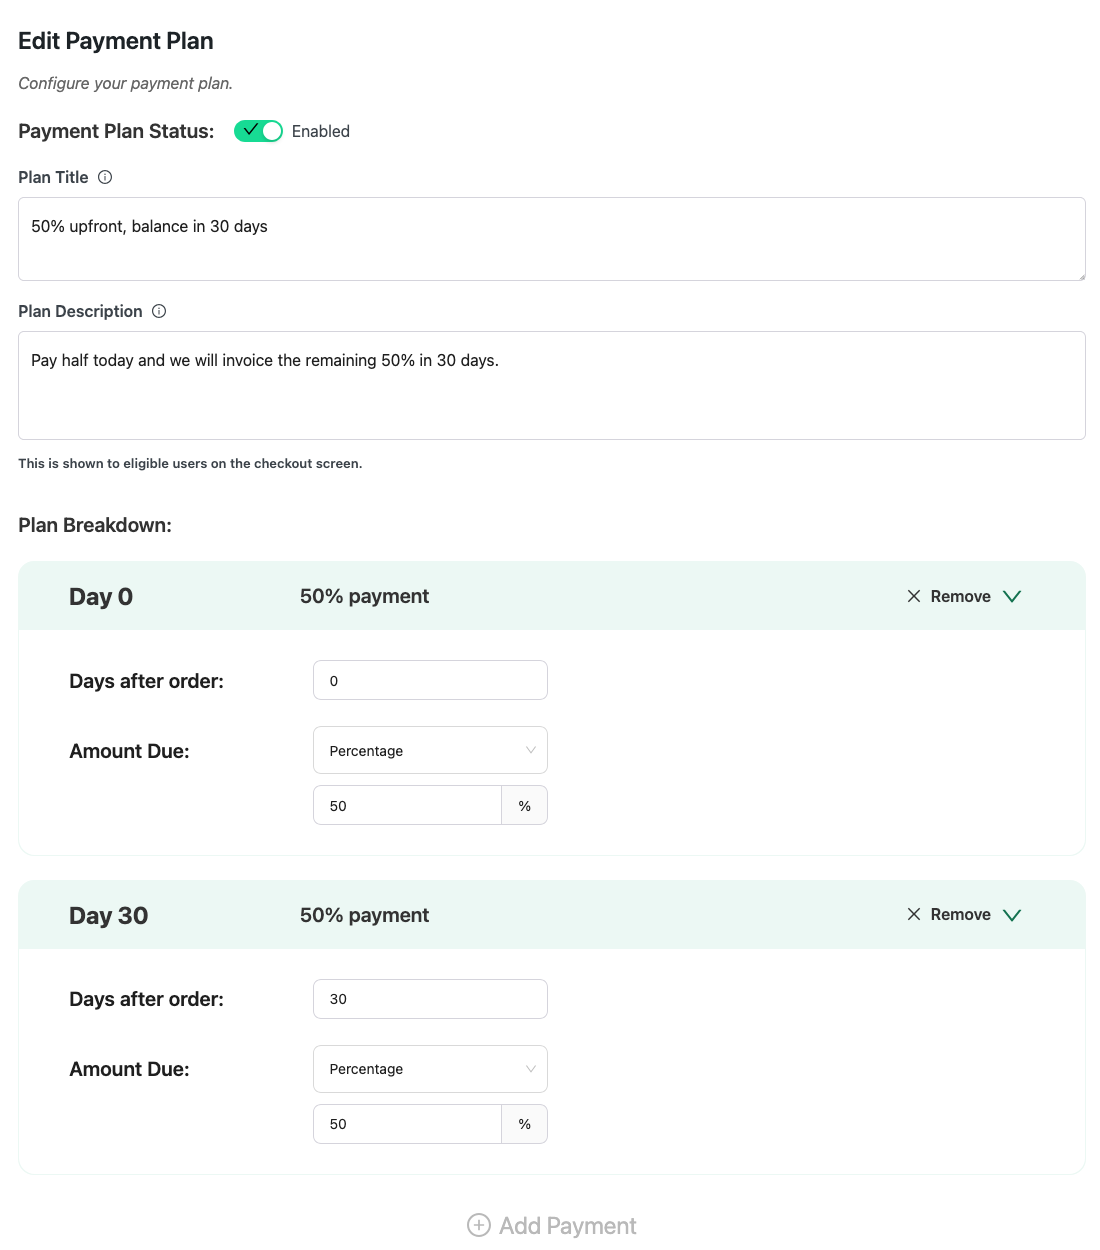
Payment plans can use fixed amounts or percentages. Wholesale Payments comes with pre-configured plan templates, such as Net 30, 50% upfront, and 3 equal payments. Create a plan from a template and enable it to offer your first payment plan at checkout.
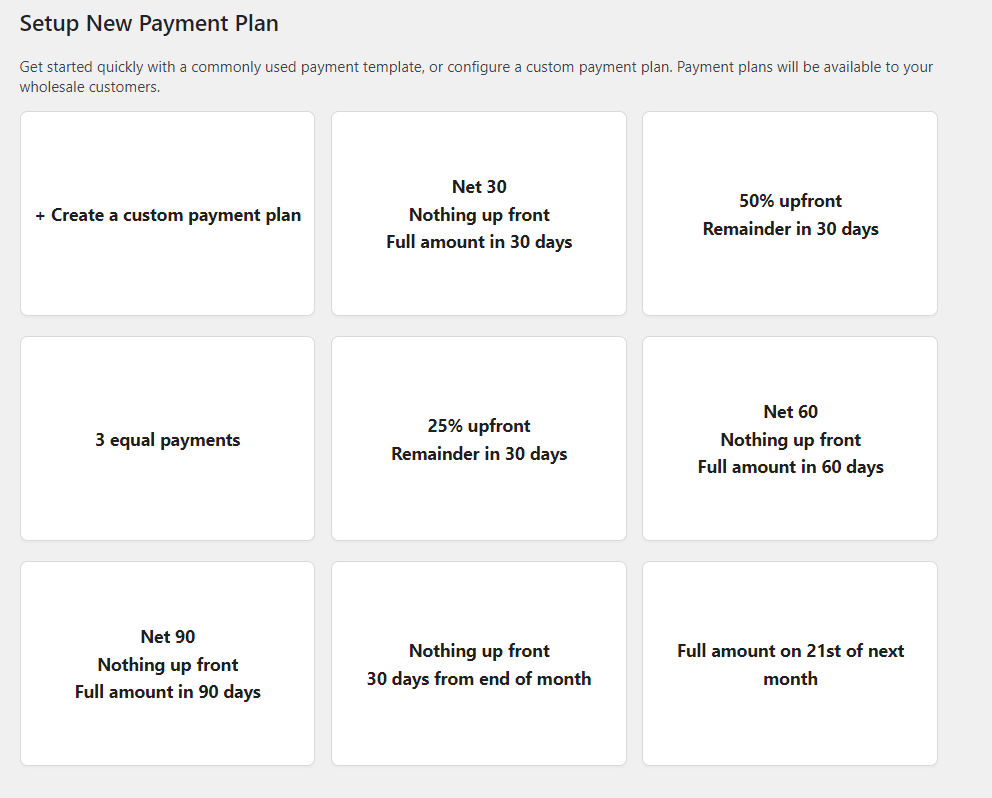
You can also create a custom plan with your own details, payment amounts, and schedule. For the full steps, see How to create payment plans for wholesale customers.
Role-based payment plans
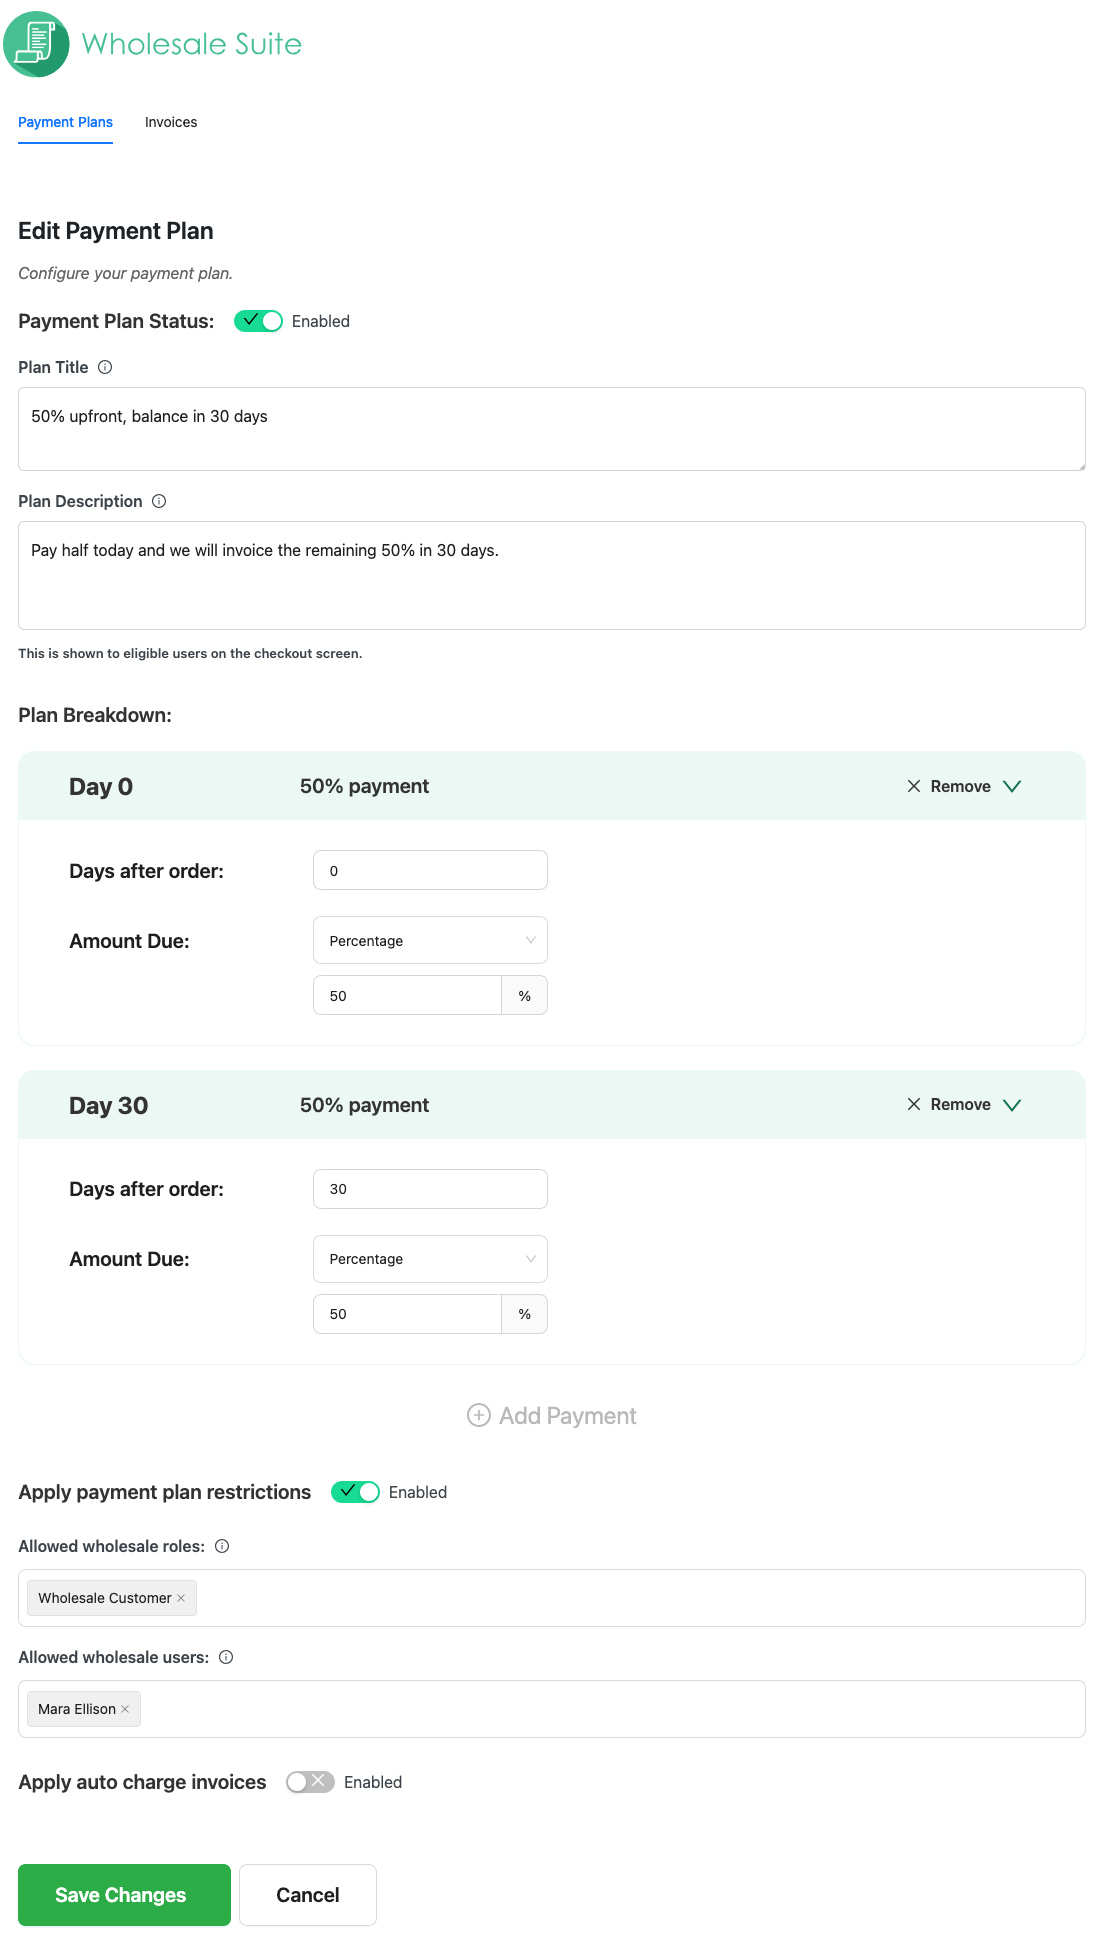
You can limit a payment plan to specific wholesale roles, to named customer accounts, or to both. In the plan editor, turn on Apply payment plan restrictions, then fill in Allowed wholesale roles, Allowed wholesale users, or both. When you set both, a customer sees the plan if their account is on the list or if they have one of the selected roles. For the steps, see How to create payment plans for wholesale customers.
The role list shows only the wholesale roles set up in Wholesale Suite. A user role created by another plugin does not appear in that list.
Change the payment section title at checkout
On the block checkout, Wholesale Payments shows a heading above its payment options. By default, the heading reads “Wholesale Payments”. To change it:
- Go to Wholesale > Settings.
- Click the Wholesale Payments tab.
- Click Checkout.
- In the Payment Section Title field, enter the heading you want customers to see.
- Click Save Changes.
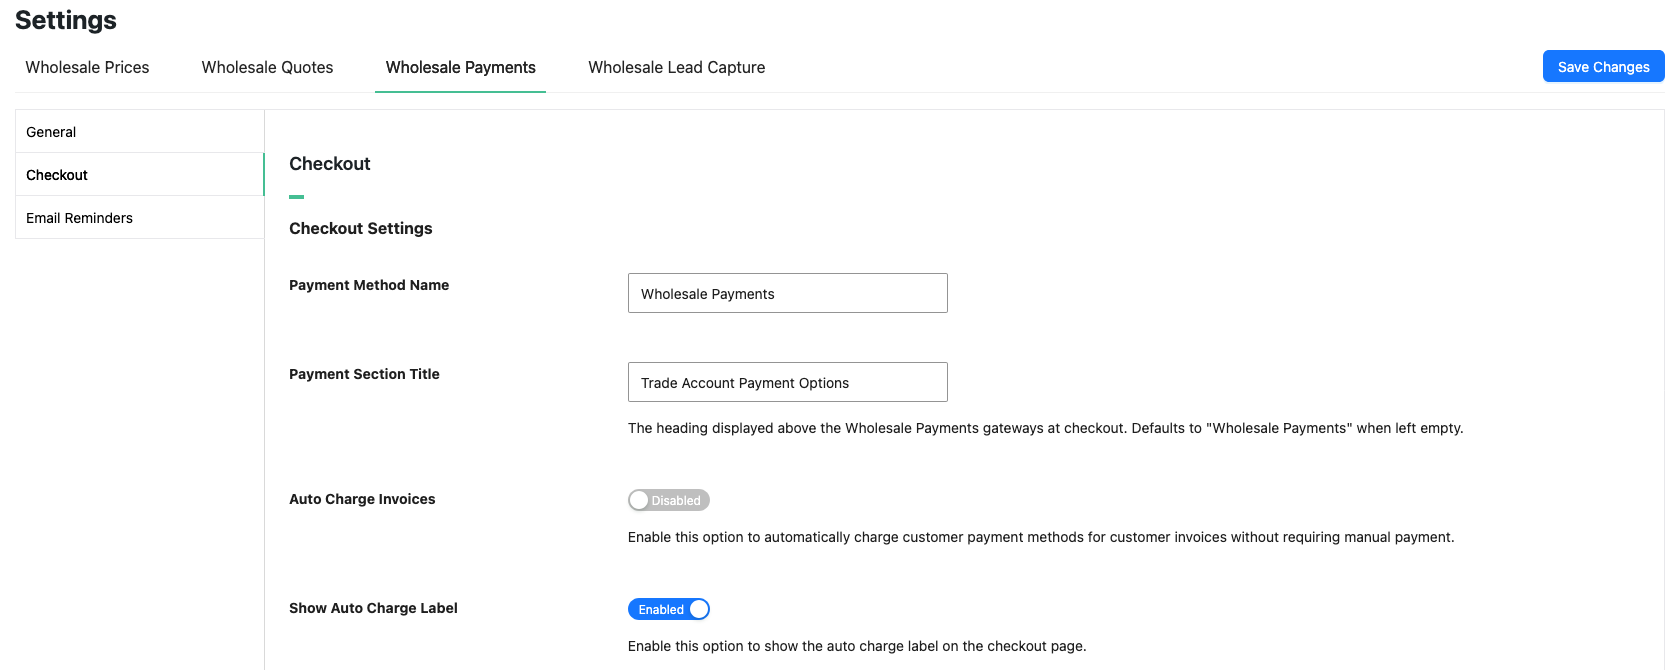
- Leave the field empty to go back to the default heading, “Wholesale Payments”.
- The classic checkout has no separate section heading. There, customers see the name from the Payment Method Name field on the same screen.
- This setting needs Wholesale Payments 1.0.7 or later.
Invoice management
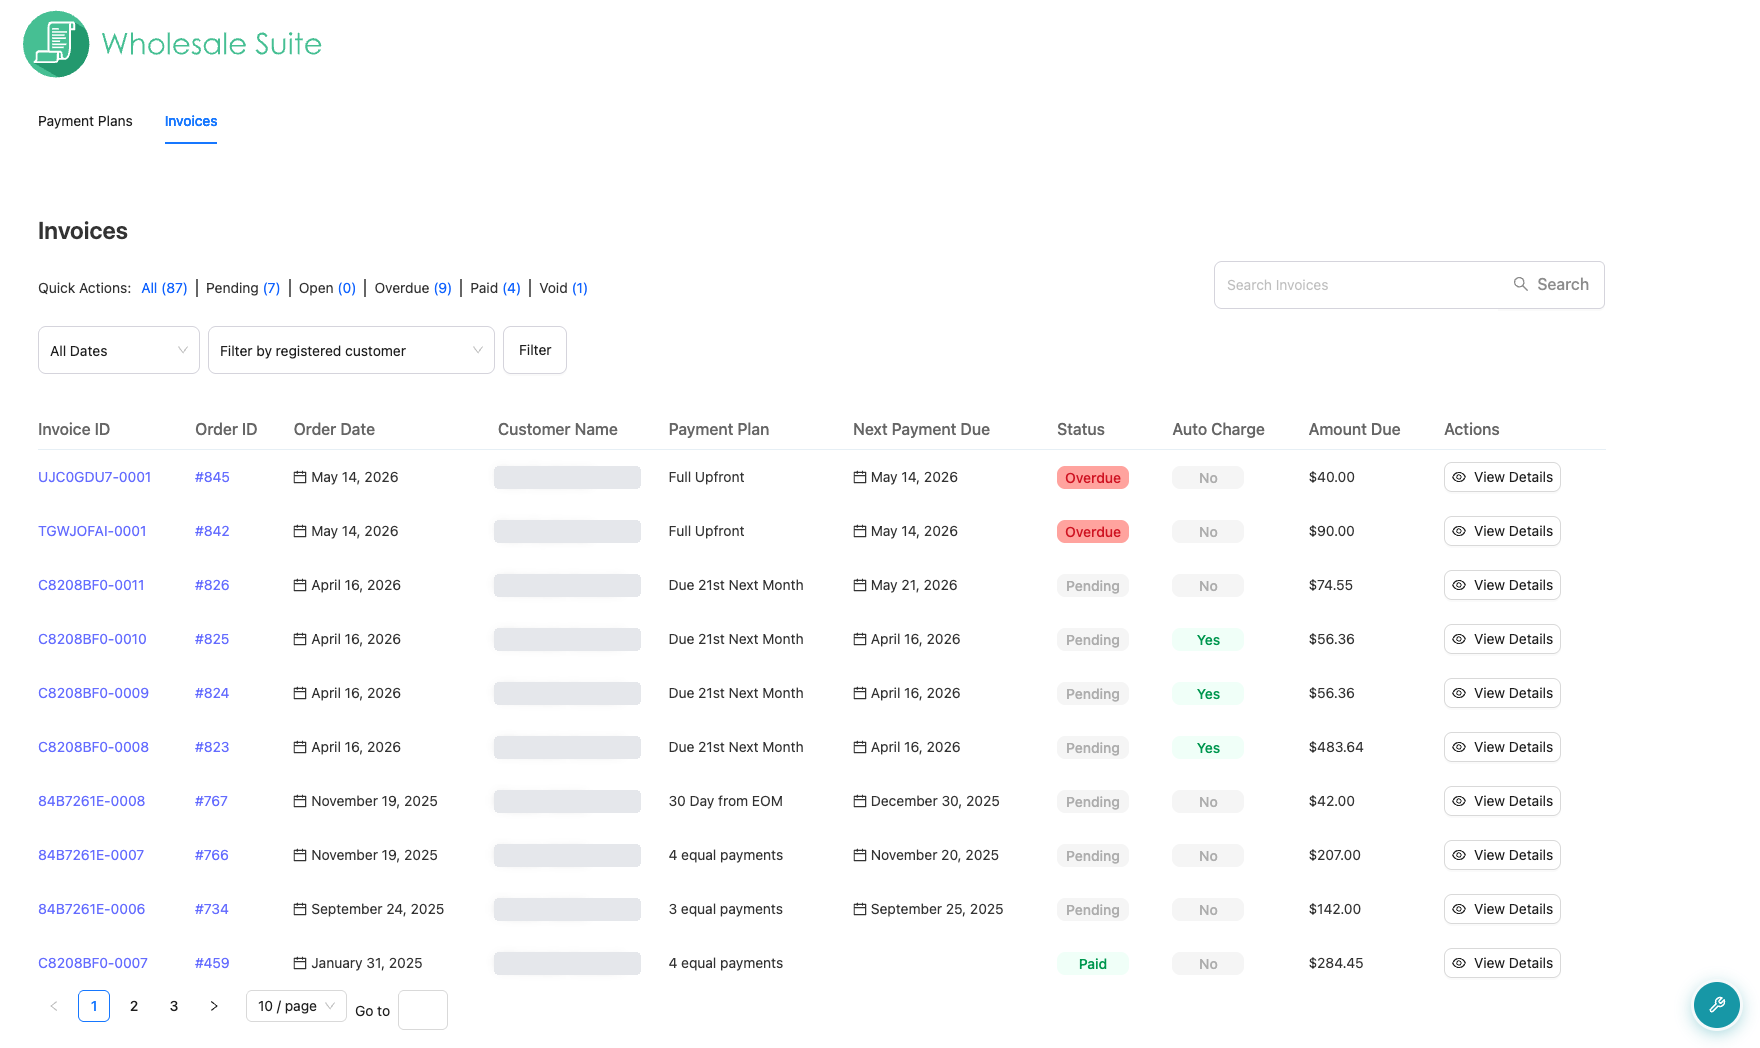
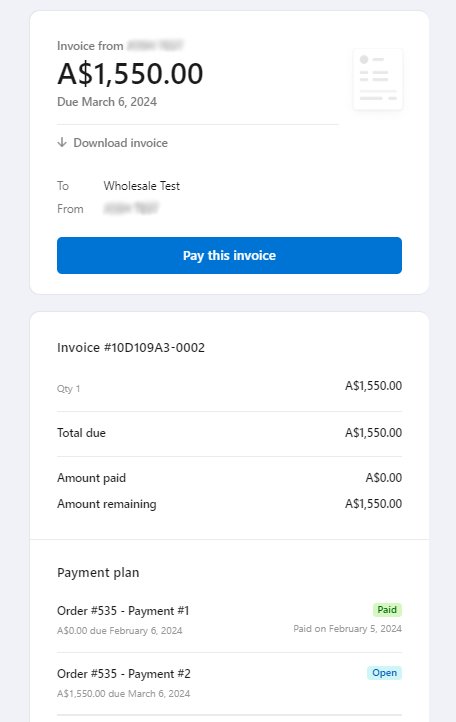
When a wholesale customer places an order with a payment plan, Stripe sends them an invoice automatically. The invoice shows the payment schedule and due dates.
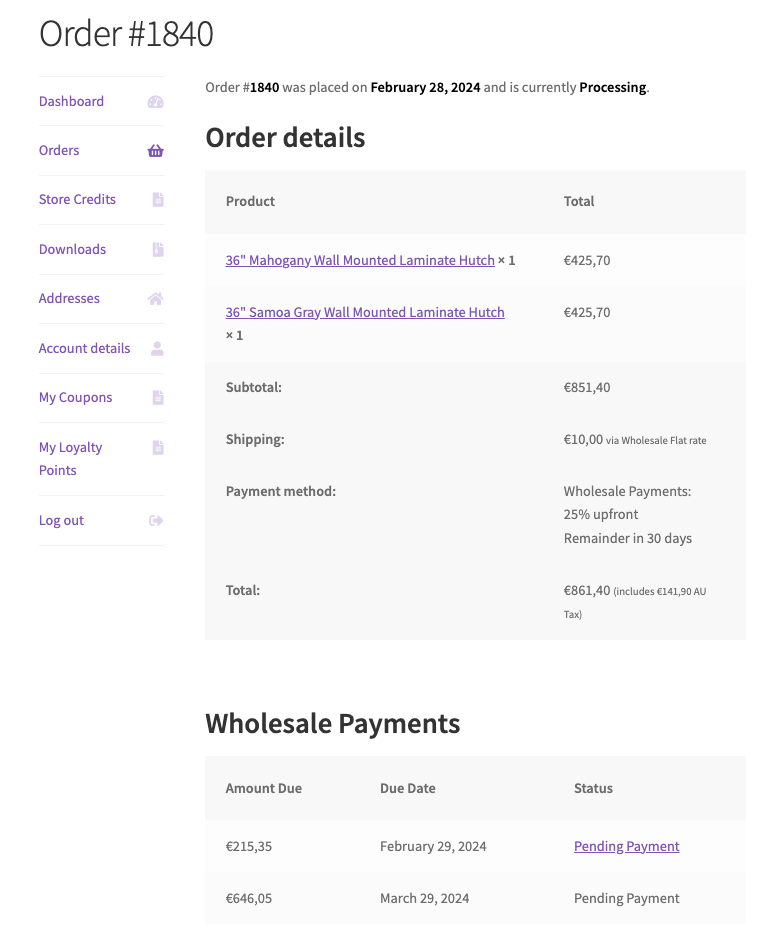
Your wholesale customer can also see each payment and its status when they open the order from the Orders tab in their account.
In WooCommerce > Orders, the Wholesale Payments column shows the payment status of each order.
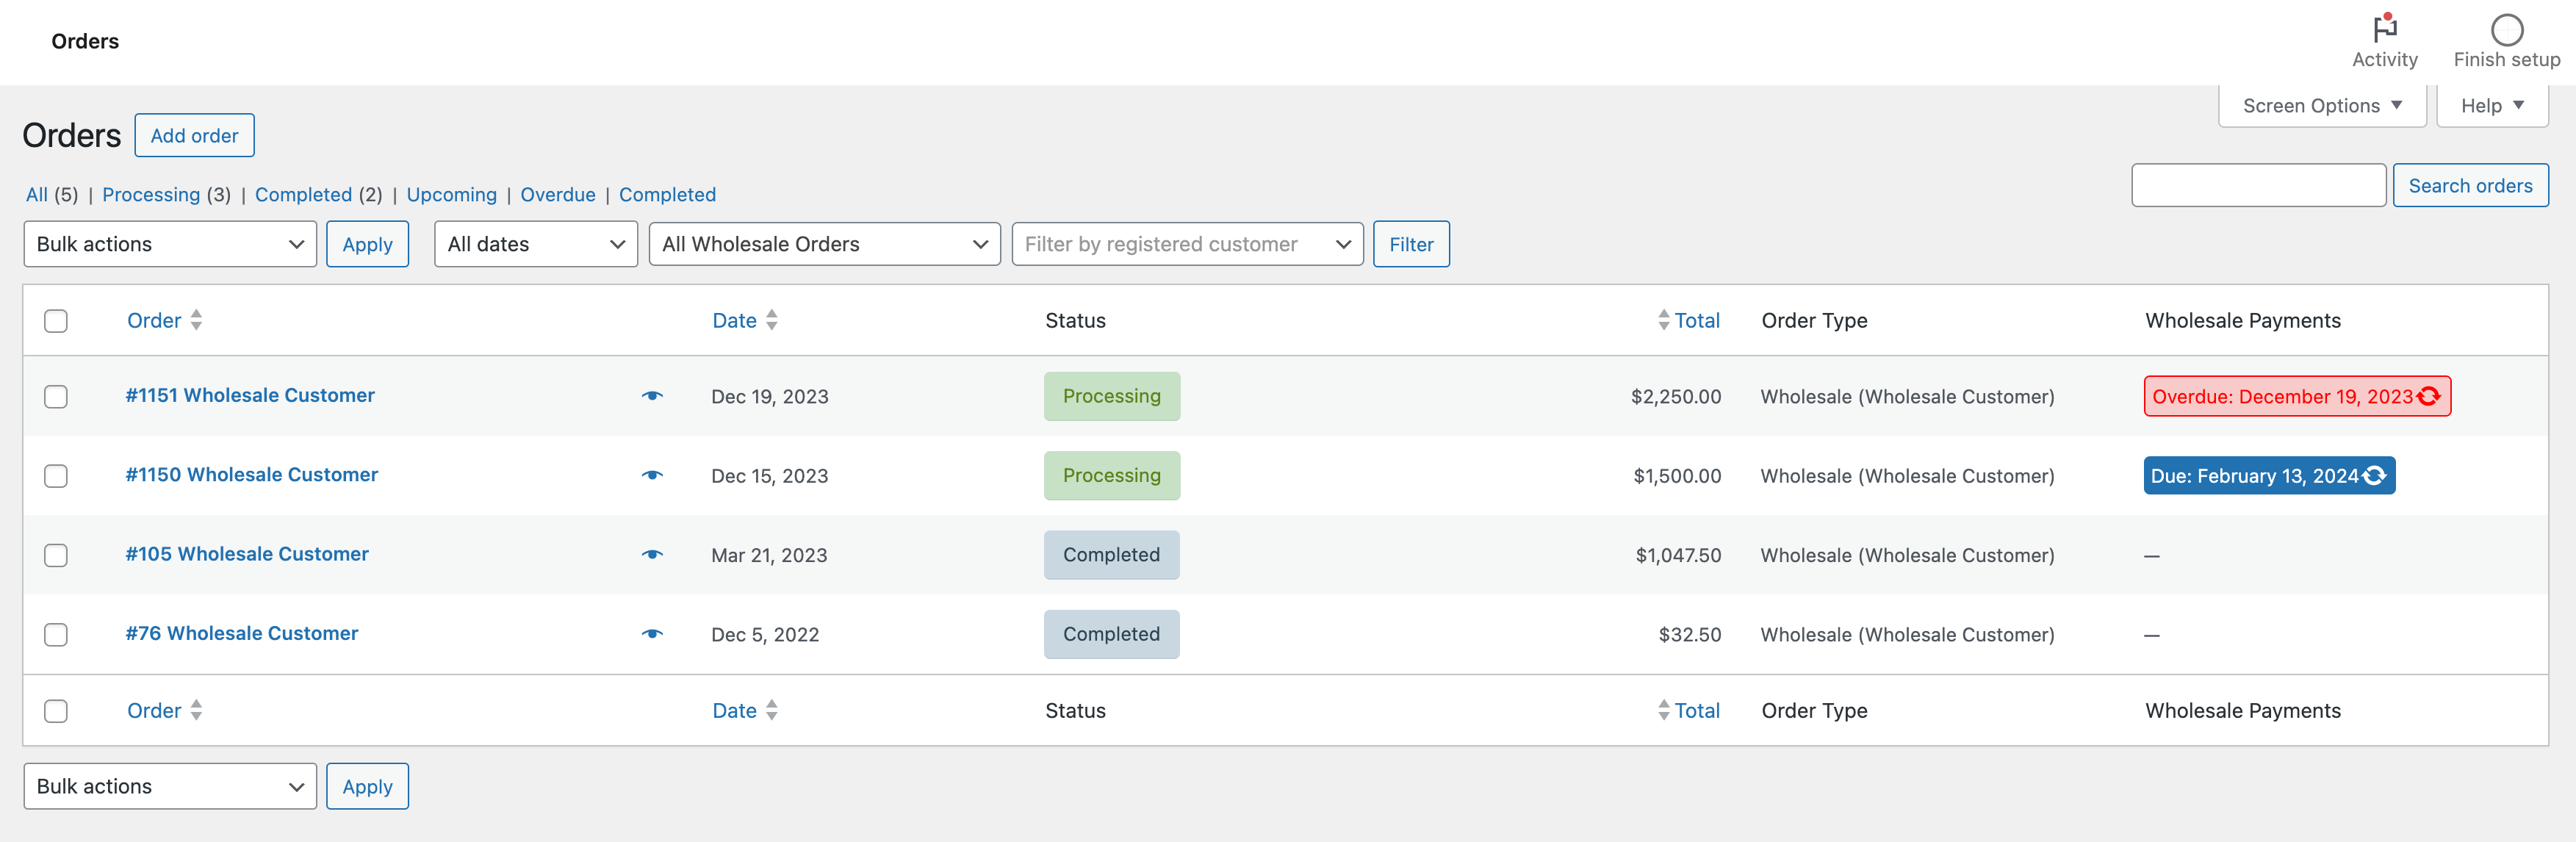
The Wholesale Payments column shows one of three statuses for each order:
- Due indicates a pending payment with the upcoming payment date.
- Paid indicates a fully paid order.
- Overdue means a payment is past its due date.
Where to go next
- How to set up Stripe for wholesale payments
- How to create payment plans for wholesale customers
- Troubleshooting Wholesale Payments setup and Stripe connection
- Wholesale Payment Invoice List Overview
Need help?
If you have a question or run into any issues, we’re here to help.
- Premium users: Open a support ticket
- Free users: Visit our community forum