If you want to collect more than an email and password from wholesale applicants, you can build your own registration form with the WooCommerce Wholesale Lead Capture plugin. This article shows how to edit the built-in fields, add custom fields, set password rules, and show custom fields at checkout. The details you gather help you decide which leads become wholesale customers.
Built-in fields
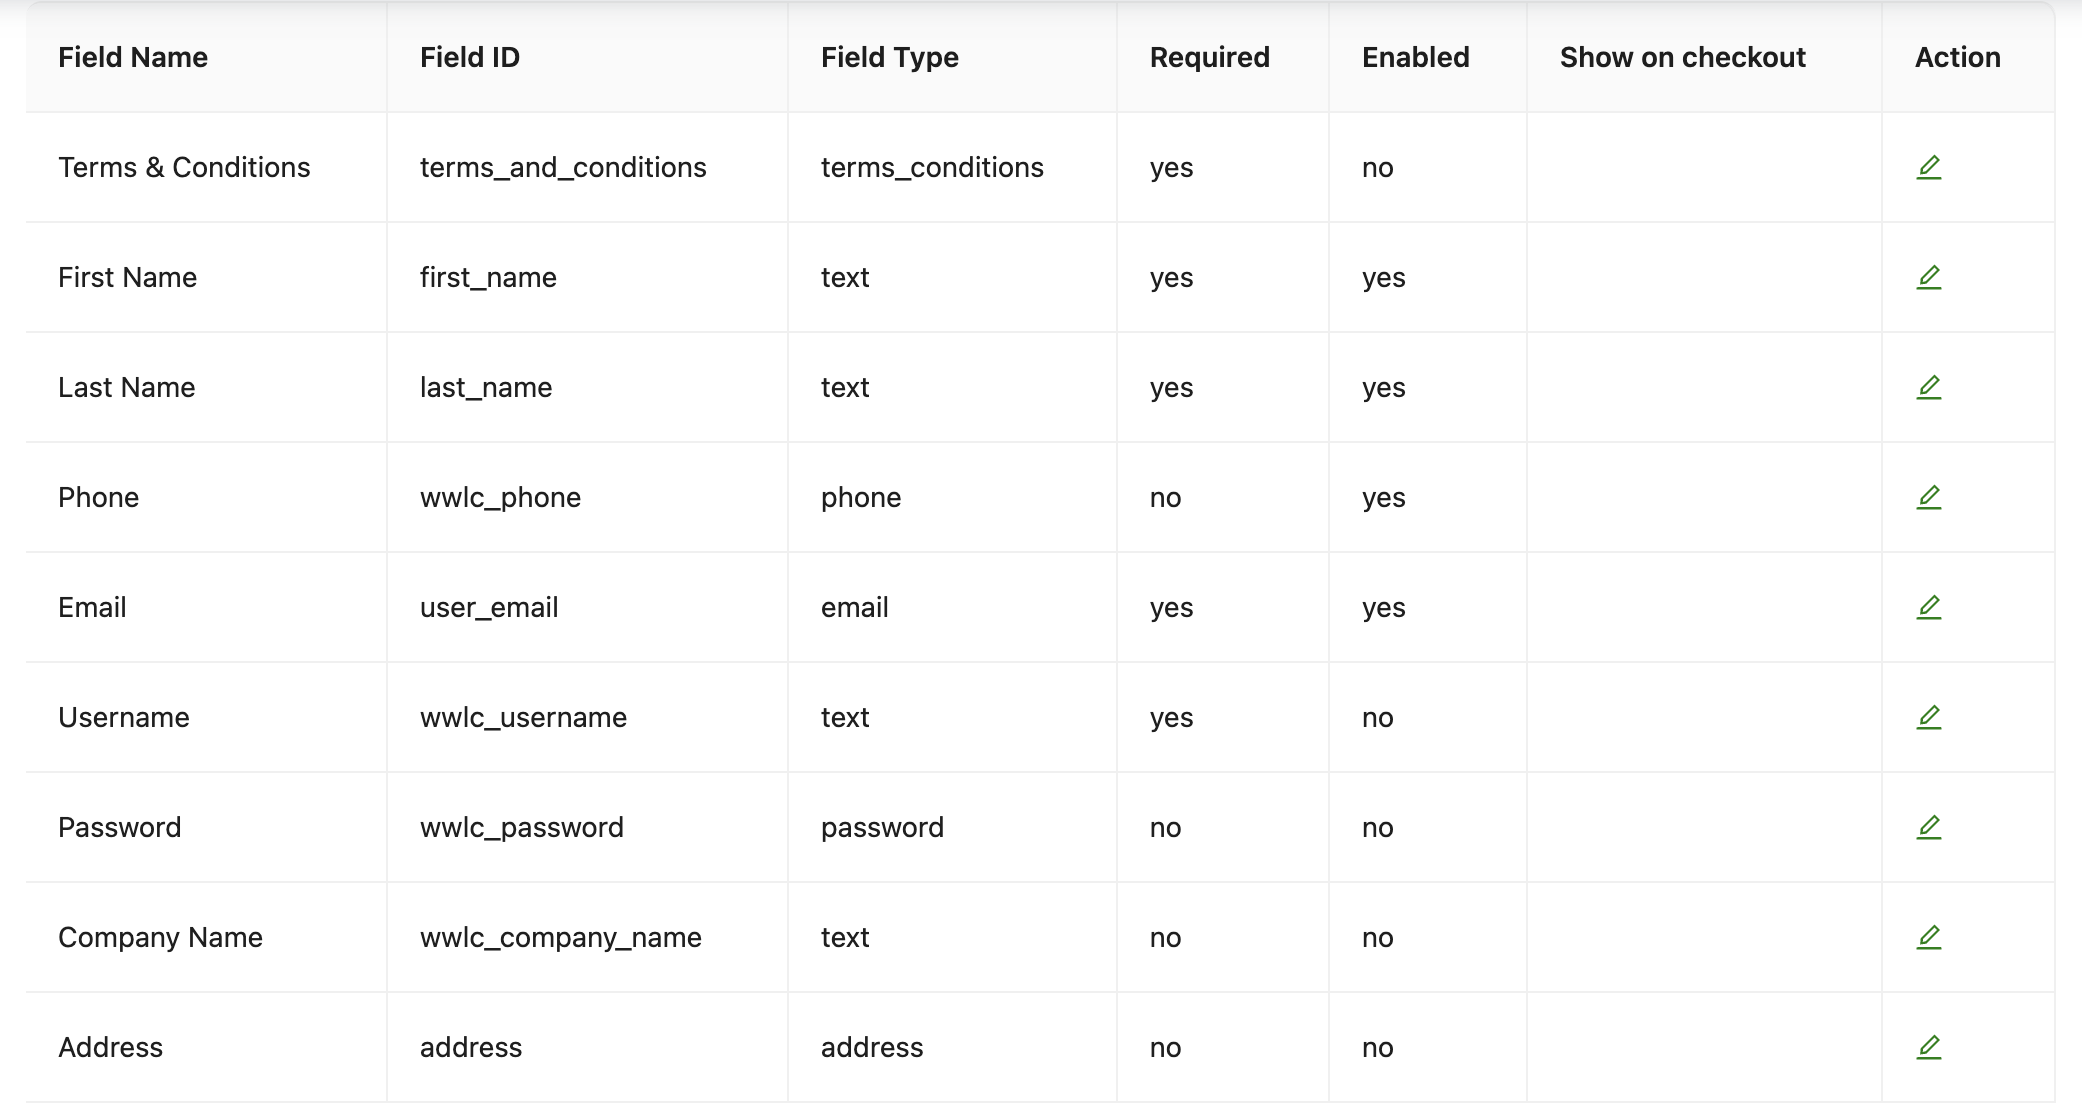
Default in-built fields on the registration form are:
- First Name (required)
- Last Name (required)
- Email (required)
- Username (optionally required)
- Password (optional) (optionally required)
- Phone (optionally required)
- Company Name (optional) (optionally required)
- Address (optional) (optionally required)
- Terms and Conditions (optionally required)
Editing the form
You can customize the fields displayed on the registration form by going to Wholesale > Settings > Wholesale Lead Capture > Registration Form in your WordPress dashboard. There, you can adjust which fields appear and modify their display order by tweaking the field settings. This allows you to control the layout and the specific information you collect from your wholesale customers.
Custom fields
The registration form is fully customizable. You can add custom fields in addition to the built-in ones, and the data will be recorded for future reference. This is especially useful when using the approvals system, as you can collect relevant data to help decide whether a user should be granted an account.
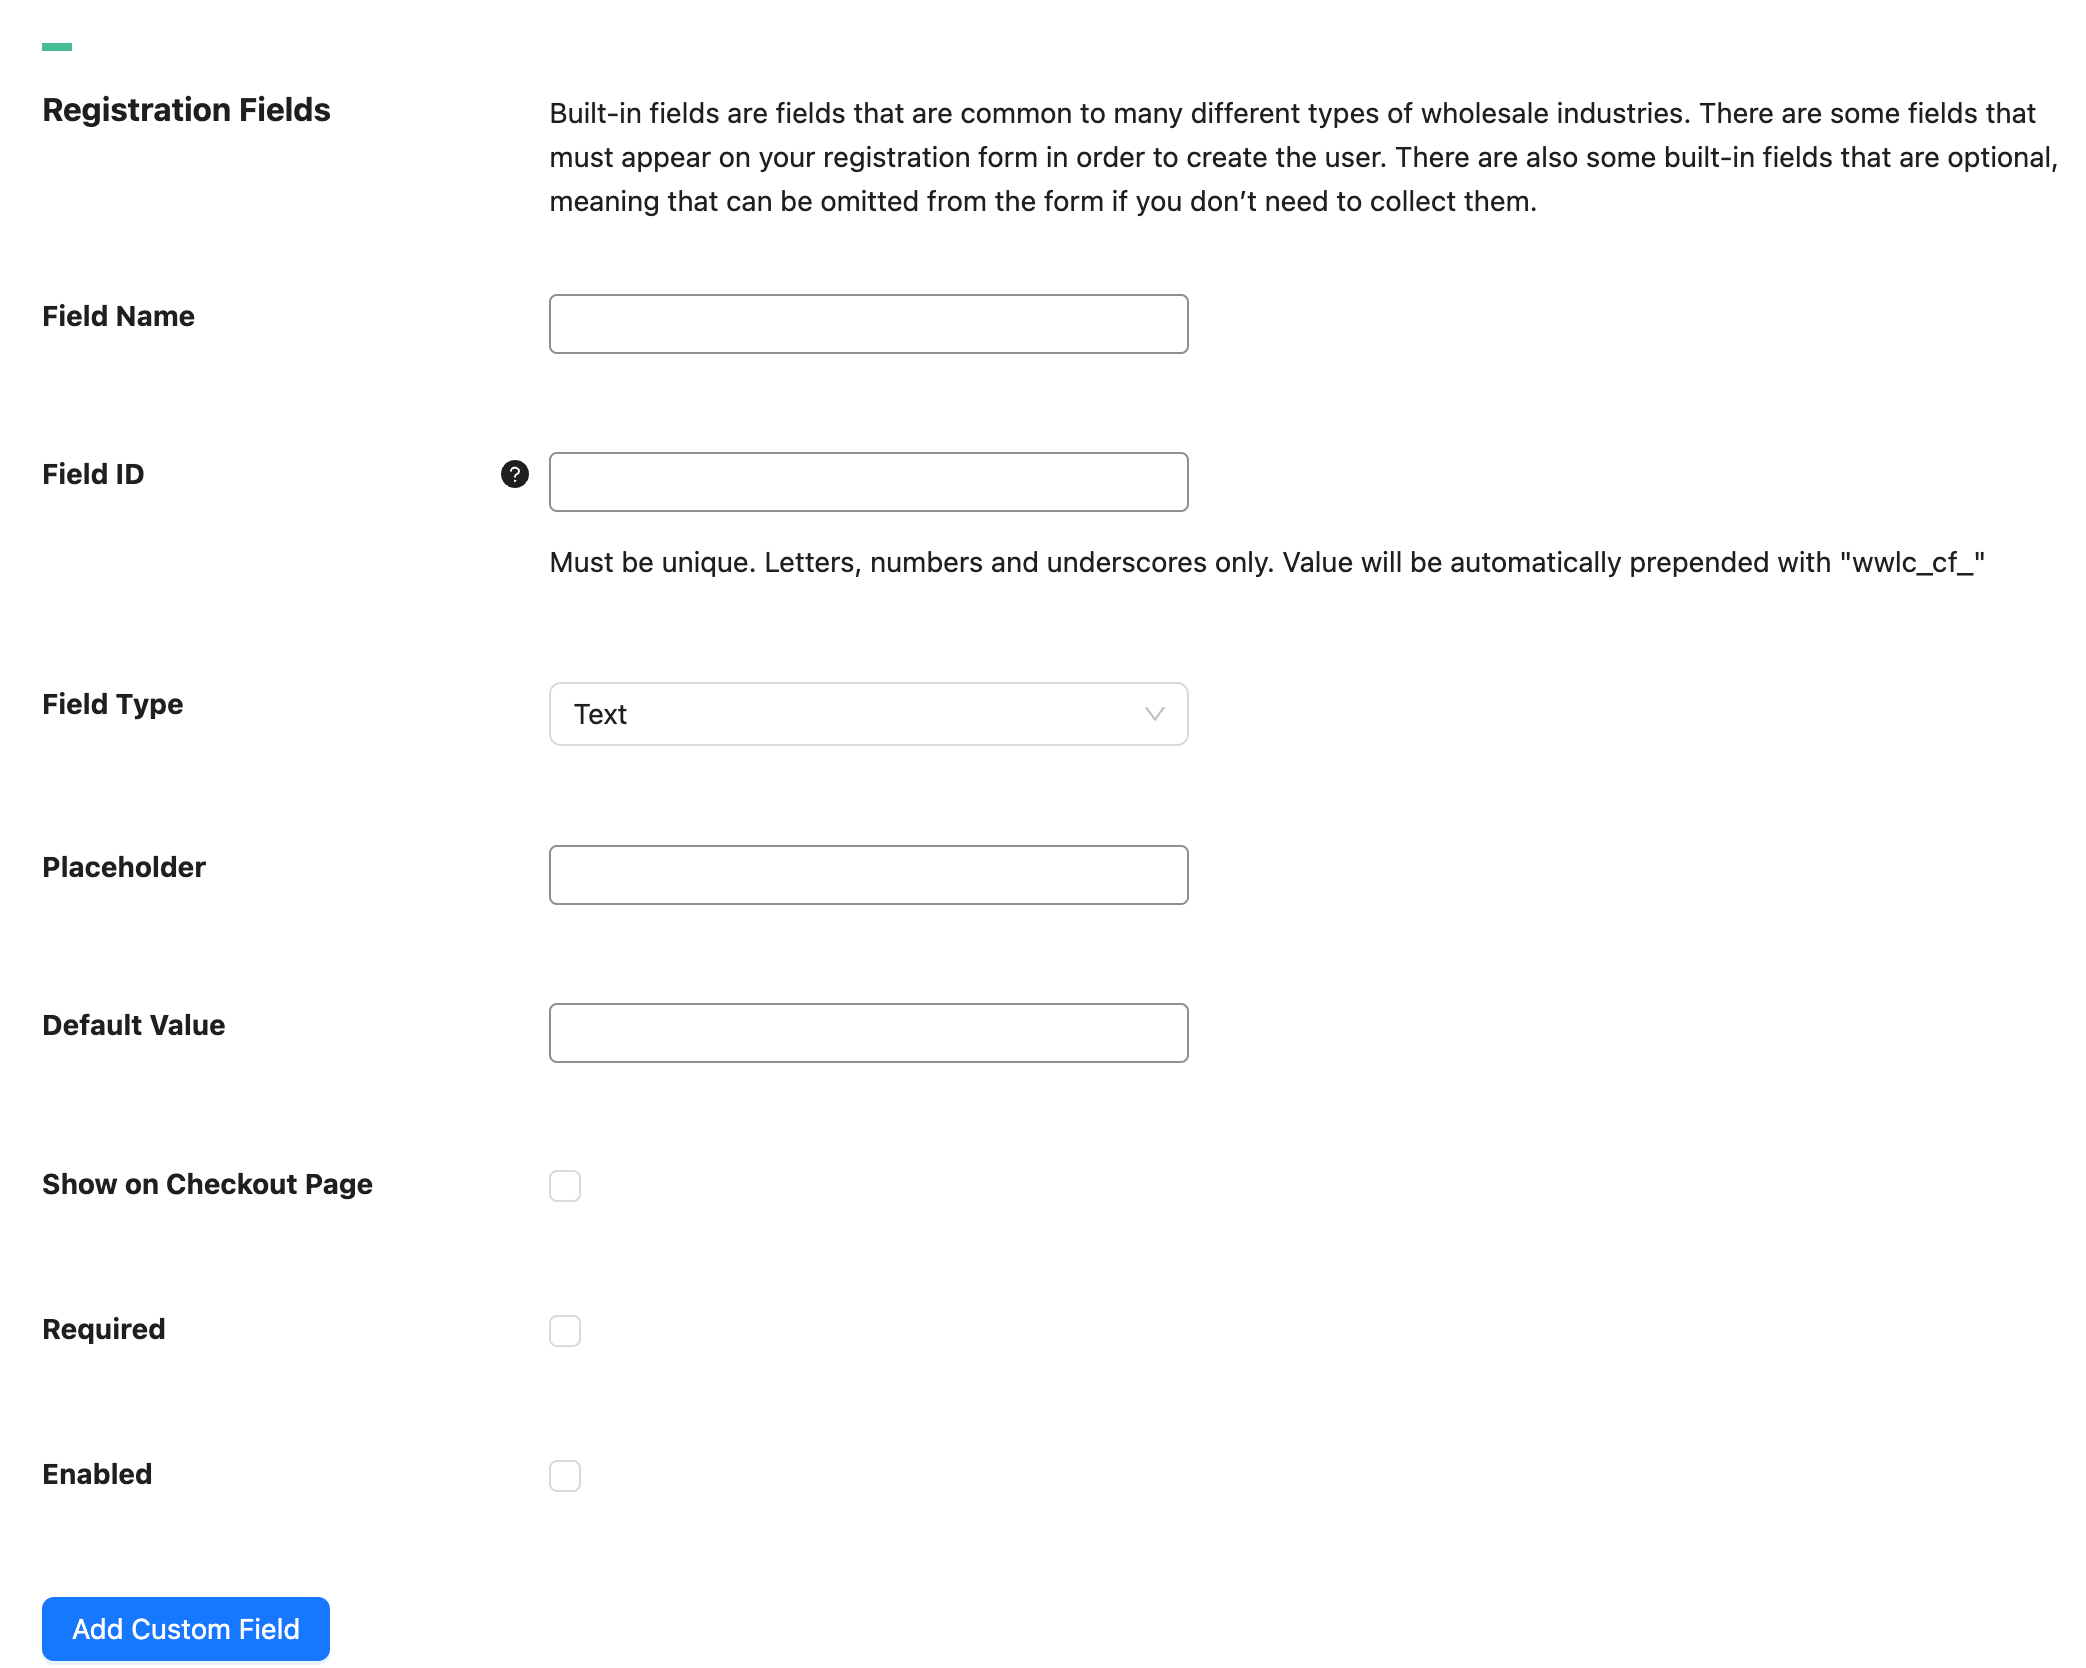
To add a custom field, you need to enter:
- Field Name (Displayed to the user)
- Field ID (The name of the user meta in the database. Must be unique. This is handy to know when exporting/importing users)
- Field Type (Currently supported types are: Text, Text Area, Number, Email, URL, Select, Radio, and Checkbox)
- Placeholder (sample text that a customer must input)
- Default Value (if the field has a default value or text)
- Show on Checkout Page (if the custom field will be available on the checkout page)
- Required (If the field should be required)
- Enabled (Enable the field to be included in the form on the front end)
Password field
To change how the Password field works, go to Wholesale > Settings > Wholesale Lead Capture > Registration Form and click the edit icon on the Password row. You can turn on two options:
- Add Password Confirmation Field: adds a second field where the customer types the password again.
- Strong password: makes the customer choose a password with at least 12 characters, including one uppercase letter, one lowercase letter, one number, and one special character.
If a password does not meet the strong password rule, the form shows an error under the field and does not submit. The rule only applies when the Password field is enabled.
Show custom fields at checkout
Turn on Show on Checkout Page for a custom field to ask for it at checkout. The field must also be enabled. The option is available for Text, Text Area, Number, Email, URL, Select, Radio, and Checkbox fields. Here is where the field and its value show up:
- Classic checkout: the field shows on the checkout form.
- Block checkout: the field shows below the address sections. Text Area, Number, Email, and URL fields show as a plain text box. Select and Radio fields show as a dropdown. Checkbox fields do not show on the block checkout.
- Order details: a Wholesale details section appears with the order details the customer sees. It lists each field name with the value saved for that customer. Fields with no value are left out.
- Edit User screen: go to Users, open the customer, and scroll to Wholesale Lead Information. The registration form fields, including your custom fields, are listed here with their values, and you can edit them. A disabled field is marked (Disabled).
When a customer fills in a field at the block checkout, the value is saved to the order and to their account.
Frequently asked questions
How do I edit the wholesale registration form?
To do this, head to Wholesale, Settings, then Wholesale Lead Capture, and open Registration Form. From there you can toggle which built-in fields appear and reorder them however suits your signup flow.
Can I add custom fields to the registration form?
Yes, the form is fully editable. Just enter a name, unique ID, and pick a type like text, number, email, dropdown, radio, or checkbox to gather any extra business details you need from applicants.
Does the wholesale signup form work with the approvals system?
Absolutely, the data collected pairs neatly with approvals. Reviewing the details each applicant submits helps you decide whether to accept someone as a wholesale buyer before granting access.
Will my custom fields also show on the checkout page?
Yes, when you turn on the “Show on Checkout Page” option for that field. It shows on both the classic and the block checkout. Afterward, the value appears under “Wholesale details” in the order details and under “Wholesale Lead Information” on the customer’s Edit User screen.
Why does my custom field not show on the block checkout?
Check that the field is enabled and that “Show on Checkout Page” is on. Checkbox fields do not show on the block checkout. Use a Select or Radio field instead if you need a set of choices.
What counts as a strong password?
When you turn on “Strong password” for the Password field, the password needs at least 12 characters, with one uppercase letter, one lowercase letter, one number, and one special character.
Why isn’t a field appearing on the front end?
Generally, check its Enabled toggle first. A disabled field stays hidden from visitors, so switch it on, confirm its required status, and save before reloading your live signup page.
Need help?
If you have a question or run into any issues, we’re here to help.
- Premium users: Open a support ticket
- Free users: Visit our community forum