When customers apply for a wholesale account on your store, their applications land in one place: the Wholesale Leads dashboard. From there you can approve, reject, edit, or deactivate individual leads, process several at once with bulk actions, sort the table, and choose exactly which columns the table shows.
Prefer video? Watch the walkthrough below.
Prerequisites
- WooCommerce Wholesale Lead Capture installed and activated
- At least one wholesale registration has been submitted by a customer
- You are logged in as a WordPress administrator or shop manager
- Choosing which columns the table shows, and changing the number of leads per page, require WooCommerce Wholesale Lead Capture version 2.0.6 or later
- Sorting the table by Name or Registration Date requires WooCommerce Wholesale Lead Capture version 2.0.7 or later
Accessing the leads dashboard
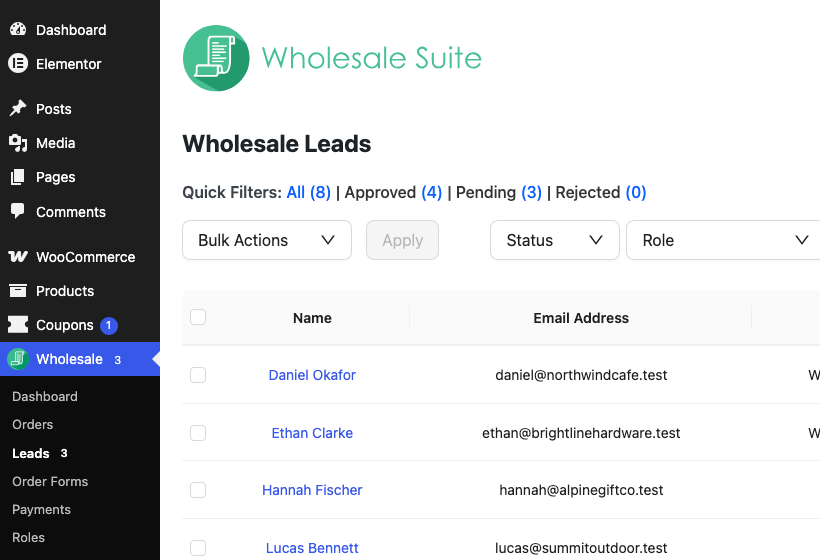
Go to Wholesale → Leads in your WordPress admin menu. If there are any leads waiting for review, a count badge appears next to the menu item so you can spot pending applications at a glance.
Understanding the dashboard
The dashboard lists every lead, regardless of status, in a table. By default it shows these columns:
| Column | What it shows |
|---|---|
| Name | The lead’s full name as entered during registration |
| Email Address | Their email address, used for login |
| Role | The WordPress role currently assigned to the lead |
| Registration Date | When they submitted their wholesale application |
| Status | Current approval state (see below) |
| Action | Icons to approve, reject, or edit the lead |
You can show additional columns, hide any of these except Name and Action, and reorder them. See Customizing which columns appear below.
The table shows 15 leads per page by default. To change this, click Screen Options at the top of the page, enter a number in Number of leads per page, and click Apply. This setting is saved to your own WordPress account.
Lead statuses
| Status | What it means |
|---|---|
| Pending | Application received, waiting for your review |
| Approved | Lead has been approved and has wholesale access |
| Rejected | Application was declined |
| Inactive | Wholesale access is switched off. The lead was approved or rejected before. |
Customizing which columns appear
If a column doesn’t matter to your workflow, hide it. If you’ve added custom registration fields and want to scan them without opening every lead, add them as columns instead. Name and Action always show, since the table needs them to identify a lead and let you act on it, but every other column, including any active custom field, is optional.
- Go to Wholesale → Leads.
- Click the Columns button in the toolbar above the table, next to the search box.
- In the panel that opens, Name appears at the top marked (required) and can’t be unticked. Tick or untick any other column to show or hide it.
- To reorder a visible column, drag it by the handle on its left into the position you want.
- Click outside the panel, or the Columns button again, to close it. Your selection and order save automatically. There is no separate save step.
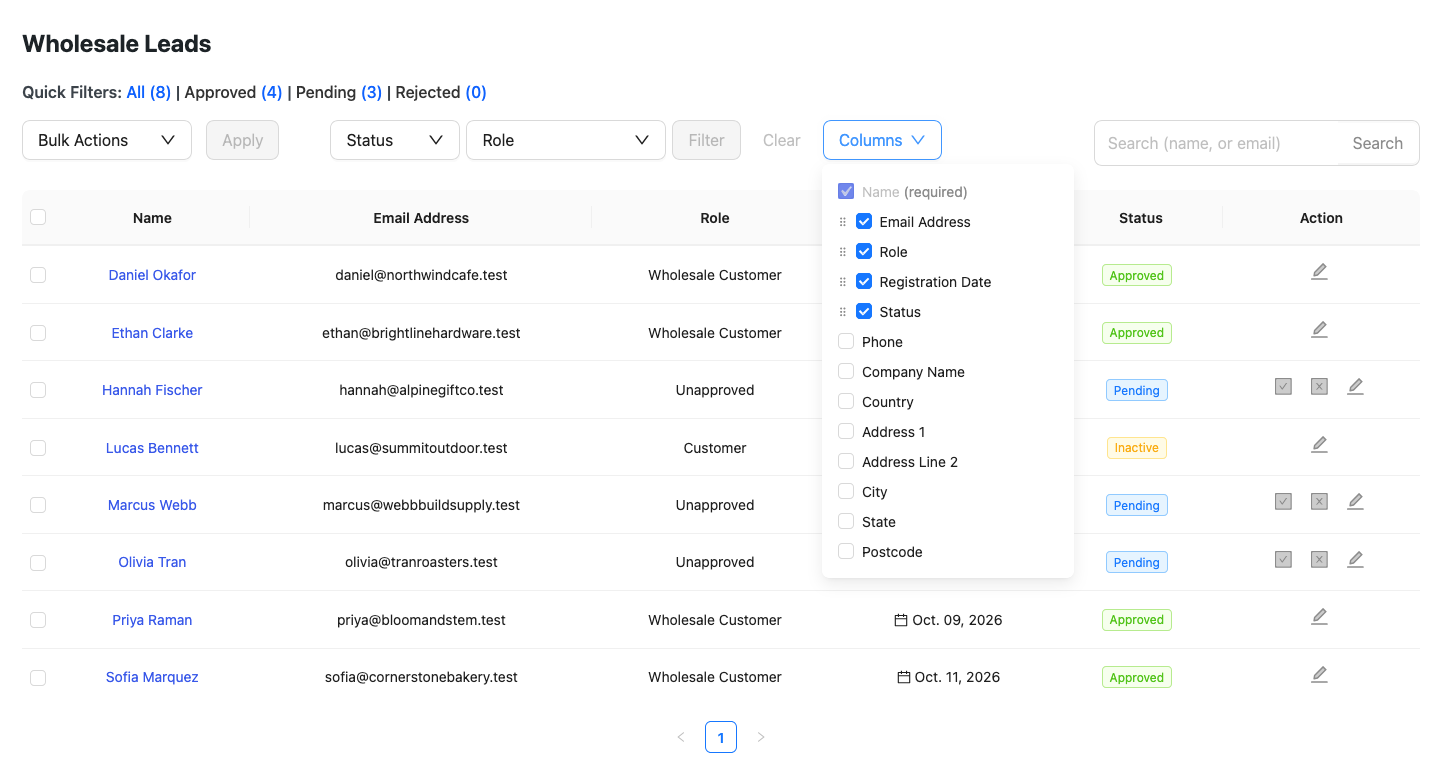
The column selection and order you choose are saved to your own WordPress account, not shared store-wide. Another administrator or shop manager can set up a different layout without changing what you see.
Searching and filtering leads
Use the tools at the top of the dashboard to narrow down the list when you have many leads:
- Search box: Type a name or email address to find a specific lead. Partial matches work, so searching “john” finds “John Smith”.
- Quick Filters: Next to the Quick Filters: label, click All, Approved, Pending, or Rejected to filter by status instantly. Deactivated leads don’t have their own quick filter or Status dropdown option. Click All to find them. They show an Inactive tag in the Status column. The Approved filter doesn’t include them, since they no longer hold a wholesale role.
- Filter dropdowns: Use the Status and Role dropdowns together, then click Filter, to see leads matching a specific status and wholesale role combination.
Sorting the leads table
You can sort the table by the Name or Registration Date column. By default, the newest registrations show first.
- Go to Wholesale → Leads.
- Click the Name or Registration Date column header. An arrow in the header shows the active sort and its direction.
- Click the same header again to reverse the order. A third click returns the table to the default order, newest registrations first.
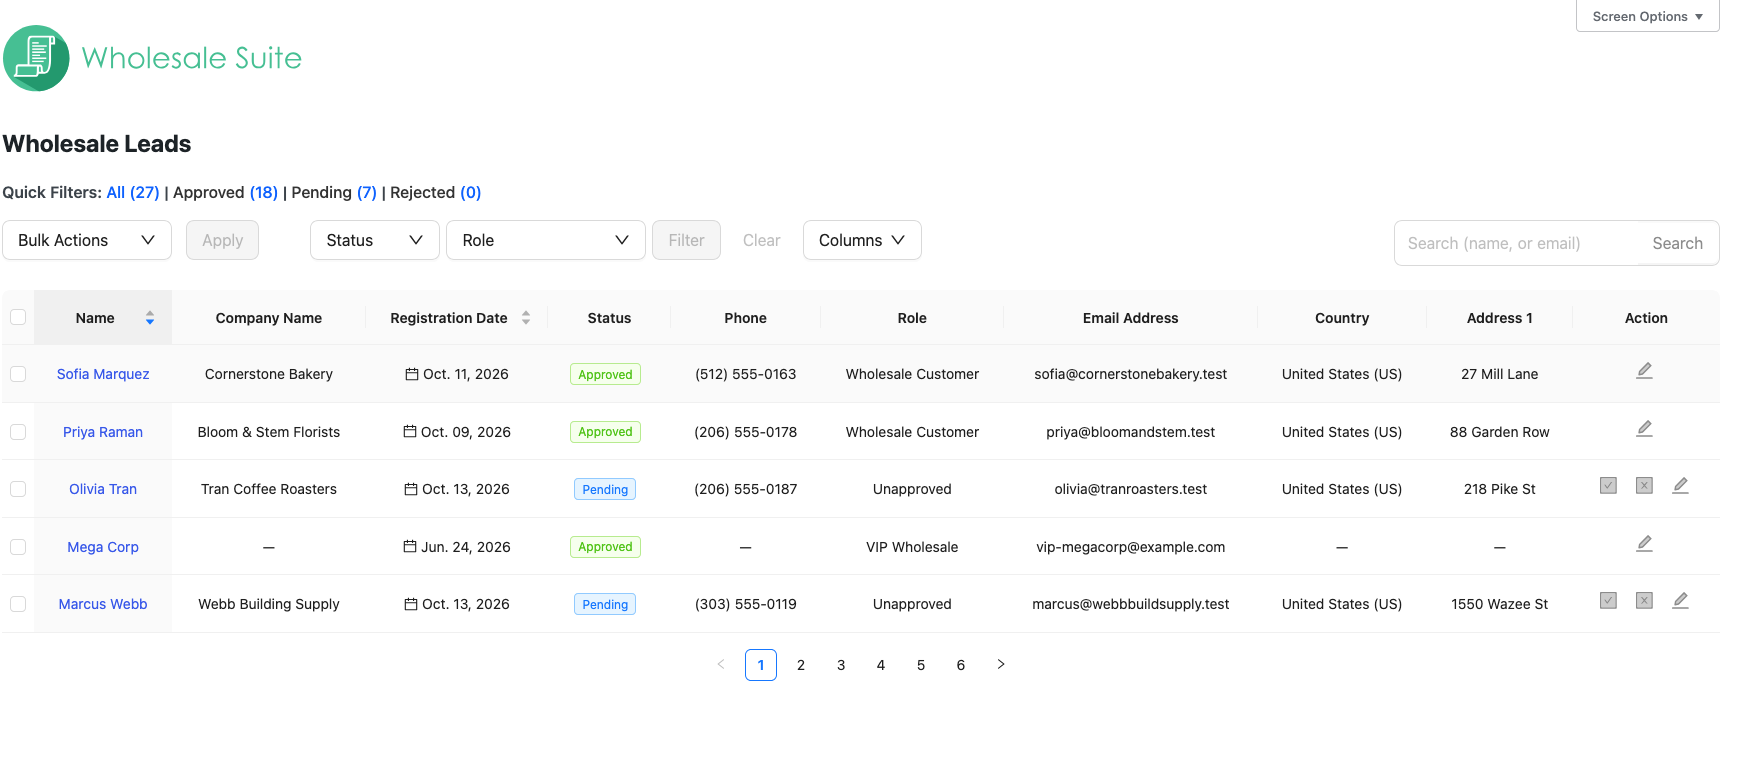
Name sorts by first name, then by last name. In A to Z order, leads with no name saved show first. Sorting keeps any search or filter you have applied, and takes you back to the first page of results.
The table remembers your sort the next time you open the page. Like your column layout, it is saved to your own WordPress account, so other administrators and shop managers keep their own sort.
Approving a lead
Approving a lead grants them access to your wholesale pricing and any wholesale-specific content on your store. The lead receives an account approved email automatically when you approve them from the dashboard.
- Locate the lead you want to approve in the table. Use the Pending quick filter to see only applications awaiting review.
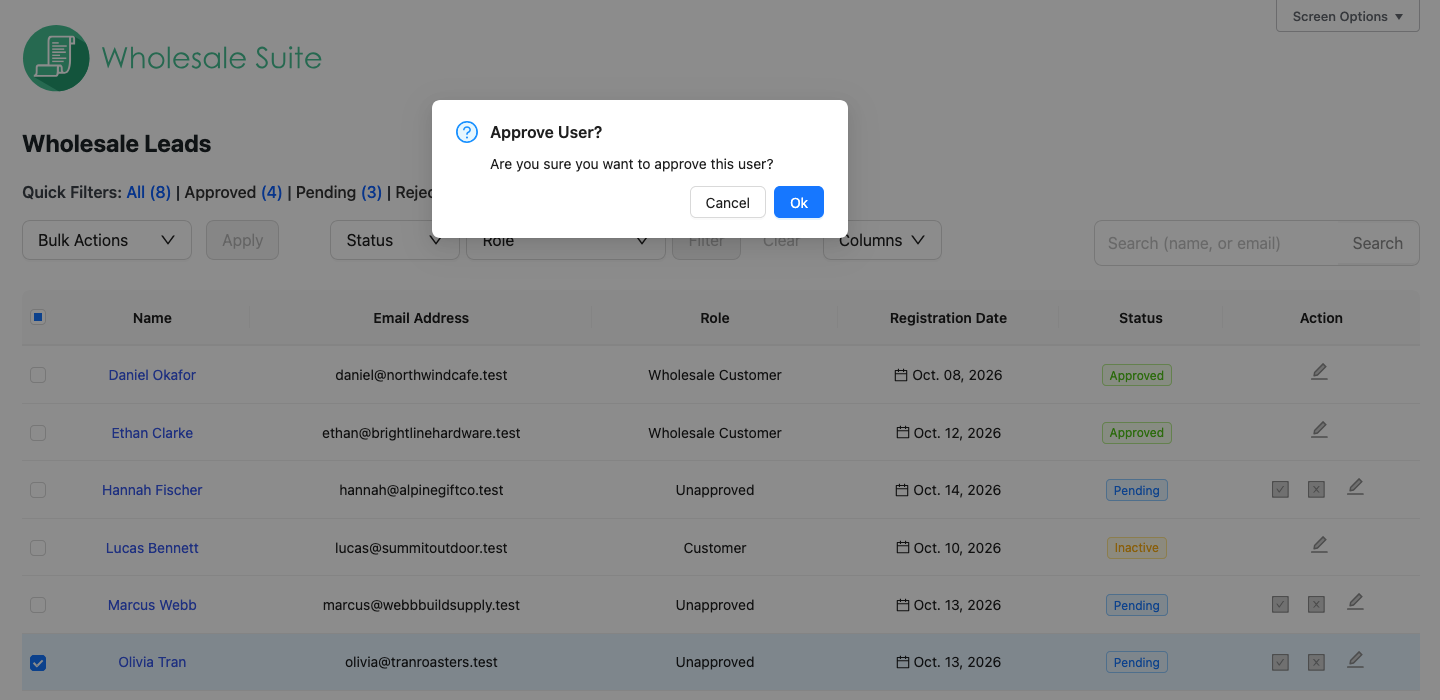
- Click the Approve icon in the Action column for that lead.
- A confirmation dialog titled Approve User? appears, asking “Are you sure you want to approve this user?”. Click Ok to confirm.
- The lead’s status changes to Approved and they get their wholesale role. An approval email is sent to the lead.
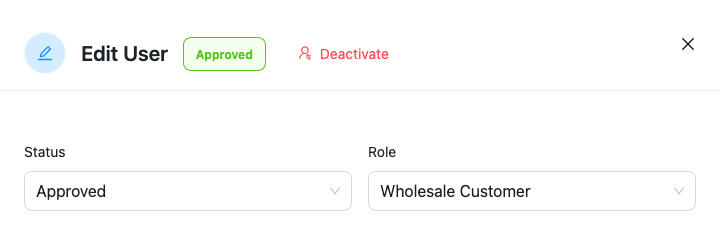
By default, an approved lead gets the role set under Wholesale → Settings → Wholesale Lead Capture → General → New Lead Role. If the customer picked a role on the registration form, they get that role instead. If you want a lead to have a different role, open Edit, set the Role dropdown to the wholesale role you want, set Status to Approved, then click Save User. This runs the approval with the role you picked and sends the approval email. Changing the Role dropdown and clicking Save User while Status is still Pending assigns the role immediately without approving the lead, so no approval email is sent and the Approve icon disappears from the row. To learn how customers can pick a role at registration, see how to add wholesale role selection to the registration form.
Rejecting a lead
Rejecting a lead declines their wholesale application. They receive a rejection notification email and their status changes to Rejected. Depending on your settings, the user account may also be deleted automatically. You can only reject a lead from the table row while it is still Pending.
- Find the pending lead in the table.
- Click the Reject icon in the Action column.
- A confirmation dialog titled Reject User? appears, asking “Are you sure you want to reject this user?”. Click Ok to confirm.
- The lead’s status changes to Rejected and a rejection email is sent to them.
To control whether rejected users are automatically deleted, go to Wholesale → Settings → Wholesale Lead Capture → General and find the Auto Remove User After Rejection option.

Editing a lead’s details
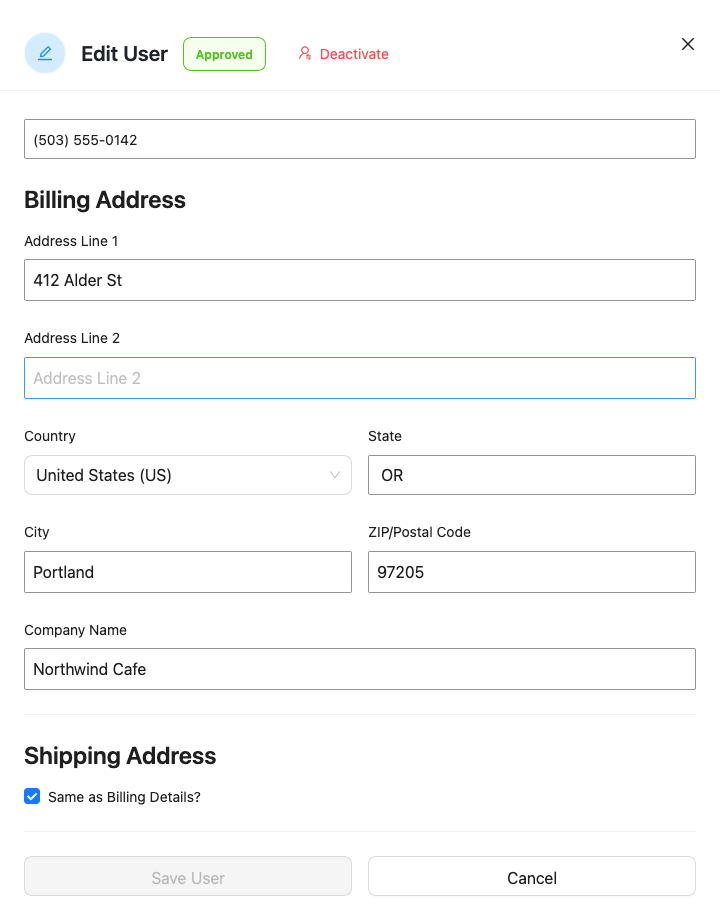
You can update a lead’s status, personal information, address details, wholesale role assignment, and any custom registration fields, all from the dashboard without leaving this page.
- Click the Edit (pencil) icon in the Action column for the lead.
- The Edit User panel opens on the right. Update any of the following:
- Status: select Approved, Pending, Inactive, or Rejected from the dropdown
- Role: select a different role from the dropdown
- First name and Last name
- Email Address
- Website URL
- Phone Number
- Billing Address (includes Company Name)
- Shipping Address (or tick Same as Billing Details? to copy it across)
- Custom fields: any extra registration form fields your store collects
- Click Save User to apply your changes, or Cancel to close without saving.
Deactivating and reactivating a lead
Deactivating a lead suspends their wholesale access without permanently rejecting or deleting their account. Their status changes to Inactive. You can reactivate them later. The Deactivate button is not in the table’s Action column. It lives inside the Edit User panel and appears only when the lead is already approved or rejected.
- Find the approved lead you want to deactivate and click its Edit (pencil) icon to open the Edit User panel.
- Click the Deactivate button in the panel header.
- A confirmation dialog titled Deactivate User? appears, asking “Are you sure you want to deactivate this user?”. Click Ok to confirm. The lead’s status changes to Inactive.
You can also deactivate one or more leads at once by ticking their checkboxes and choosing Deactivate from the Bulk Actions dropdown (see below).
Bulk Approve does not reactivate an inactive lead. Deactivating moves the lead to the Customer role, and the inactive row has no Approve icon in the Action column. Reactivate the lead through the Edit User panel instead:
- Find the inactive lead and click its Edit (pencil) icon to open the Edit User panel.
- Change the Status dropdown to Approved.
- Change the Role dropdown to the wholesale role the lead should have, for example Wholesale Customer. Deactivating reset it to Customer, which has no wholesale pricing.
- Click Save User. The lead’s status changes to Approved with the role you picked, and this sends the Wholesale account approved email again.
Using bulk actions
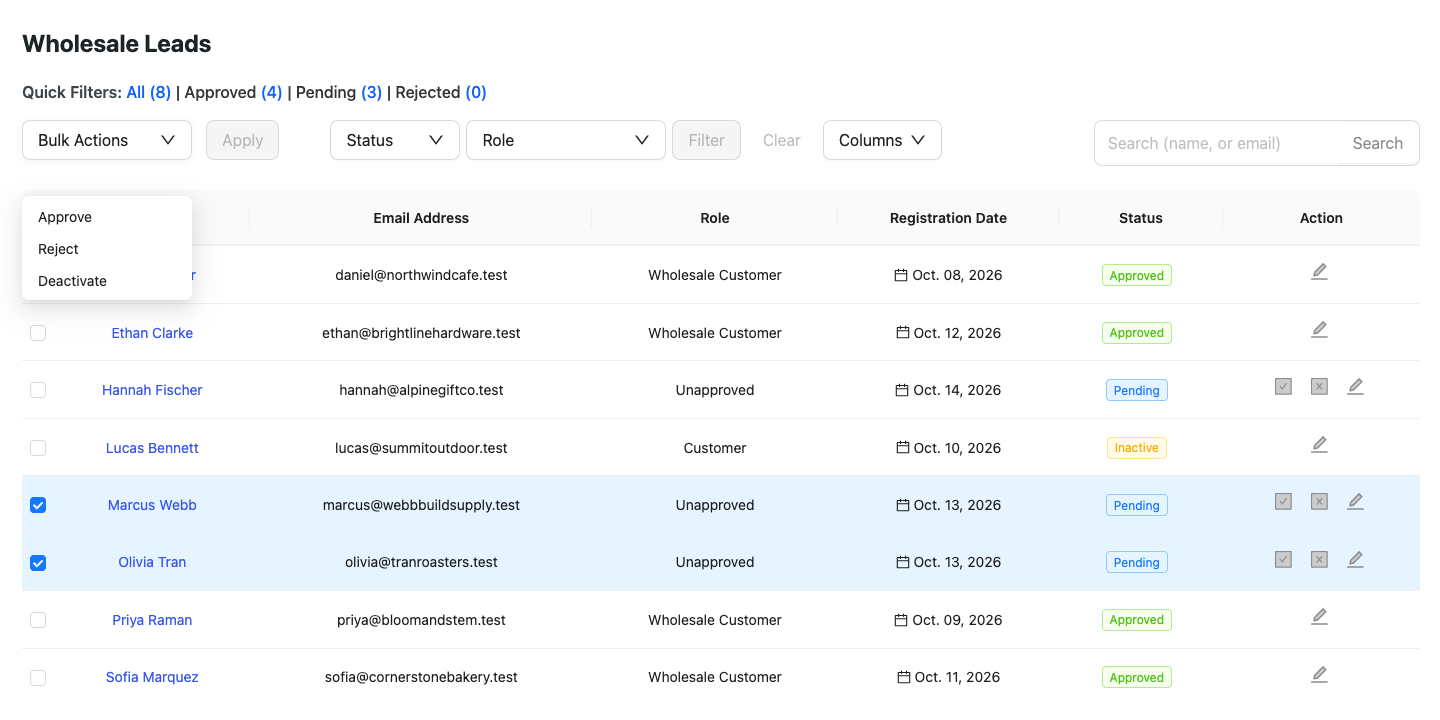
When you have multiple leads to process at once, bulk actions save you time. You can approve, reject, or deactivate several leads in a single step.
- Tick the checkbox next to each lead you want to process. Tick the checkbox in the table header to select every lead on the current page.
- Open the Bulk Actions dropdown and choose Approve, Reject, or Deactivate.
- Click Apply. The selected leads are processed and their statuses update in the table.
Email notifications sent on each action
The dashboard triggers the following emails automatically when you take action on a lead:
| Action | Email sent | Recipient |
|---|---|---|
| Approve | Wholesale account approved | The lead (applicant) |
| Reject | Wholesale account rejected | The lead (applicant) |
| Deactivate | None | None |
You can customize the content and subject of these emails under WooCommerce → Settings → Emails. Look for the Wholesale account approved and Wholesale account rejected email entries.

Troubleshooting
Why isn’t my custom field available as a column?
Confirm the field is active. The Columns picker only lists active registration and custom fields. It also leaves out file uploads, content/heading blocks, terms and conditions fields, multi-option checkboxes, and password fields, since none of those have a single display value for a table cell. First name, last name, and email aren’t listed separately either, since they’re already covered by the Name and Email Address columns.
Why don’t I see a Columns button?
Update WooCommerce Wholesale Lead Capture to 2.0.6 or later.
Why can’t I sort by other columns?
Only Name and Registration Date are sortable. To narrow the list by status or role, use the Quick Filters or the Status and Role dropdowns instead. If no column header shows a sort arrow, update WooCommerce Wholesale Lead Capture to 2.0.7 or later.
Frequently asked questions
Why didn’t the lead receive an approval email?
First confirm the Wholesale account approved email is enabled under WooCommerce → Settings → Emails. Then ask the lead to check their spam or junk folder. If emails are still not arriving, check that your hosting server can send email (a plugin like WP Mail SMTP can help route emails through a reliable provider).
Can I approve a lead and assign them a different wholesale role at the same time?
Yes. Click Edit to open the lead’s details, set the Role dropdown to your preferred wholesale role, set Status to Approved, then click Save User. This runs the approval with the role you picked and sends the approval email. Do not save a new role while Status is still Pending. That assigns the role without approving the lead, sends no approval email, and removes the Approve icon from the row.
How do I bring back a lead I deactivated by mistake?
Click the All quick filter to find them. Inactive leads show an Inactive tag in the Status column. There is no dedicated Inactive filter option. Open the lead’s Edit (pencil) icon, change the Status dropdown to Approved, change the Role dropdown to the wholesale role the lead should have, and click Save User. The lead’s status changes to Approved with the role you picked, and this sends the Wholesale account approved email again. Bulk Approve does not work on inactive leads.
Can I remove the Name or Action columns?
No. Both always show. Name is marked (required) in the Columns picker, and Action isn’t listed there because it can’t be hidden.
Does everyone with admin access see the same columns?
No. Your column selection and order are saved to your own WordPress account. Other administrators and shop managers can set up their own layout without affecting yours.
Does my sort order change what other admins see?
No. Your sort is saved to your own WordPress account. Other administrators and shop managers see the table in their own saved order, or newest registrations first if they have never sorted it.
What happens to a column if I later deactivate the custom field it’s based on?
It drops out of the Columns picker and out of any saved column selections automatically. The table shows the rest of your chosen columns, and nothing breaks.
Does hiding a column delete the underlying data?
No. Hiding a column only changes what the table displays. The lead’s data, including any custom field values, is unaffected and reappears if you show the column again.
Help & support
We have a dedicated support team for Wholesale Suite who knows our products, WooCommerce, and the industry very well. You’re welcome to make use of their expertise at any time, worldwide.
If you are an existing customer please go to the support ticket request form and send us a message.
If you are a free plugin user, please send us a support request on the forum. We actively monitor the WordPress.org support forums for the free plugin and help our users there as best as we can.