WooCommerce store owners like you manage a LOT of data. You often need to export different types of data for various reasons, from generating sales reports to managing inventory and creating data backups. Doing this process manually not only eats up your time–it’s also less efficient and prone to errors! This is where automating WooCommerce data export can help.
In this blog, we will show you how you can easily accomplish this with Visser Labs. Using Visser Labs’ Store Export Plugin, you can easily set up an automated WooCommerce data export system that saves you time. So, are you ready to learn how? Let’s get right into it!
Understanding WooCommerce Data Management
WooCommerce data management is an important aspect of running your business. It entails using tools and strategies to maintain accurate data records of your store, including sales data, customer information, inventory levels, product details, and more. These records give you valuable insights about your business, helping you identify trends, evaluate performance, and protect your store from unexpected downtimes. To streamline data handling and ensure consistency across platforms, businesses can leverage ETL tools that efficiently extract, transform, and load information from multiple sources into a unified system.
Efficient data management is also crucial to decision-making. With accurate and up-to-date data at your fingertips, you can make better, more strategic decisions. After all, whether you’re crafting a new marketing campaign or planning a big inventory purchase, you need to look into your data to make well-informed and effective choices.
WooCommerce store owners can leverage Visser Labs plugins to streamline this process. Its features powerful plugins that allow you to automate exports and effortlessly import product data, helping you save time and reduce errors.
Let’s take a quick look at these powerful plugins below:
- WooCommerce Store Exporter: This plugin automates the export of store data, including orders, products, and customer information, in various formats like CSV, XML, and XLS.
- WooCommerce Product Importer: This plugin simplifies the process of importing product data into your WooCommerce store, supporting bulk uploads and various data formats.
In this article, we’ll focus on WooCommerce data export and how you can automate it with Visser Labs.
How To Automate WooCommerce Data Export In 5 Easy Steps
Automating WooCommerce data export is one of the most powerful ways to streamline your data management. By eliminating manual data export, you can save valuable time, reduce errors, and ensure your data is accurate and up-to-date at all times. However, WooCommerce doesn’t offer this feature out of the box. This is where tools like Visser Labs’ Store Exporter can be an absolute game-changer for your business.
In this section, we’ll show you how you can easily set up automated WooCommerce data exports using this powerful plugin.
Important Note: In this tutorial, we’ll assume you’ve already installed and set up Visser Labs Store Exporter. If you haven’t done so already, you can get the plugin here.
Step 1: Create your first scheduled export
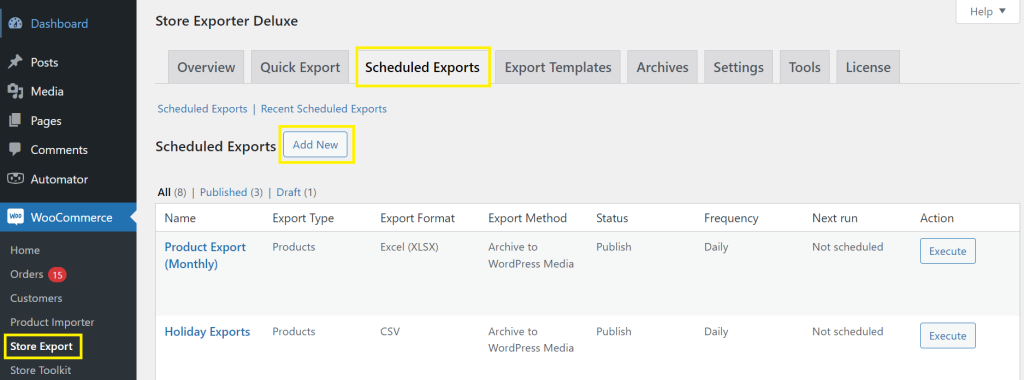
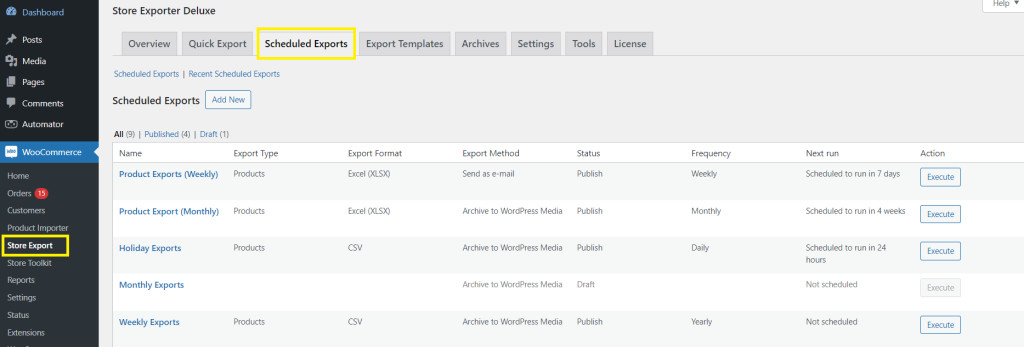
After installing and activating Visser Labs’ Store Exporter, simply head to your WordPress Dashboard > WooCommerce > Store Export > Scheduled Exports. This will take you to the dashboard where you can manage all your scheduled exports (more on this later). To create an automated WooCommerce data export, click on “Add New”.
Step 2: Configure your general settings
After clicking “Add New”, you’ll get access to the Scheduled Export Settings page. Begin by giving your Scheduled WooCommerce data export a name (e.g., “Monthly Orders”, or “Weekly Customer Export”) This will help you identify and manage your scheduled exports later on!
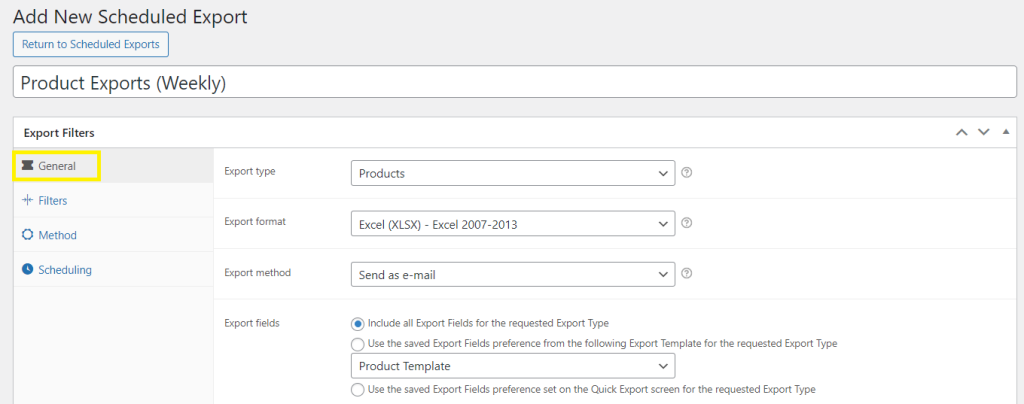
Next, click the “General” tab:
This is where you can configure the following:
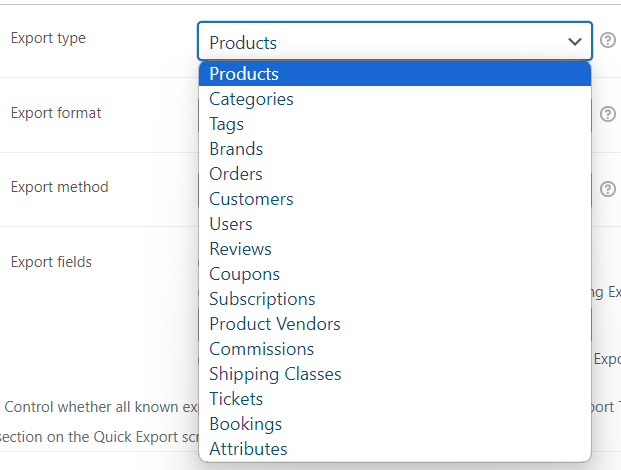
- Export type: This is where you can choose what type of data you want to export. Some common options include Orders, Products, Categories, and Reviews.
- Format: Choose what data format aligns with your needs. Options include CSV, XLS, TSV, XML, and JSON.
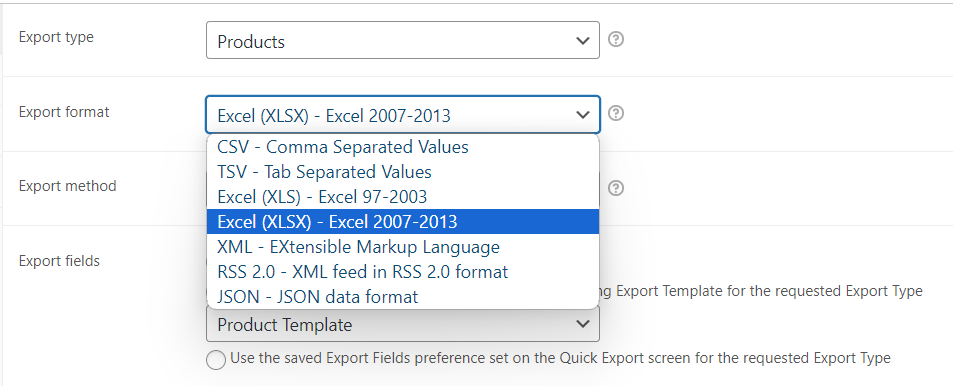
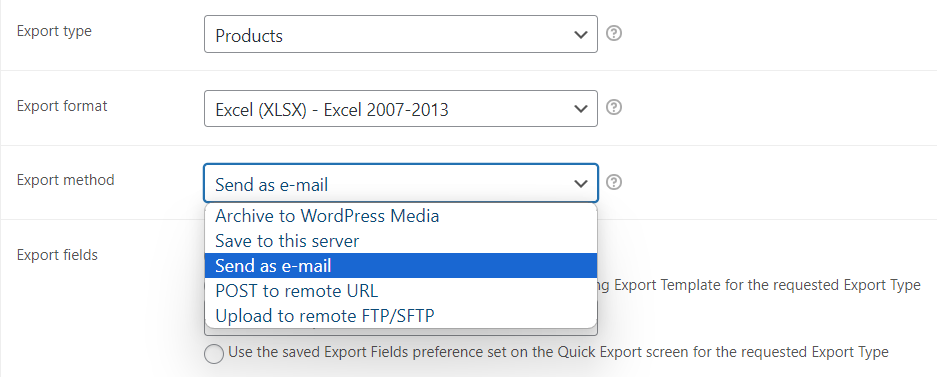
- Export Method: In here, you can specify how you want your data to be delivered. You have lots of options, including having data archived to your WordPress Media, saved to your server, or sent as an email.
Important Note: Depending on the method you choose, you can further customize the method settings in the “Method” tab (more on this later).
- Export Fields: This option allows you to select which fields you want to include in your export.
A great tip for customer data exports is to include user roles in your selected fields. Knowing your customers’ WooCommerce user roles allows for powerful segmentation. For example, you can use this data to create targeted marketing campaigns for different customer groups, like VIPs or wholesale buyers, making your efforts much more effective.
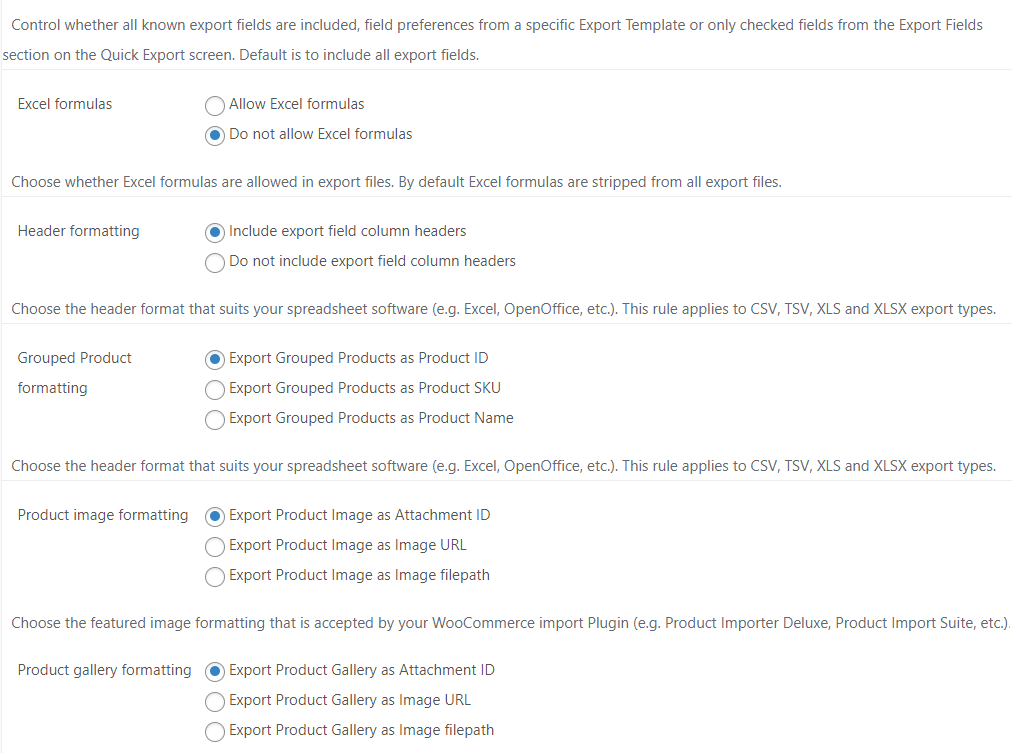
If you scroll down the General settings, you’ll notice that there are other configurations you can tweak depending on your preferences. For example, you can allow or disallow Excel formulas, include or exclude header formatting, or change the order of your data:
Feel free to explore these additional settings to ensure your WooCommerce data export meets your requirements!
Step 3: Set up filters
Now that you’ve chosen your Export Type and modified your general settings, it’s time to set up your filters!
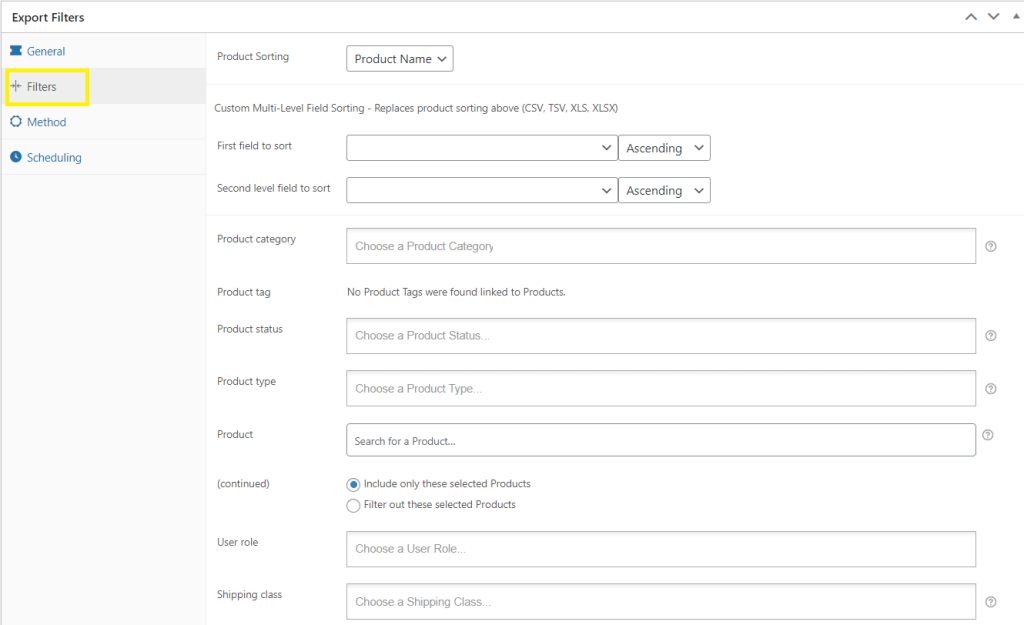
Filters allow you to choose the specific data to export, ensuring you only get the information relevant to you as a store owner. By applying filters, you can choose to export only specific segments of your data, which saves you time and makes analyzing your data easier. For instance, you may want to export products only from a specific category or items published within a certain date range–filters make this possible!
To set filters, head to the “Filters” tab in your Scheduled Export settings:
Take note that the filters available will depend on the Export category you chose. In the example below, we selected the “Product” Export category type, which allows us to filter our WooCommerce data export based on Product Category, Product Status, Product Type, Date Published, and so much more!
Step 4: Customize your method
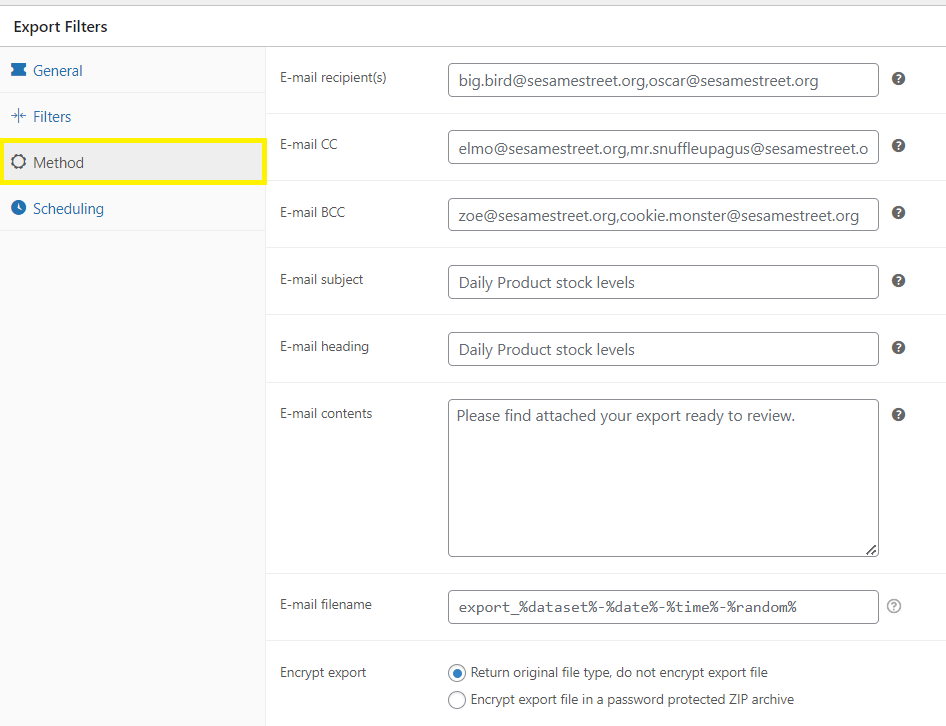
In the first step of this tutorial, we chose an Export Method to decide how to save your file after each scheduled export. To modify the additional settings for your chosen method, head to the “Method” tab in the Scheduled Export Settings.
Like the Export filters, the settings you can modify will depend on your chosen Export method. In the example below, we chose the “Send to email” method, therefore allowing us to tweak the email recipients, subject, heading, contents, and so much more:
Step 5: Schedule your WooCommerce data export
Almost done! We’ve modified all the key settings for our WooCommerce data export and it’s now time to schedule it. To do so, head to the “Scheduling” tab:
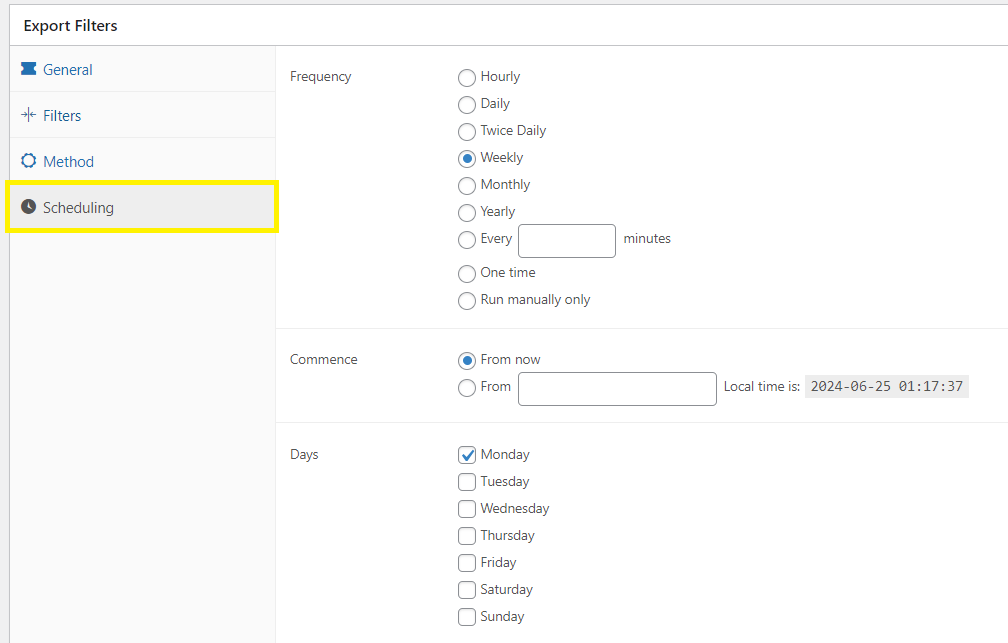
Here, you can modify the following:
- Frequency: Choose how often you want your export to occur–whether hourly, daily, weekly, monthly, yearly, or in custom intervals.
- Commence: Decide when the scheduled export should start. You can either choose to start now to specify a custom date and time.
- Days: Choose which days of the week you want your export to run. For instance, you may want to it run every Monday.
Once you’re happy with your settings, hit “Publish” and you’re good to go! Now, you have a fully automated WooCommerce data export system.
You can view and manage your scheduled exports anytime by heading to WooCommerce > Store Export > Scheduled Exports:
Conclusion
Data management is a crucial part of being a WooCommerce store owner. After all, you need accurate and reliable data to drive and inform your business decisions. Thankfully, you can leverage tools to automate and streamline this process.
In this article, we’ve shown you how you can easily create a scheduled WooCommerce data export system with Visser Labs’ Store Exporter. To summarize, let’s walk through the key steps below:
- Create your first scheduled export
- Configure your general settings
- Set up filters
- Customize your method
- Schedule your data export
Do you have any other questions about this topic? Share them with us in the comments section. 😊


