Every element on your order form has its own settings panel, and the names of the options are not always obvious. This article lists the exact options for the product info popup, the product count, the stock amount column, the price column, the select all checkbox, the Add Selected to Cart button, the cart subtotal and the simplified View Cart link, with the choices and defaults for each. WooCommerce Wholesale Order Form needs WooCommerce Wholesale Prices to run.
Open the settings for an element
You change element settings in the order form editor. If you have not built a form yet, start with Getting started with WooCommerce Wholesale Order Form. Header and footer elements each have a gear icon. So does every table column except Add to Cart Checkbox.
- Go to Wholesale > Order Forms.
- Find your form and click Edit.
- Hover over the element in the form and click the Element Settings gear icon.
- Open the Options panel in the drawer that slides in.
- Click Update at the top of the editor to save your changes.
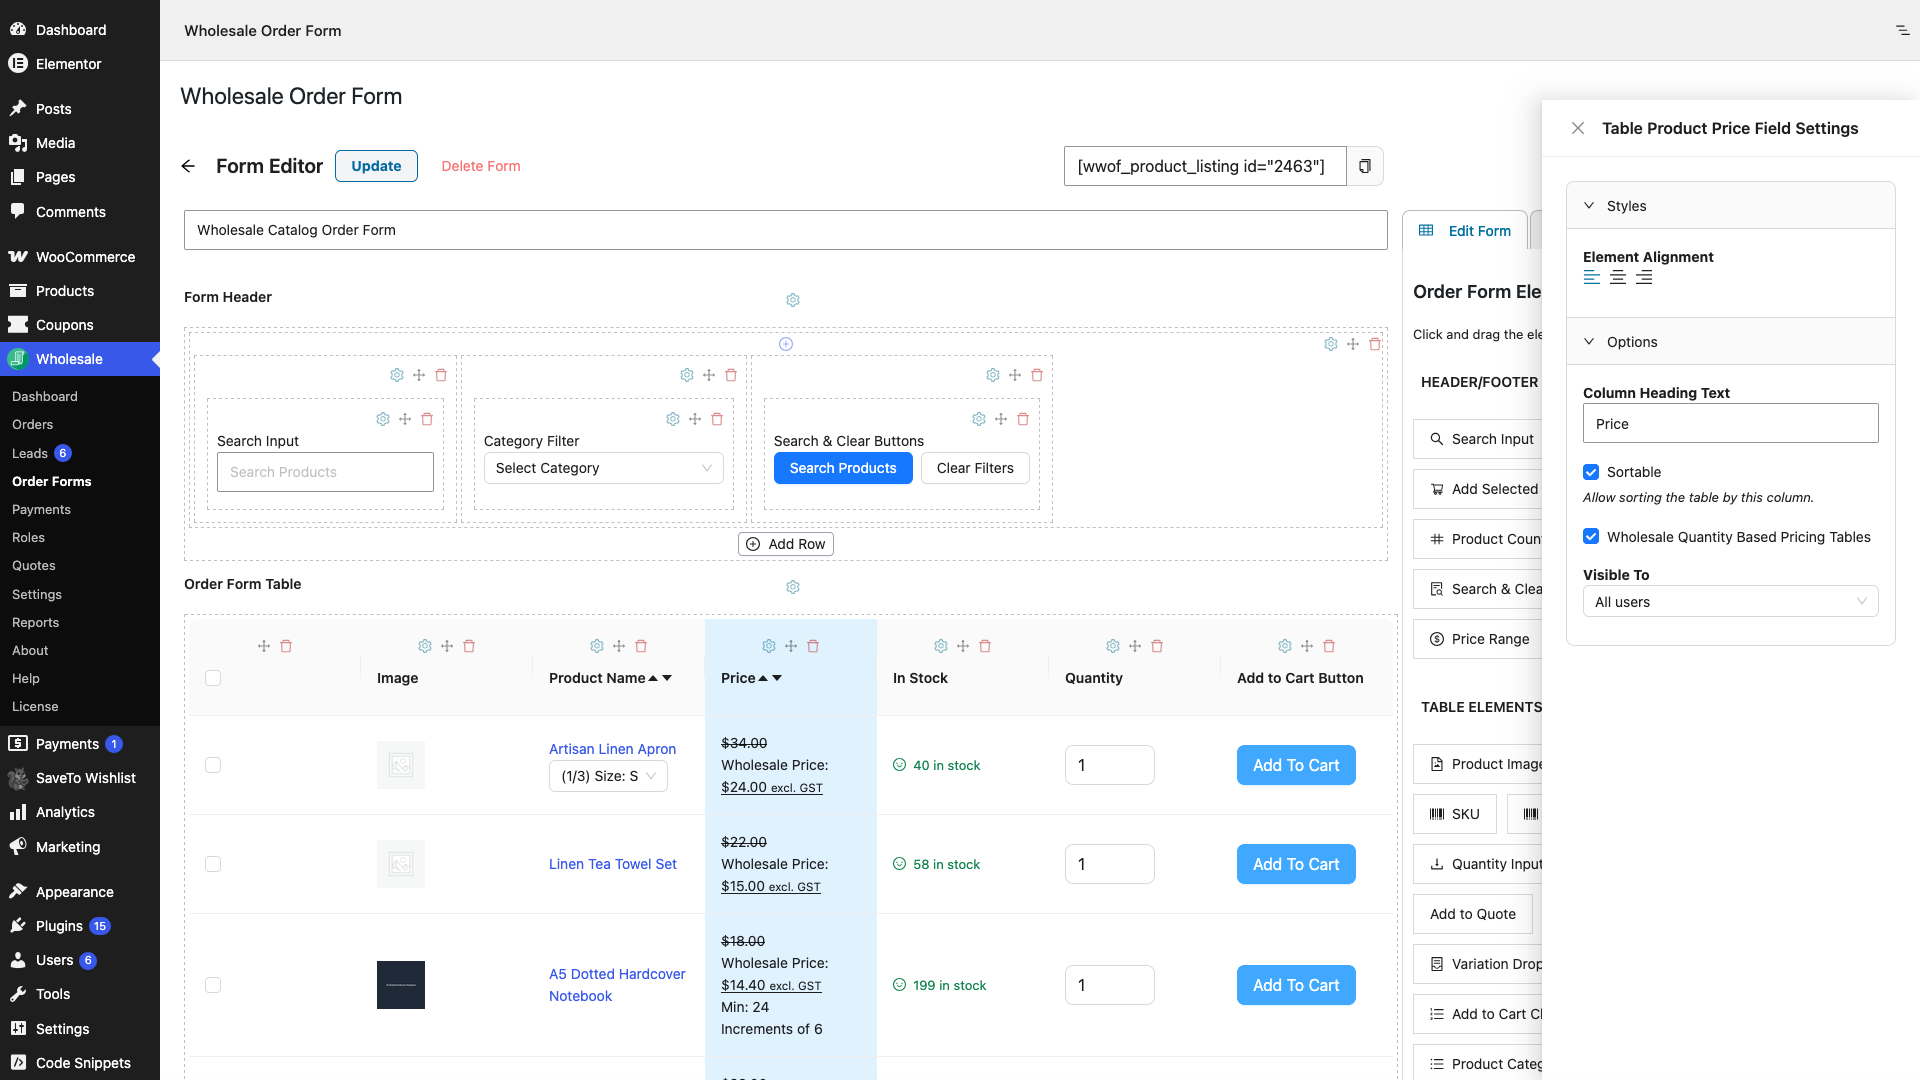
The drawer title is the element’s internal name followed by Field Settings. Table columns start with Table, for example Table Product Price Field Settings, Table Product Name Field Settings and Table In Stock Amount Field Settings. Header and footer elements do not, for example Product Count Field Settings, Cart Subtotal Field Settings and Add Selected To Cart Button Field Settings. The Styles panel holds colors, fonts and spacing. This article covers the Options panel only.
Options shared by table columns
Some options appear on several table columns. They are listed once here so the sections below only name them.
| Setting | Choices | Default | What it does |
|---|---|---|---|
| Column Heading Text | Free text | The element name, for example Price or In Stock | The heading shown above the column on the order form. Each section below gives the default for that column. |
| Sortable | Tick or untick. Hint text: Allow sorting the table by this column. | Ticked | Lets customers sort the table by this column. Only some columns show this option. The sections below say which. |
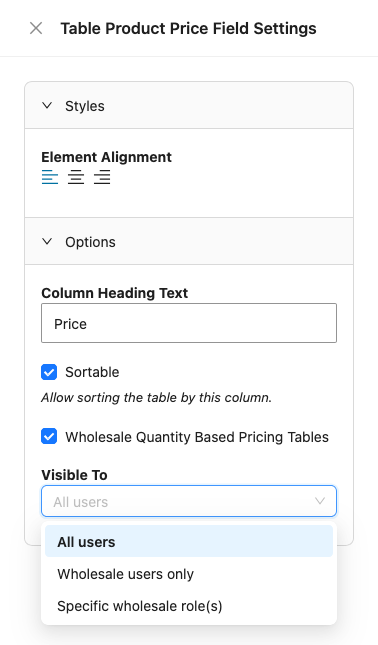
| Visible To | All users, Wholesale users only, Specific wholesale role(s) | All users | Controls who sees the column. It appears at the bottom of the Options panel for every table column that has a gear icon, which is every column except Add to Cart Checkbox. It never appears for header or footer elements. |
| Allowed Wholesale Role(s) | Multi-select list of your wholesale roles. Placeholder: Select wholesale role(s). | Empty | Appears only when Visible To is set to Specific wholesale role(s). If you pick no roles, the editor warns that the column is hidden for everyone except site administrators and shop managers. |
Product info popup
The product info popup is not an element you drag onto the form. It is a choice you make on the Product Image, Product Name and Product ID columns. Each of these columns has a click action option that decides what happens when a customer clicks it.
| Setting | Choices | Default | What it does |
|---|---|---|---|
| Image Click Action (Product Image column) | Show Product Details Popup, Navigate to Single Product Page, Show Image Popup, None | Show Product Details Popup | Sets what happens when a customer clicks the product image. |
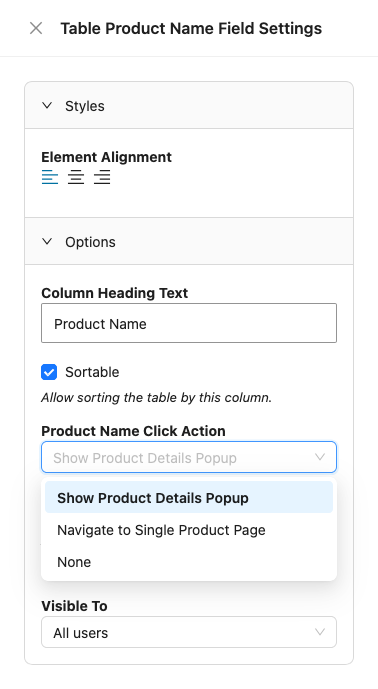
| Product Name Click Action (Product Name column) | Show Product Details Popup, Navigate to Single Product Page, None | Show Product Details Popup | Sets what happens when a customer clicks the product name. |
| Display Variation Dropdown (Product Name column) | Tick or untick. Hint text: Add a variation dropdown below the product name. | Unticked when you first open the panel | Shows a variation dropdown below the product name for variable products. When ticked, a Variation Style choice appears. A form that has never saved this option still shows the dropdown on the order form until you save the choice. |
| Product ID Click Action (Product ID column) | Show Product Details Popup, Navigate to Single Product Page, None | Show Product Details Popup | Sets what happens when a customer clicks the product ID. |
| Open in new tab | Tick or untick. Hint text: Opens the link in new tab. | Ticked | Appears only when the click action is Navigate to Single Product Page. Opens the product page in another browser tab. |
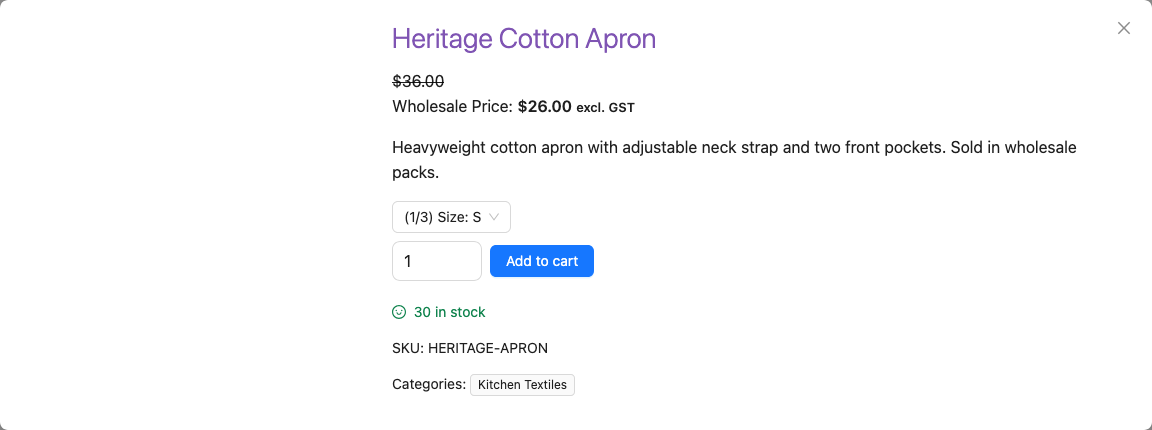
When a customer picks the popup, it shows the product name, price and short description. For a variable product it also shows the variation dropdown. If the product has quantity based pricing, it shows the quantity pricing table when the Price column has that option ticked. It then shows the quantity field and an Add to cart button. After the product is in the cart, the Add to cart button changes to Remove from cart and a View Cart button appears.
Below the buttons, the popup shows the stock amount, the SKU, categories, tags, weight and dimensions. Weight and dimensions only show when the product has values for them.
The Show Image Popup choice is different. It opens a larger copy of the product image instead of the product details.
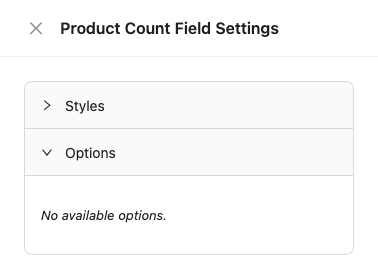
Product count
Product Count is a header or footer element. It shows the number of products on the form, for example 24 Products, or 1 Product when there is only one.
| Setting | Choices | Default | What it does |
|---|---|---|---|
| No options | Not applicable | Not applicable | The Options panel only says No available options. Use the Styles panel to change how the count looks. |
Stock amount column
The In Stock Amount element is a table column. It shows the stock status of each product.
| Setting | Choices | Default | What it does |
|---|---|---|---|
| Column Heading Text | Free text | In Stock | The heading shown above the column. |
| Visible To | See the shared options above | All users | Controls who sees the column. |
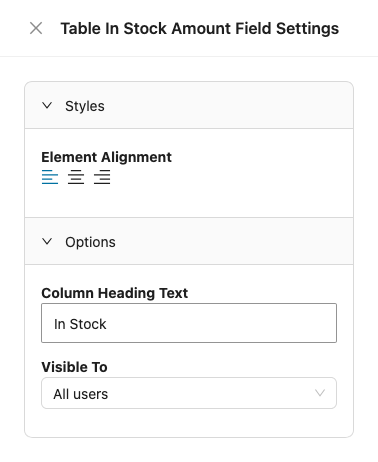
The column has no setting for the wording. The message depends on the product and your stock display format. The column can show Out of stock, Available on backorder, In stock, a number such as 12 in stock, or Only 3 left in stock. When a customer types a quantity above the stock level, it can also show Stock not sufficient.
The format follows the WooCommerce stock display setting. If you use WooCommerce Wholesale Prices Premium, the Wholesale Stock Display Format setting overrides it for wholesale customers. The Only left in stock message uses the product’s own low stock threshold, or the WooCommerce low stock threshold when the product has none.
Product price column
The Price element is a table column that shows each product price.
| Setting | Choices | Default | What it does |
|---|---|---|---|
| Column Heading Text | Free text | Price | The heading shown above the column. |
| Sortable | Tick or untick | Ticked | Lets customers sort the table by price. |
| Wholesale Quantity Based Pricing Tables | Tick or untick | Ticked | Shows the quantity pricing table under the price. It only appears in the panel when WooCommerce Wholesale Prices Premium is active. |
| Visible To | See the shared options above | All users | Controls who sees the column. |
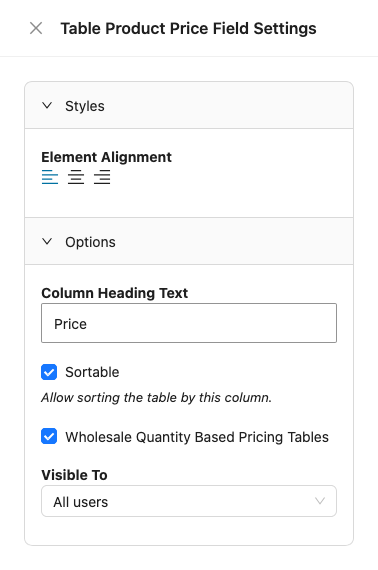
The quantity pricing table shows only when all of these are true: the checkbox is ticked, WooCommerce Wholesale Prices Premium is active, and the customer has a wholesale role. The product, one of its categories, or one of its variations must also have a quantity based discount rule for that role.
If the table does not show on a form you built in the editor, open the Price column settings, make sure the checkbox is ticked, and click Update. This saves the choice for that form.
Select all checkbox
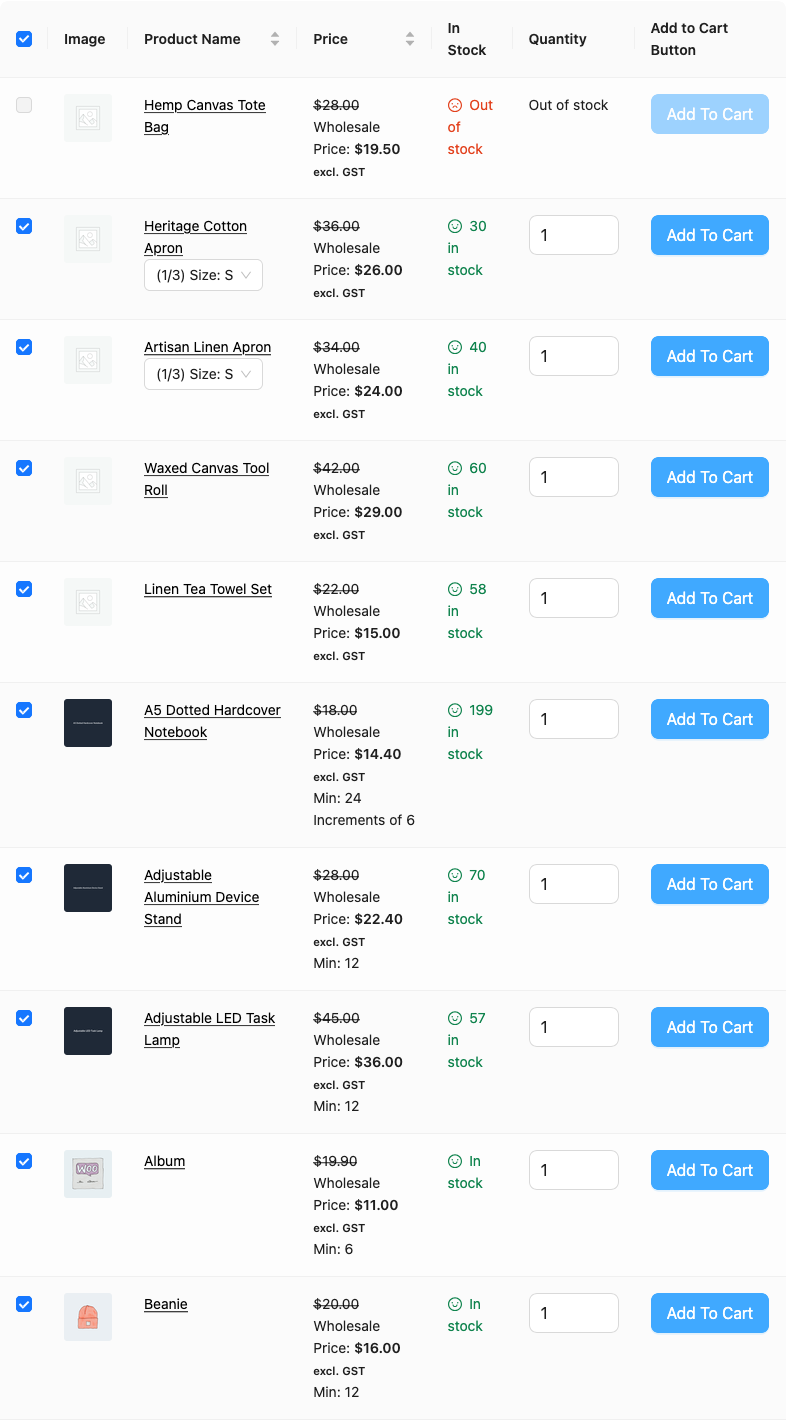
The select all checkbox is not a separate element. It is the checkbox in the heading of the Add to Cart Checkbox column. Drag the Add to Cart Checkbox element into your table to get a tick box on every row and the select all box above them.
The Add to Cart Checkbox column has no Element Settings gear, so it has no options to set. You cannot change its heading or limit who sees it.
The select all checkbox works on the current page only. It does not tick products on other pages, and it does not clear ticks a customer made on other pages. It skips products that are out of stock and external products. If only some rows on the page are ticked, the box shows a partial state.
Add Selected to Cart button
This header or footer element is listed in the editor as Add Selected Products to Cart. It adds every ticked row to the cart in one click. The button stays disabled until the customer ticks at least one product.
| Setting | Choices | Default | What it does |
|---|---|---|---|
| Button Text | Free text | Add Selected to Cart in the editor. A form where you never opened this panel shows Add Selected Products To Cart. | The text on the button. If you clear the field, the button shows Add Selected Products To Cart. |
| Enable Add to Cart Notification | Tick or untick. Hint text: Adds a notification message when adding product(s) to cart. | Ticked | Shows a popup notification after products are added. Appears only when Simplify Add to Cart Notices is off. |
| Notification Duration | Number of seconds. Hint text: Leave empty to use default. Default is 10 seconds. | 10 | How long the popup notification stays on screen. Appears only when Simplify Add to Cart Notices is off. |
| Add to Cart Link Behavior | Open in new tab, Open in same tab | Open in new tab | How the View Cart link opens. Hint text: Choose how the link will be opened when clicked. |
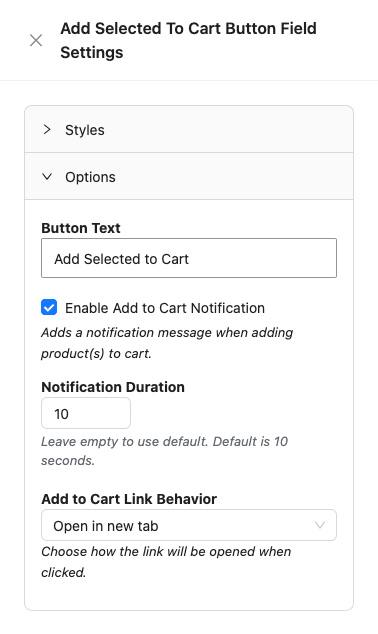
The Simplify Add to Cart Notices setting is on the form Settings tab, not in this panel. See the simplified View Cart link section below.
Cart subtotal
Cart Subtotal is a header or footer element. It shows the running subtotal of the customer’s cart. A form created in the editor has it in the footer by default.
| Setting | Choices | Default | What it does |
|---|---|---|---|
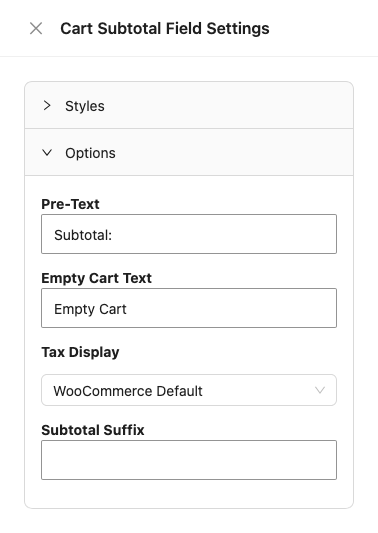
| Pre-Text | Free text | Subtotal: | Text shown before the amount. If you clear it, the form still shows Subtotal:. |
| Empty Cart Text | Free text | Empty Cart | Saved with the form, but it does not change what customers see on the order form. |
| Tax Display | WooCommerce Default, Including Tax, Excluding Tax | WooCommerce Default | Chooses whether the amount includes tax. WooCommerce Default uses the Wholesale Prices Premium cart tax display for wholesale customers when it is set, and the WooCommerce cart tax display otherwise. |
| Subtotal Suffix | Free text. Accepts {price_including_tax} and {price_excluding_tax}. | Empty | Text shown after the amount. The two placeholders insert the amount with or without tax. |
Available placeholders for Subtotal Suffix
| Setting | Choices | Default | What it does |
|---|---|---|---|
| {price_including_tax} | Not applicable | Not applicable | The cart subtotal including tax. |
| {price_excluding_tax} | Not applicable | Not applicable | The cart subtotal excluding tax. |
If you leave Subtotal Suffix empty, the element uses the WooCommerce price display suffix when your store has one. If neither exists and tax is on, it adds (incl. tax) or (excl. tax) after the amount to match the Tax Display choice.
Simplified View Cart link
The simplified View Cart link is not an element. It is a small button with a View Cart label and a cart icon that appears after a customer adds products. Three settings control it.
| Setting | Choices | Default | What it does |
|---|---|---|---|
| Simplify Add to Cart Notices | Tick or untick (form Settings tab) | Ticked | When ticked, the form shows the View Cart link instead of popup or slide notifications. Hint text: Simplifies the Add to Cart Notices by displaying icons next to the Add to Cart button instead of showing popup/slide notifications. |
| Add to Cart Link Behavior | Open in new tab, Open in same tab | Open in new tab | Set in the Options panel of the Add to Cart Button column and the Add Selected Products to Cart element. Decides how View Cart opens. |
| Enable Add to Cart Notification | Tick or untick | Ticked | Only matters when Simplify Add to Cart Notices is off. It decides whether the popup notification shows. |
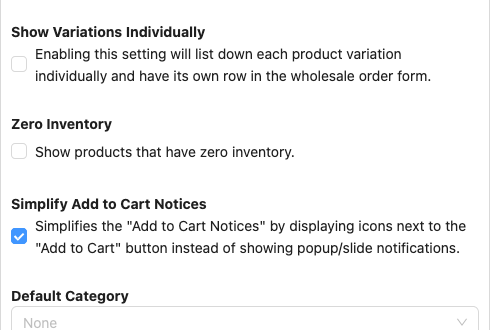
The link takes the customer to your WooCommerce cart page. After one product is added with an Add to Cart button, a green check mark shows next to it. After Add Selected to Cart, the link shows a message such as 3 products added. The link disappears after five seconds. To remove the notifications completely, see How to disable the add to cart notification.
A form saved before the Add to Cart Link Behavior option existed opens the link in the same tab. Open the element settings and save the form to choose the behavior you want.

Frequently asked questions
Why can I not see Enable Add to Cart Notification in the panel?
The option is tied to the Simplify Add to Cart Notices setting on the form Settings tab. On the Add Selected Products to Cart element, it shows only when that setting is off.
Why can I not see the Wholesale Quantity Based Pricing Tables checkbox?
It shows only when WooCommerce Wholesale Prices Premium is active on your site.
Can I hide a column from retail customers?
Yes. Open the column settings, set Visible To to Wholesale users only, then click Update.
Need help?
If you have a question or run into any issues, we’re here to help.
- Premium users: Open a support ticket
- Free users: Visit our community forum