A flawlessly crafted order form is essential to your company’s success. It not only acts as a crucial brand touchpoint, but it also gives you the ability to efficiently control your sales volume and raise your overall effectiveness.
This is why we’re continuously improving Wholesale Order Form. After all, our goal is to bring you a superior order form solution that will completely revamp your store’s ordering process.
In this article, we’ll discuss Wholesale Suite’s drag-and-drop order form builder. In addition, we’ll share six tips that’ll help you get the most out of it.
The Continuous Evolution Of Wholesale Order Form
After a year of completely rewriting our Wholesale Order Form plugin from the ground up and testing it with our beta users, we released version 2.0 of the React JS-powered plugin in May 2022.
While the plugin has since gone through many huge changes, Version 2.0 was among its most important milestones. After all, this was when we were able to make the plugin significantly lighter, which boosted loading speeds by a considerable degree.
In addition, the update came with a bunch of exciting features. As a result, you can now simplify ordering for your customers on a whole new level.
Below are just some of the features Version 2.0 brought to the table:
- Multiple Order Forms: Before it became a reality, this was our most frequently requested feature.
- Drag-and-Drop Form Builder: This powerful and versatile form builder allows you to personalize the appearance of your order forms.
- Order Forms May Be Placed Everywhere: We tweaked this feature a bit to make the forms more flexible.
- API Integration: To achieve blazing-fast performance, we started using our Wholesale Suite API and WooCommerce’s Product API from Version 2.0 onwards.
Drag-and-Drop Form Builder
So, we’ve mentioned some of the cool stuff that came with Wholesale Order Form Version 2.0. Now, let’s talk about its most important contribution: the drag-and-drop order form builder!
Previously, you could only have one form on a single page. However, starting with Version 2.0, we gave users the ability to generate numerous order forms in a variety of layouts.
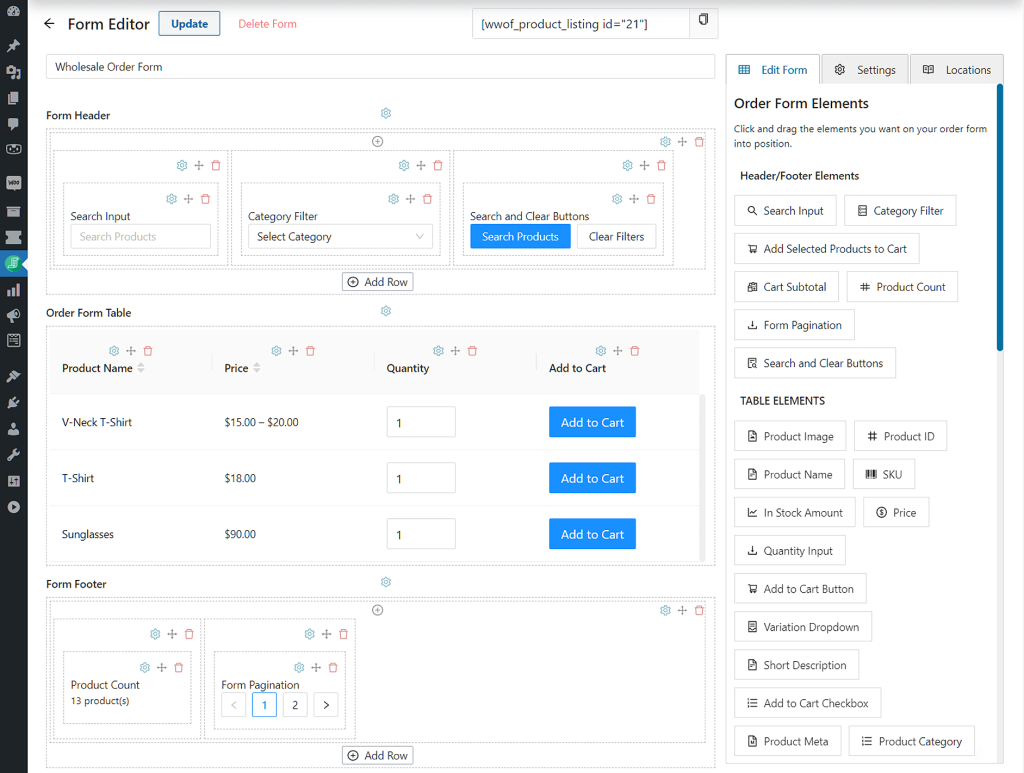
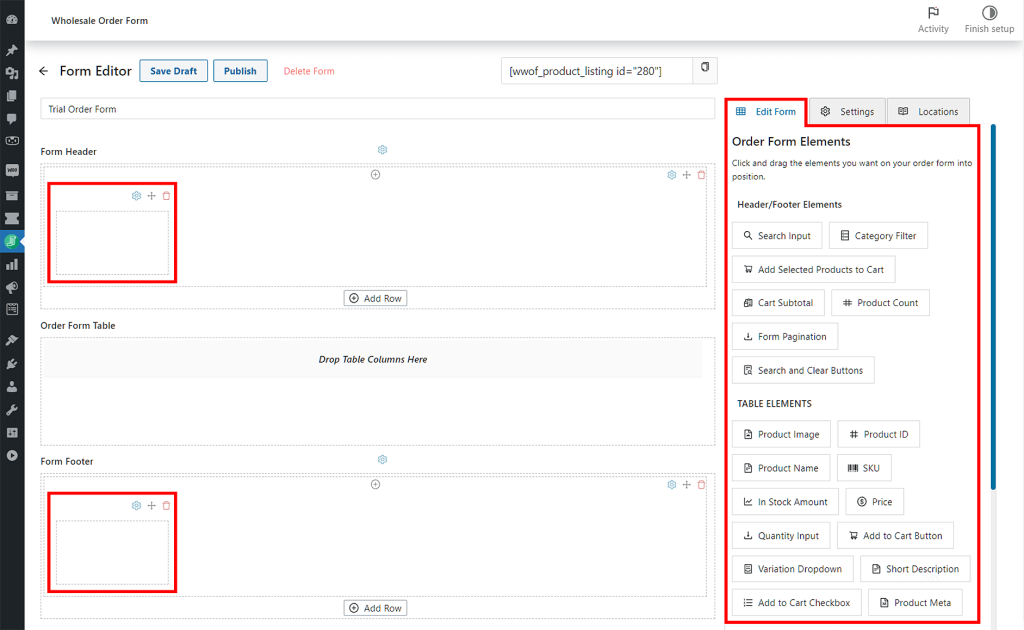
Since we’re now able to have multiple forms, we created an order form builder that allows users to drag and drop objects into the header, table, and footer sections.
This gives your form total flexibility for any personalization you wish to add to the interface!
In addition, it allows a more practical approach to changing the configuration of order forms. Furthermore, it lets you quickly generate new order forms. Lastly, it enables the intuitive adjustment of the settings of various order form elements.
6 Tips To Get The Most Out Of The New Order Form Builder
Remember: an order form’s goal is to record pertinent customer and transaction details to help in efficiently managing and delivering orders.
Therefore, as a store owner, your form should be as simple as possible so that customers from various walks of life can access it conveniently.
With that in mind, here are six tips for using the order form builder to simplify your store’s ordering process:
1. Make sure you’ve upgraded to the latest version of Wholesale Order Form
First things first: you need to update Wholesale Order Form to its latest version. Basically, this will let you access all of its features – the drag-and-drop form builder included.
Once the update is complete, the Plugin and WooCommerce Settings page will display a banner like the following:
Next, you have to update your existing order forms so that you don’t have to start over.
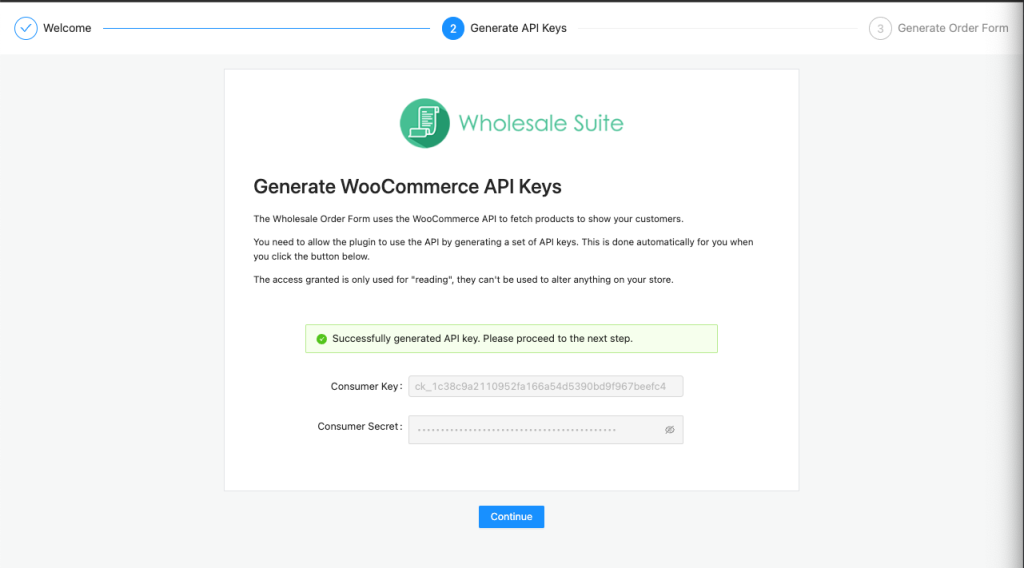
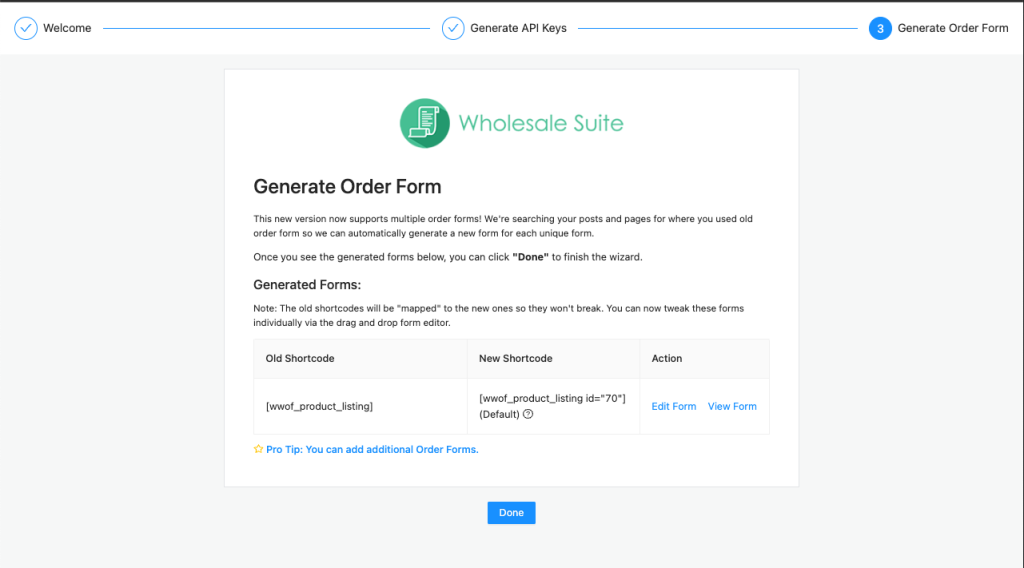
To make sure all of your forms are compatible with the latest version, run the migration wizard by clicking Start Migration. This will redirect you to the Setup Wizard page, where you can generate WooCommerce API keys.
This will then automatically convert all of your existing order forms into the latest version. From here, you can easily edit, view, or even add additional order forms using the updated form builder.
2. Create multiple order forms
A WooCommerce bulk order form is essential for wholesalers. This is likely why this feature was so popular with our customers even before it went live!
Likewise, if you frequently sell large quantities of your products, you’ll need a bulk order form that allows your wholesale buyers to browse your products without having to visit individual product sites.
This is where Wholesale Order Form’s multiple order form feature comes in.
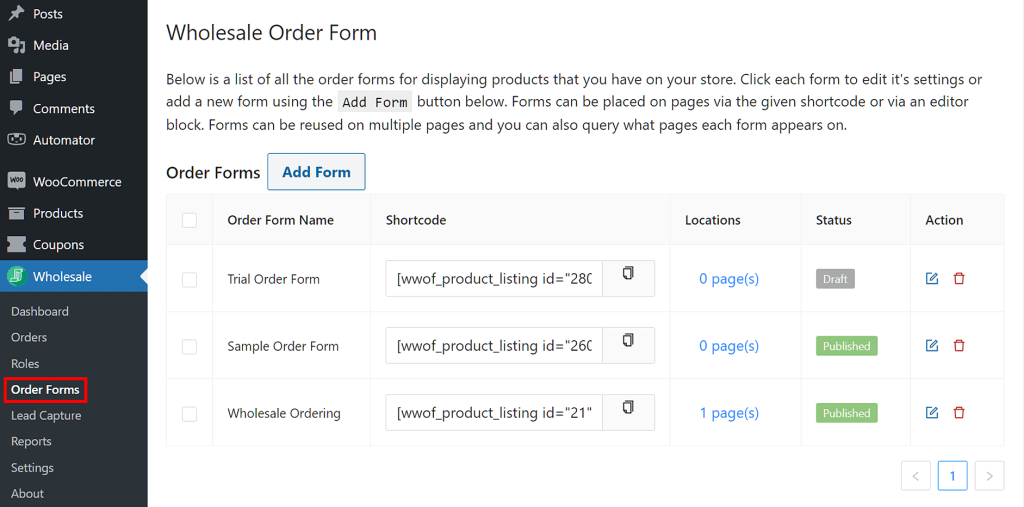
Simply navigate to Wholesale > Order Forms. This will redirect you to the Wholesale Order Form page, where you can set up one or more order forms in your shop:
Basically, the Wholesale Order Form page lets you view the name, shortcode, publishing status, and location of each order form you’ve created.
To start building a new form, simply click Add Form. Alternatively, you can edit an existing form by clicking its edit button.
Note that you can create multiple order forms that can be posted anywhere on your site using the given shortcode or an editor block. Additionally, you can reuse forms across several pages by specifying which pages each form appears on.
Know more about the shortcodes on the Order Form by checking out our Knowledge Base article here.
3. Explore the order form display settings for further personalization
Again, your brand should be represented in every touchpoint, including order forms. Hence, as a store owner, you would want to tailor the elements shown in your form accordingly.
Fortunately, you can quickly alter and personalize your form with the order form builder by simply dragging and dropping objects into your display. Although it’s quite simple to use, we strongly suggest that you explore all of the options in this step to make the most of the feature.
So, where to start?
Modifying the header, table, and footer sections
First, click the Add Form or an existing order form’s edit button on the Wholesale Order Form page. This will redirect you to the Add Order Form site where you’ll see three main sections:
- Form Header
- Order Form Table
- Form Footer
To modify the Form Header and Form Footer, create rows in each section by clicking Add Row. Next, create columns in each row by pressing the + icon at the top of the row. Then, drag your preferred Header/Footer Elements into these columns.
Modifying the Order Form Table is simpler; simply drag Table Elements into the section to automatically create columns of elements.
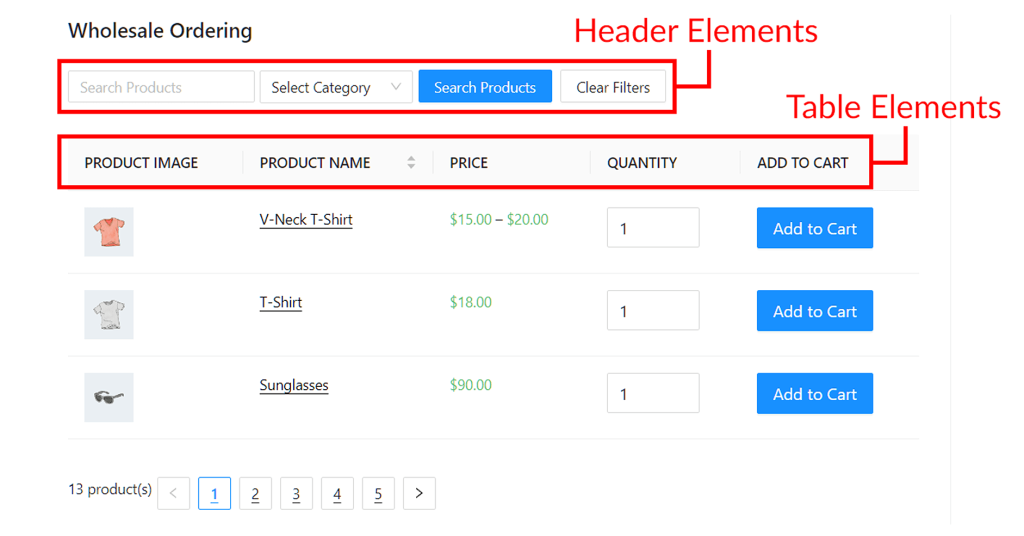
Let’s say that you add the Search Input, Category Filter, and Search & Clear Buttons elements to your form’s header. Also, you customize your table to display the Product image, Product Name, Price, Quantity Input, and Add to Cart Button.
This is what your order form will look like on the front end:
Basically, you can stop once you’ve added the elements you want your form to display. However, there’s a way to customize the interface further.
Modifying the element settings
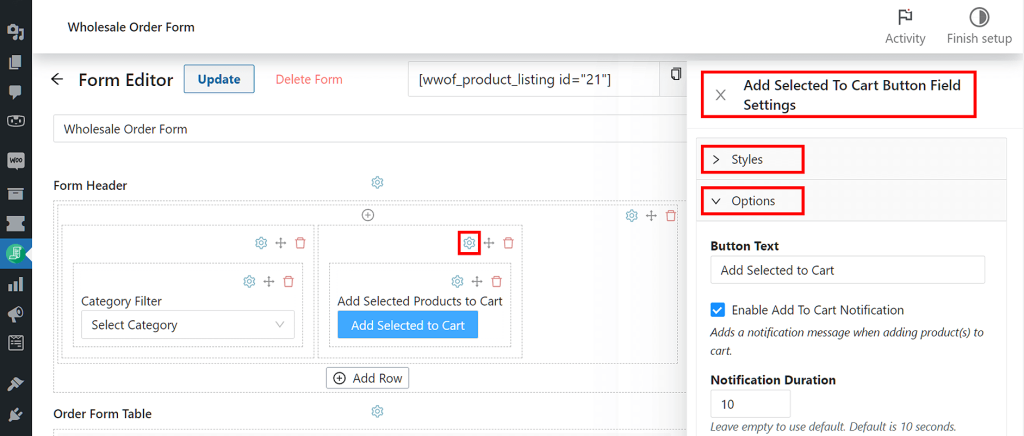
If you want to personalize your elements further, click the gear icon above a column element’s name. This displays the element’s configuration and styling choices on the right side.
For example, in the image below, we clicked the Add Selected Products to Cart Button’s gear icon to access its Field Settings, which consists of Styles and Options:
Styles lets you change the button’s alignment and other characteristics. On the other hand, Options allows you to control the text that appears on the button, and more.
You’re free to play with these elements to see what form structure or layout suits your company’s needs the best. However, keep in mind that you should design your interface to be straightforward and simple to use.
4. Sort your products
To simplify your order form even more, carefully consider how your products are arranged upon ordering. Remember, the objective is to make your form as simple as possible so that your customers won’t encounter any confusion during the ordering process.
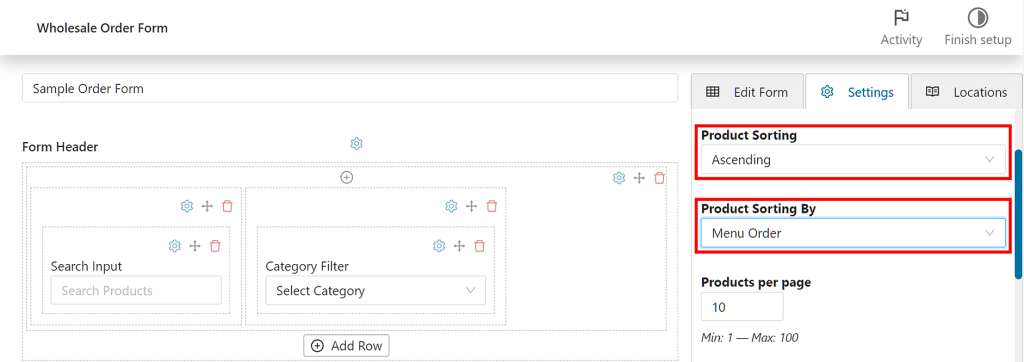
You can configure this setting by clicking the Settings tab next to Edit Form on the same page. This will allow you to standardize how your products will be displayed during ordering.
In addition, make sure to specify the category you want your products to be sorted into. This way, your listings are arranged more deliberately and in line with the preferences of your intended customers.
For this setting, you have five options to choose from:
- WooCommerce Default: This shows your items in the order that they appear on the Products > All Products page.
- Menu Order (Custom Ordering): This is preferable if you want more customizable ordering on your form.
- Name: Pick this to arrange your products alphabetically.
- Sort by Date: This lets you sort your products according to the date you created them.
- SKU: Select this to organize your products according to their stock-keeping unit.
5. Configure your order form settings
There are more default settings besides Product Sorting that you should also carefully consider to bring out the best in your form. Some of these include:
- Hide Form Title
- Lazy Loading
- Show Variations Individually
- Zero Inventory
- Simplify Add to Cart Notices
- Include Products
- Exclude Products
The combination of these variables will decide how functional your order form is. So, let’s explore some of these settings!
Lazy Loading
If you want to save customers the hassle of navigating to different pages in order to view more products, consider enabling the Lazy Loading functionality. To do this, simply tick the checkbox next to the option:
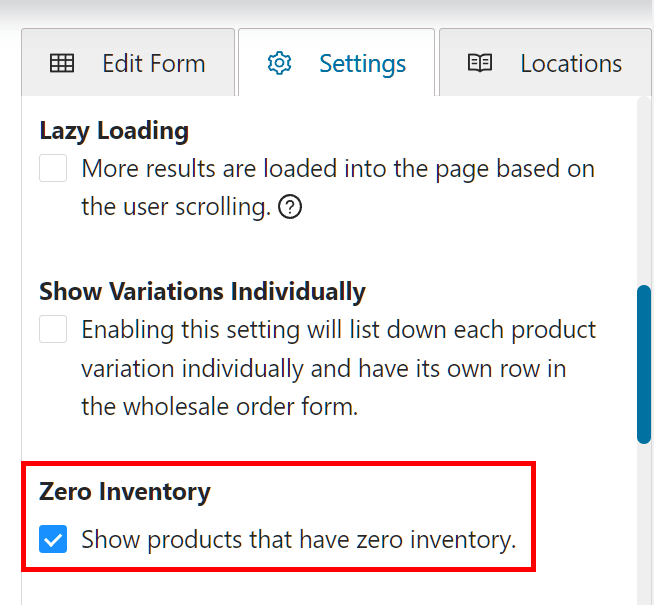
Zero Inventory
While we don’t recommend using this function, you may want to display unavailable items on your order form.
To do this, tick the Zero Inventory checkbox. Basically, this allows your form to display products with no inventory.
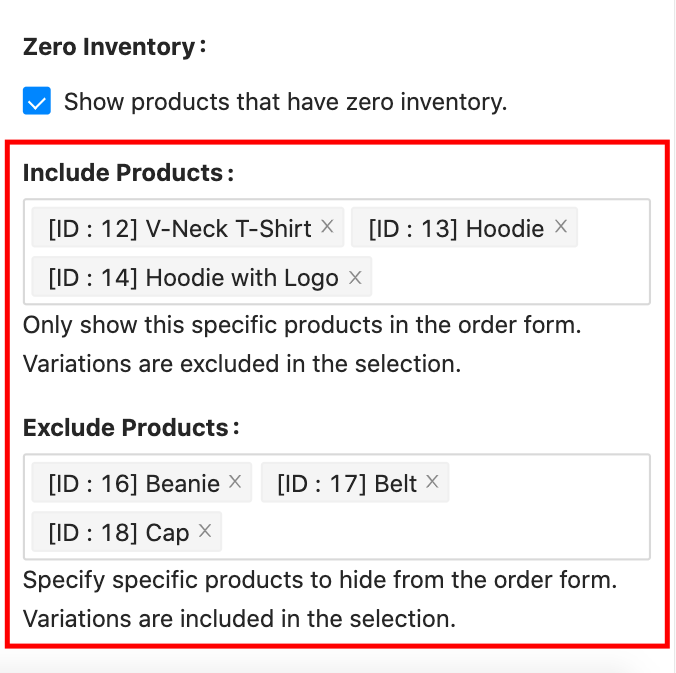
Include & Exclude Products
Do you want to further improve the organization of your order form? Then you may want to specify the products you’ll be showing or hiding on it.
To do this, configure the Include Products or Exclude Products setting:
6. Get the Wholesale Suite Bundle
Finally, while Wholesale Order Form is amazing on its own, downloading the entire set of Wholesale Suite plugins is the best way to take full advantage of its features.
The Wholesale Suite Bundle is a comprehensive collection of plugins that includes every feature you’ll require to enhance your WooCommerce store, including lead onboarding, pricing, and ordering.
In addition to the Wholesale Order Form, it also includes two more fantastic plugins that work perfectly together:
- Wholesale Prices Premium: A powerful plugin that lets you set super flexible pricing structures in your store, allowing you to cater to all kinds of customers!
- Wholesale Lead Capture: A versatile extension that helps you create a custom registration form with a comprehensive onboarding process.
Conclusion
Wholesale Order Form boasts a number of exciting features that we’re sure you’ll enjoy.
In this article, we discussed one of its standout features: the drag-and-drop order form builder. We also shared six tips on how you can get the most out of it:
- Upgrade to the latest version
- Create multiple order forms
- Explore your display settings
- Sort your products
- Configure your order form settings
- Get Wholesale Suite Bundle
Do you have questions about the new drag-and-drop order form builder? Ask us about it in the comments section below!

