Catering to the needs of your customers is likely a top priority for your business. However, it’s probably safe to bet that not all of your customers have the same needs or purchase from you in the same volume. This can lead to imbalances when it comes to shipping rates. That’s where role-based shipping comes in.
Being able to set custom rates based on each customer’s unique situation, might be just what you need. Fortunately, the Wholesale Suite plugin for WooCommerce enables you to do just that.
In this article, we’ll walk through the steps you’ll need to set up role-based shipping in WooCommerce with the Wholesale Suite plugin. We’ll also discuss scenarios where this might be the most useful. Let’s dive right in!
Understanding Role-Based Shipping and Why It’s Useful
Role-based shipping is a useful technique you can implement with your online store. This is especially useful when you have both wholesale customers and regular customers.
With WooCommerce and Wholesale Suite’s Wholesale Prices Premium plugin, you gain a lot of control over how your products display for certain users. This includes the shipping options. For example, you can create a role for local shoppers that includes an option to pay no shipping costs and pick up their orders locally.
That’s just one example of how you can use role-based shipping. As we go through the set up in WordPress, we’ll investigate some of the other options made available in the configuration tabs.
How To Set Up Role-Based Shipping in WooCommerce
Setting up role-based shipping options requires you to also configure your shipping zones and methods. We’ll guide you through the steps so you’ll be able to customize your shipping options and prices for all your different customer groups.
1. Install and Activate Wholesale Suite
To get started, you’ll need to already have WooCommerce integrated into your WordPress website. Then you’ll need to choose a plan and download the Wholesale Suite plugin files.
Once you’ve downloaded the necessary plugin files, open up your WordPress website and navigate to Plugins > Upload Plugin and then use the Choose file option to upload the Wholesale Suite file from your computer:

You’ll be able to see on the screen when the upload is complete. Then you can activate the plugin and create your first role.
2. Create a New Wholesale Role in WooCommerce
Now you’ll find a new option in your WooCommerce menu. This is enabled through the Wholesale Suite add-on. To add a new role, navigate to WooCommerce > Wholesale Roles. Here, you will be able to choose a unique name for each of the roles you need:
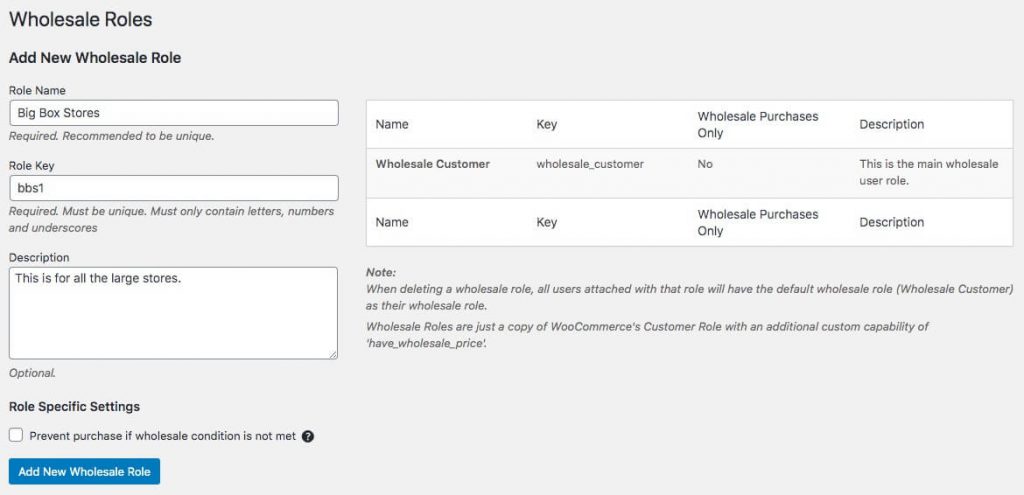
Once you’ve assigned a name, role key, and description, click Add New Wholesale Role.
3. Establish Shipping Zones and Methods
Next, you’ll need to create different shipping zones and methods. These can later be applied to the Wholesale roles you created previously. First, go to WooCommerce > Settings > Shipping:
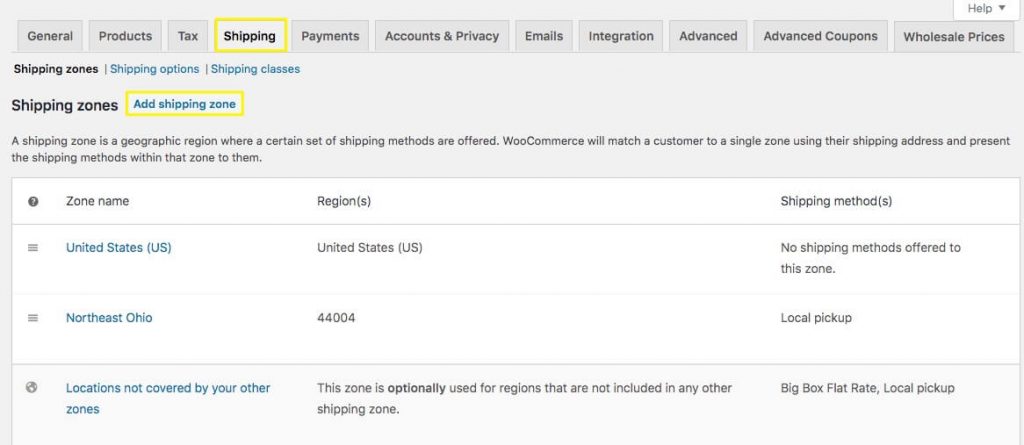
In this tab, you’ll be able to see any existing shipping zones or add new ones. To create a new one, click Add shipping zone. This will take you to a screen where you can name your zone and configure the shipping methods you want to allow in that zone:
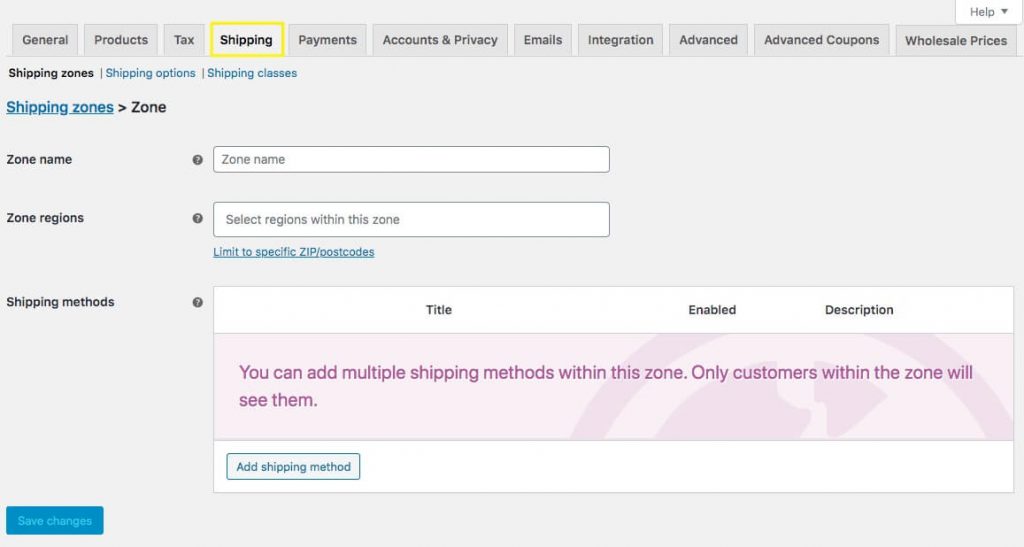
When you click Add shipping method, you can choose from flat rate, free shipping, or local pickup. Once you choose one, you can add a customized name and set the rate.
4. Map Your Wholesale Role to a Shipping Zone and Method
Now you should have your roles and your shipping zones created. Next, you’ll need to map them to each other so your Wholesale customers will have access to the shipping methods you assign to them.
To do that, go to WooCommerce > Settings > Wholesale Prices:
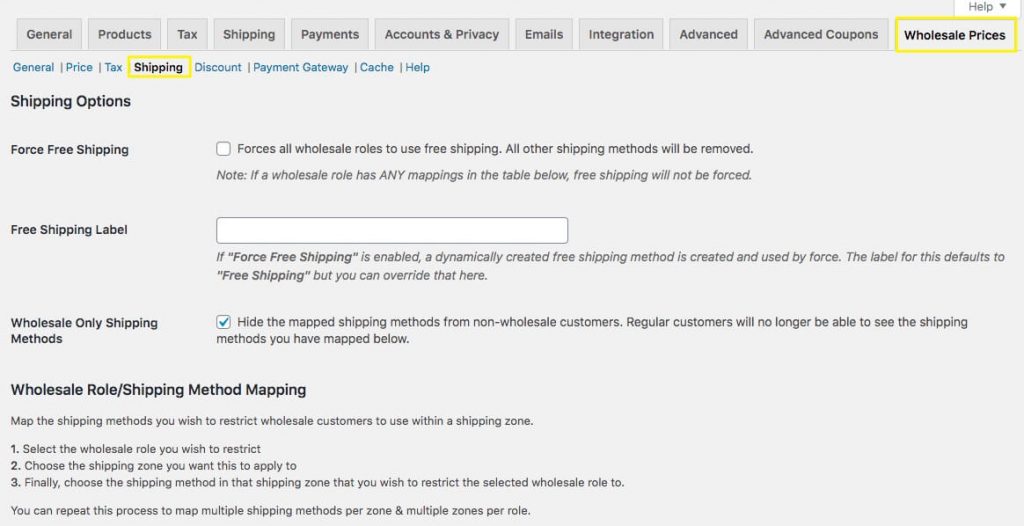
You’ll see in this tab, Wholesale Prices (added through the plugin you installed earlier) has it’s own Shipping settings. There, you can check a box to blanket all your Wholesale roles with free shipping as their only option.
Additionally, you can configure your wholesale shipping options to remain hidden from any non-wholesale customers. However, to connect your roles to specific shipping options, you’ll need to scroll down to the mapping feature:
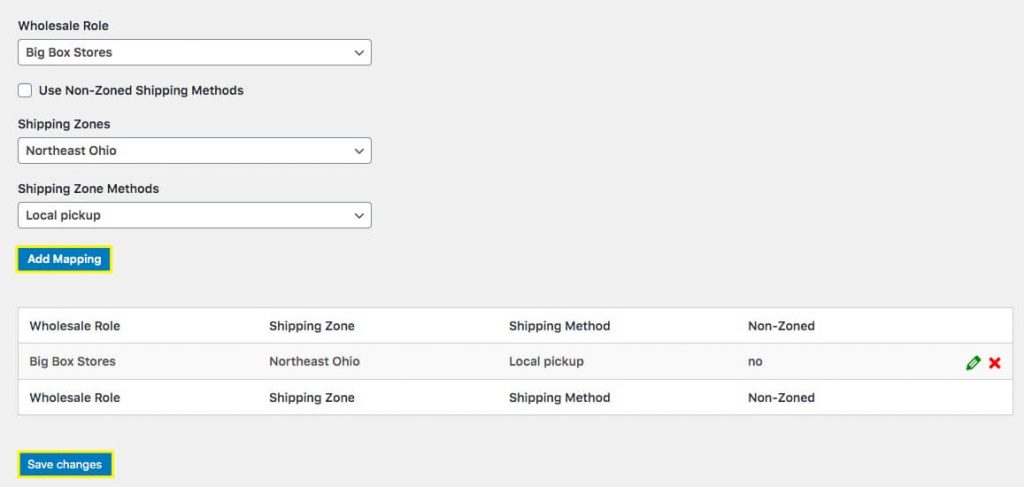
Here, you can select from all the Wholesale Roles you’ve created. Then you will need to choose a shipping zone. The methods you’ve assigned to that zone will then be available in the Shipping Zones Methods dropdown.
Once you’ve made your selections, click Add Mapping. You can continue to add mappings until you’ve covered all the roles and methods you want to offer. Then, make sure you click Save changes. Before you leave the page.
Now, customers who have been assigned Wholesale Roles will have access to only the shipping options you choose for them.
Create Role-Based Shipping With Wholesale Suite and WooCommerce
Knowing you don’t have to offer the same shipping options and prices to all of your customers should give you the control you need to accomplish your goals. This might mean you can create a more dynamic business model, or simply offer your most loyal wholesale customers a shipping discount.
Wholesale Suite’s Wholesale Prices Premium pluginhttps://wholesalesuiteplugin.com/woocommerce-wholesale-prices-premium/ for WooCommerce enables you to set up role-based shipping options with just these four steps:
- Install and activate the Wholesale Suite plugin.
- Create Wholesale Roles in WooCommerce.
- Establish your desired shipping zones and methods.
- Map each Wholesale Role to your chosen shipping zones.
Do you have questions about role-based shipping? Share your thoughts with us in the comments section below!

