When you start doing business with wholesale customers, you may get requests to put in an efficient wholesale ordering form. This is because wholesale customers have different needs from regular customers.
Typically, regular customers are happy to browse your product pages, and thus don’t mind taking their time to gather the information they need before making an order.
In contrast, time is money for wholesale customers. As they already know about your products, they rarely want to linger in your store, with their priority being to get in and out in as few clicks as possible. For these reasons, an inefficient ordering process can cause headaches for the person ordering.
Therefore, if you’re wondering why your wholesale customers aren’t reordering as quickly as expected, a substandard wholesale ordering process could be the culprit. Thankfully, this is an issue a proper wholesale ordering form can help.
The Wholesale Order Form Plugin is the best solution for providing a form suitable for wholesale customers in WooCommerce. With very little effort, store owners can set up an amazing ordering experience for their wholesale customers.
In today’s post, we’ll show you how easy it is to set up a wholesale ordering solution that your customers will love. So let’s get to it!
Wholesale Ordering Form Plugin Setup
When you purchase and install Wholesale Order Form, the plugin generates a page on your site called “Wholesale Ordering.”
By default, this can be found at: http://[yoursiteurl]/wholesale-ordering/
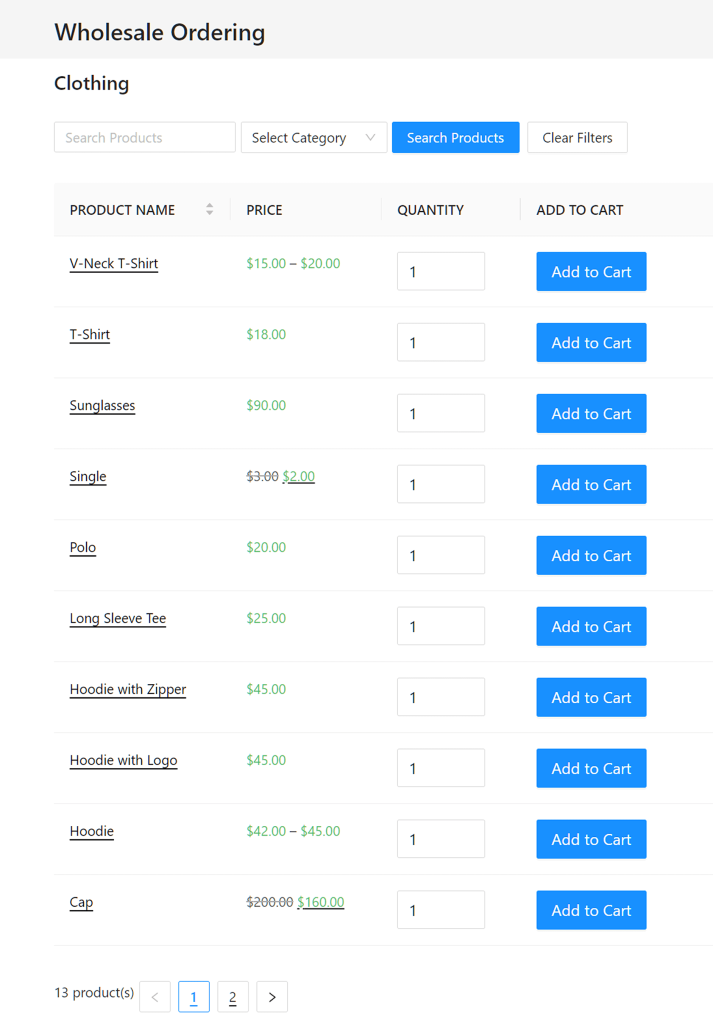
This page will show the wholesale ordering form with a basic configuration.
Many e-commerce store owners use the form like this straight out of the box. By default, this form will do its best to fit in with your WordPress theme and inherit any styles already present.
However, Wholesale Order Form gives you many options to customize and optimize your order form. Let’s explore some of these options, shall we?
How To Create A WooCommerce Wholesale Ordering Form (In 4 Steps)
Below, we’ll show you how to customize your wholesale ordering form using the options Wholesale Order Form offers you.
However, for this guide to work, you’ll need the WooCommerce e-commerce platform and the aforementioned Wholesale Order Form. Thus, we’re going to assume you already have both installed and activated.
With that in mind, let’s begin!
Step 1: Choose the look of your wholesale ordering form
If you view the wholesale ordering page before adjusting any settings, you’ll see that the standard layout has an Add To Cart button next to each product.
This has been designed with ordering efficiency for average-sized e-commerce stores in mind. As such, it allows your customers to quickly and easily order multiples of the same product with a simple click.
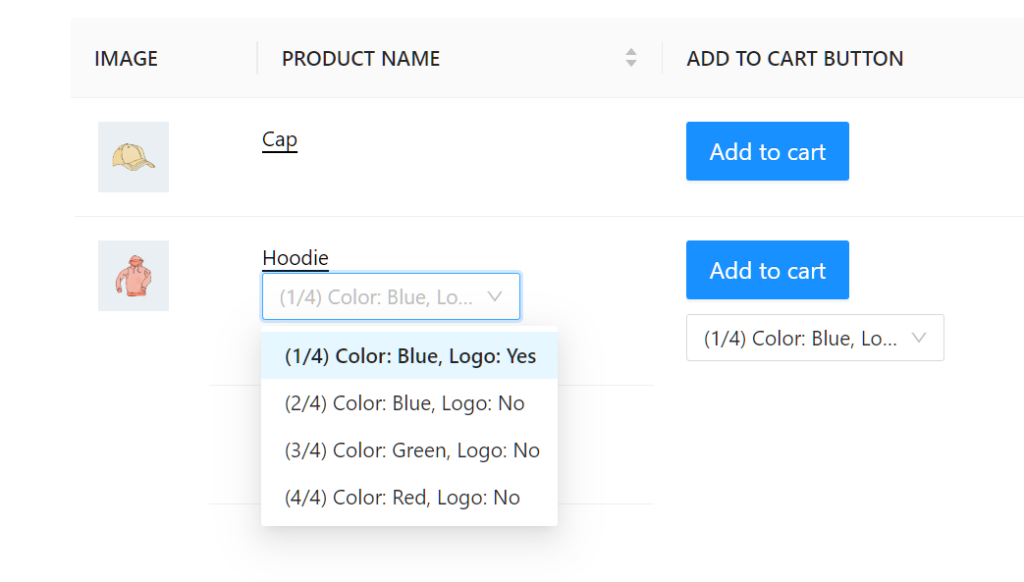
It’s especially handy for products that have variations where the customer might want to order different variations of the same product:
Basically, a customer has to select their desired product variation and its quantity, then hit Add To Cart to place it in their cart.
This process uses AJAX to add the product variation to the cart without any page reloading. Therefore, the customer is free to change the variation quickly and hit Add To Cart, again and again, making the ordering process very quick.
However, if you have a store with a few products, you might want to consider using an alternate layout option, instead.
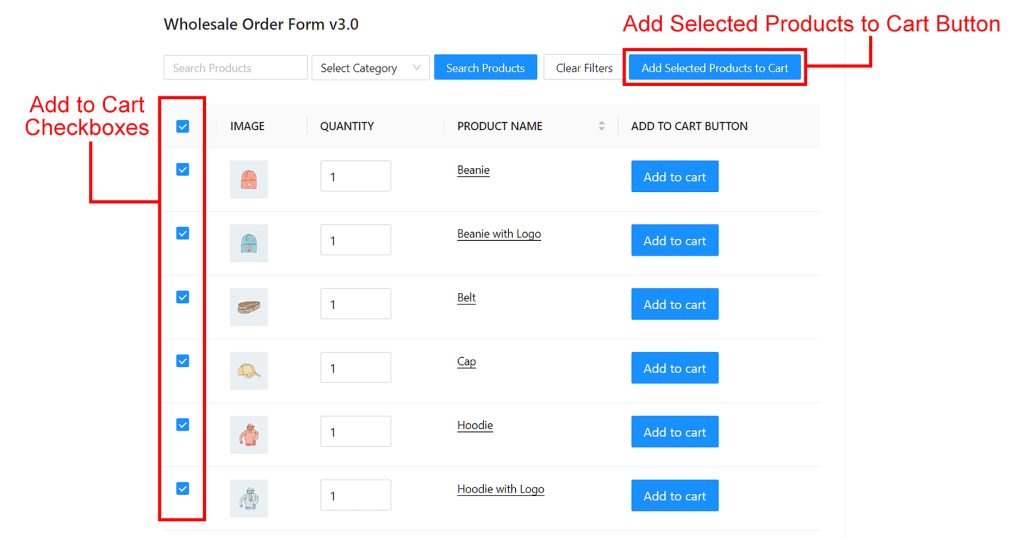
One great layout alternative presents a checkbox next to each product and a single Add Selected Products To Cart button at the top of the form. This lets customers quickly add multiple selected items to their carts.
For example, let’s say a customer wants to buy multiple items quickly. To select their desired items, they simply have to tick the checkboxes next to the item names. Then, to simultaneously add all these items to their cart, all they have to do is click the Add Selected Products to Cart button.
So, how do you give your wholesale ordering form this appearance and function? Simply follow the steps below!
A. Access the Form Editor
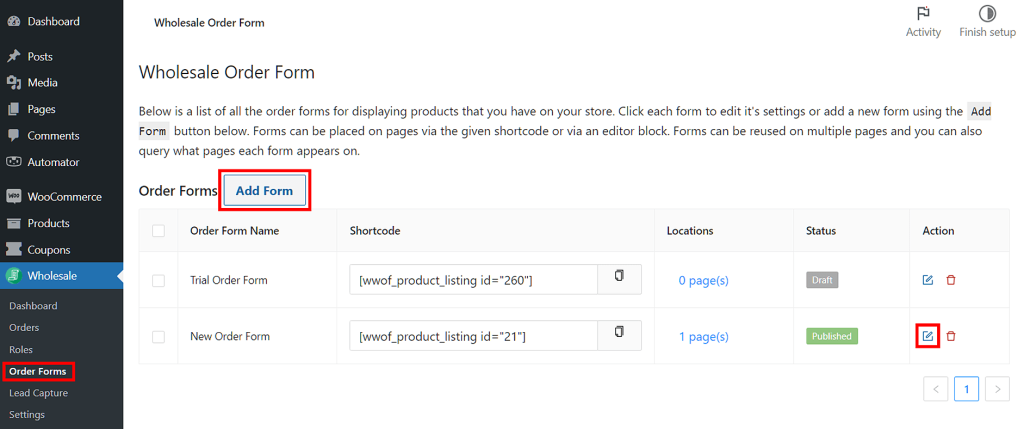
First, go to your WordPress dashboard and click WooCommerce > Order Forms. Then, either create a new form by clicking Add Form or edit an existing one by clicking its edit button.
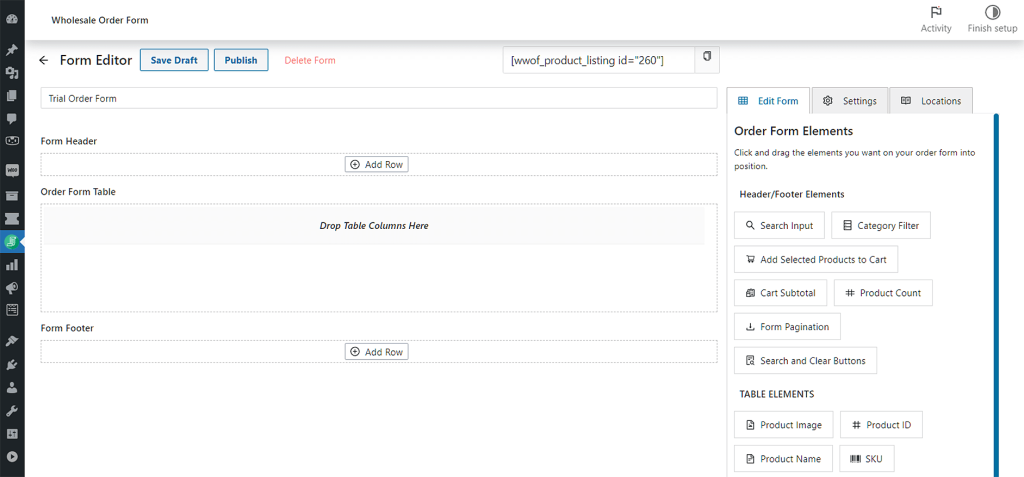
This will redirect you to the Form Editor page, as seen below.
Now, it’s time to fill the form with elements.
B. Insert Add Selected Products to Cart into your order form
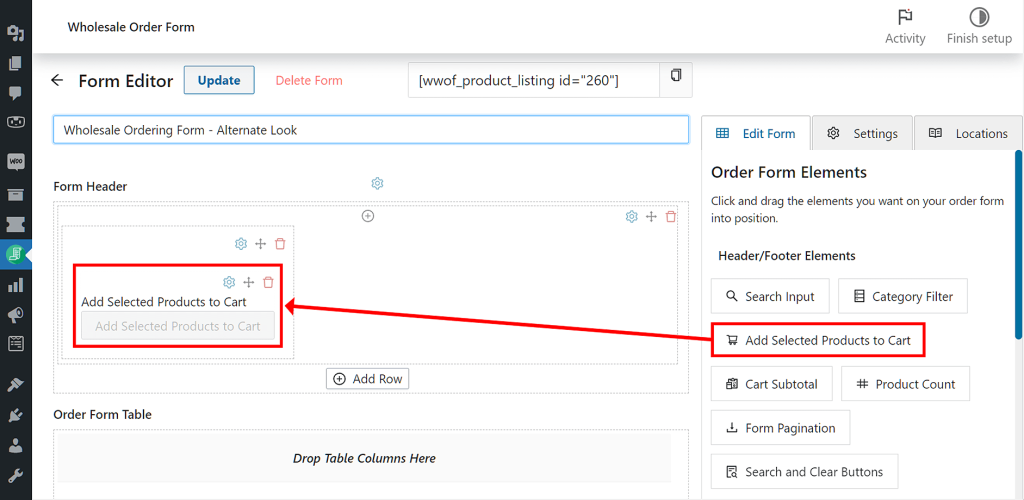
Your next step is to insert the Add Selected Products to Cart element into the Form Header section.
Create a row in a section by clicking Add Row. Then, click the + icon at the top of the row to create a column.
Next, head to the right side of the Form Editor page and select the Edit Form tab. Under Header/Footer Elements, find Add Selected Products to Cart, then drag and drop it into the newly created column.
C. Insert Add to Cart Checkbox into your order form
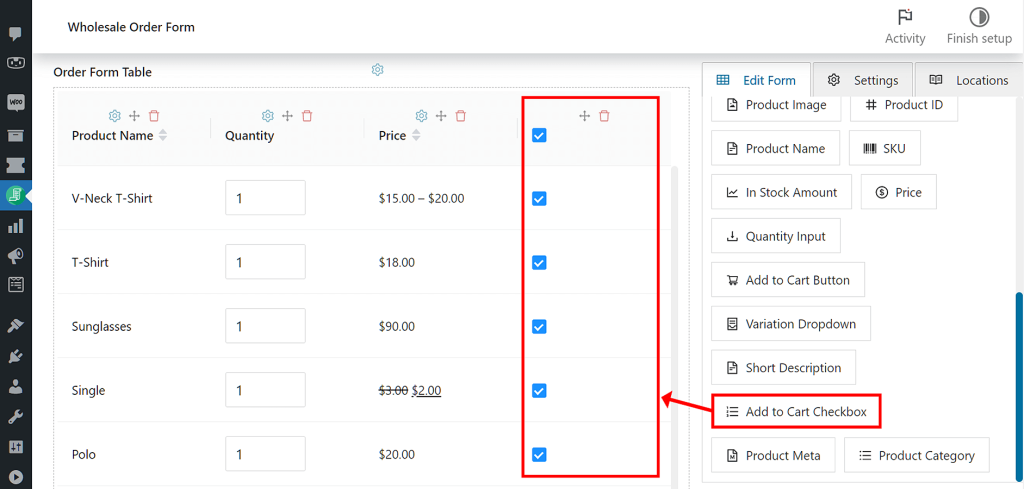
Now, you have to insert the Add to Cart Checkbox into your order form’s table.
Again, go to the right side of the Form Editor page and select the Edit Form tab. This time, however, scroll down to Table Elements and find Add to Cart Checkbox. No need to create a row; simply drag and drop Add to Cart Checkbox into the Form Table section.
Lastly, to save these settings, click Publish near the top of the page. Alternatively, you can click Update if you’re editing an existing form.
And that’s it: you now have an alternate layout for your wholesale ordering form!
Step 2: Add extra column data
The next major setup decision is to choose what other product data to show on the form.
You can easily show:
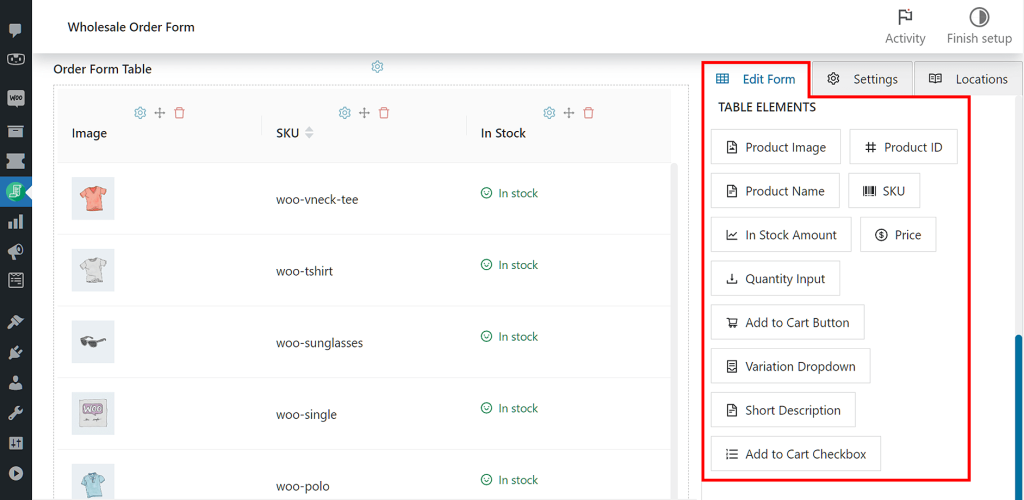
- A small product thumbnail
- Product SKU
- In Stock Amount
- … and even more, if you want to override the template and add the data yourself
If you look at the image of the Form Editor page below, you’ll see that these are all Table Elements under the Edit Form tab. Therefore, including such product data in your form simply entails dragging these elements into your form’s Form Table section.
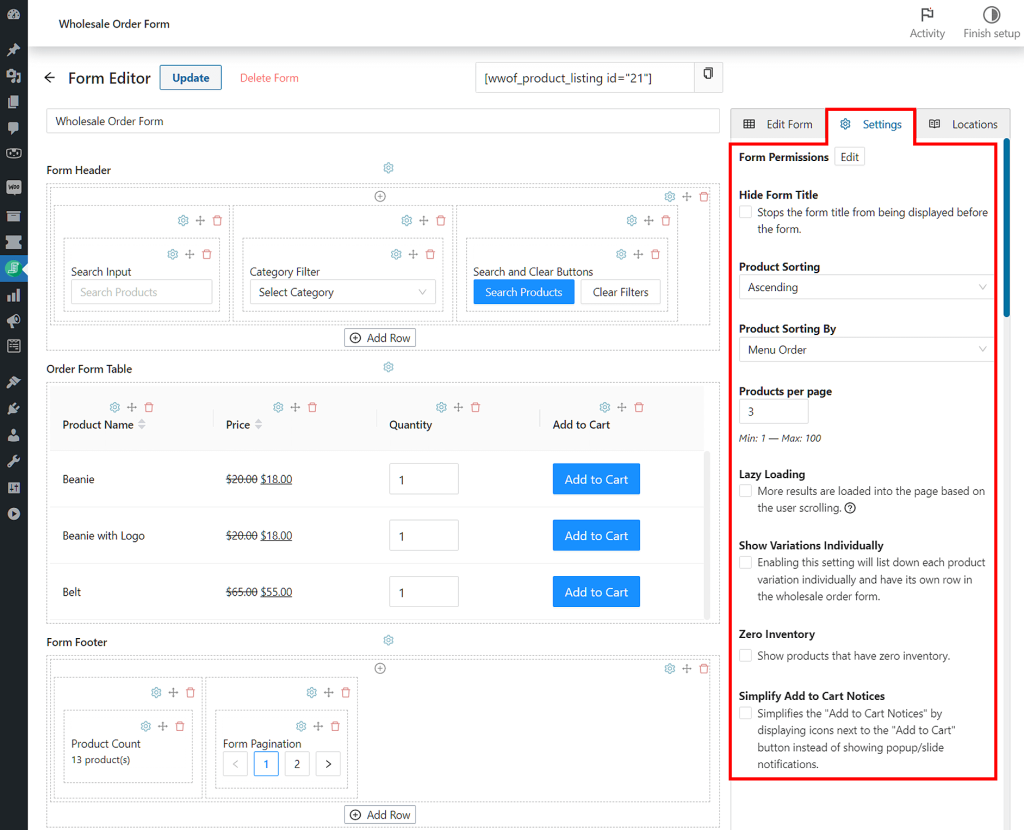
In addition, check out the Settings tab on the right side of the Form Editor page. Basically, this area allows you to modify how you present your product information. For example, you can change how your products are organized, how many products appear per page, and more.
Step 3: Set the wholesale ordering page template
The next step is to choose what page template you should use on the page itself.
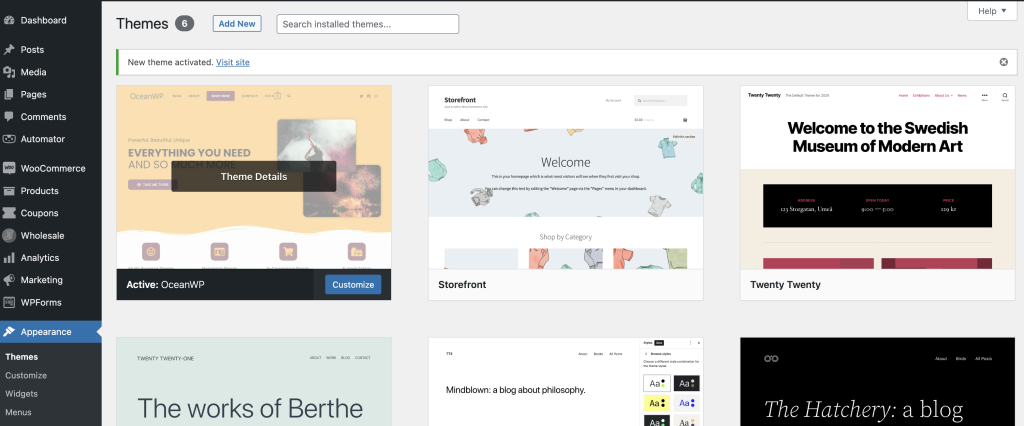
By default, most WordPress themes have many templates to choose from. However, these templates vary from theme to theme, so you might have to consult your theme’s documentation or ask your developer for help:
Depending on what your goals are, you might want to choose a default template or a full-width template that would make the form take up the whole width of the page.
The form usually looks great straight out of the box. However, some CSS styling might be required to make it look 100% right. It might even be something you’ll have to do to integrate the form with your site’s theme.
Generally, using a page template that allows for a sidebar is a good idea. Such a setup allows you to use the WooCommerce Cart Widget to give users instant feedback about their order progress.
Step 4: Add a cart widget
Some WordPress themes may not offer a dedicated blank sidebar that can be customized separately from the other sidebars on your site. If you prefer to have a distinct sidebar that differs from the rest of your site, there is a straightforward solution that is effective across various themes.
We recommend installing the Custom Sidebars plugin which is free on WordPress.org. Basically, this allows you to add additional sidebar areas to put widgets in. In addition, they let you choose what pages these sidebar areas appear on.
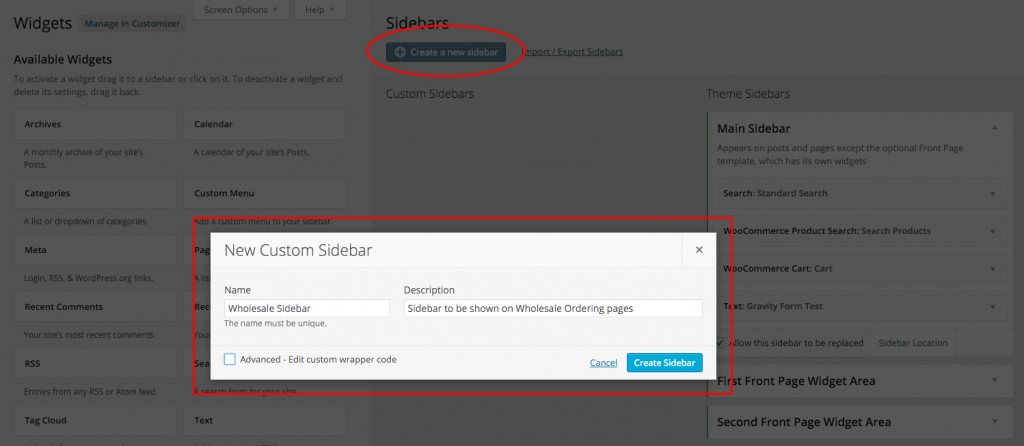
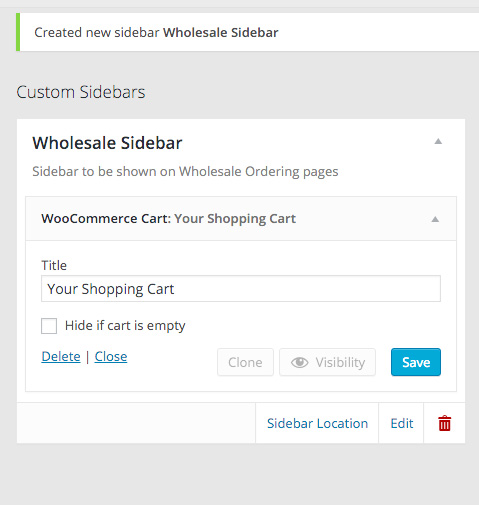
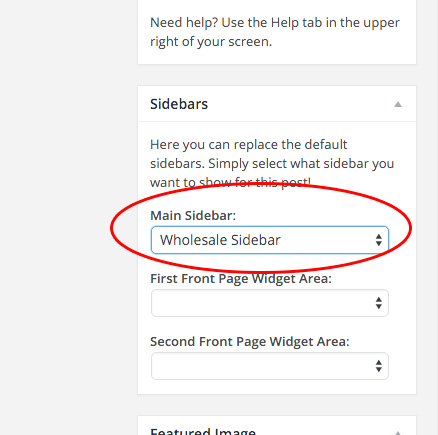
This plugin is the ideal solution to this issue. After all, it’s important to avoid having the wholesale-only sidebar, which will exclusively contain the Cart widget, dominate the entire site. Similarly, it’s also not advisable to use the site-wide sidebar, which includes all other widgets, on the wholesale ordering page.
To set up a wholesale-only sidebar in Custom Sidebars:
- Create a new sidebar area for wholesale only
- Add the WooCommerce Cart widget to the new sidebar
- Select this sidebar on the edit screen for your Wholesale Ordering page
Now, your wholesale ordering page has a cart widget in the sidebar. In addition, Wholesale Order Form will update the sidebar cart every time your customers add a new product to the cart.
Remember: Your Wholesale Customer’s Time Is Precious
One of the golden rules when setting up a wholesale ordering system is to remember that time is precious. The quicker they can make an order and get on with other businesses, the better.
Quicker and more efficient ordering systems have been shown to increase reorders and reduce customer frustration. These lead to happier wholesale customers who are more willing to do business with you time and time again.
Click here to purchase a copy of the WooCommerce Wholesale Order Form Plugin.
If you’re just getting started setting up wholesale on your WooCommerce store, be sure to see the full Wholesale Suite Bundle. This also includes solutions for wholesale pricing and wholesale registration and is available at a discount when you purchase them all together.
Conclusion
A wholesale ordering form can make the ordering process quicker and more convenient for wholesale customers, making it necessary for wholesale businesses.
To recap, you can create a wholesale ordering form by observing a few steps:
- Choose the look of your wholesale ordering form
- Add extra column data
- Set the wholesale ordering page template
- Add a cart widget
Do you have any questions about wholesale ordering forms? Let us know in the comments section below!

