Do you need to list the menu items on your eCommerce store? Do you want to make it as easy for shoppers to navigate your store and find the food, drinks, and other products they’re looking for? Then consider simplifying your WooCommerce menu cart!
Whether you’re a relatively new online seller or an experienced pro, making your store more appealing to shoppers is essential. Ensuring that your site is simple and easy to use can go a long way toward increasing your store’s conversion rate and popularity.
Adding a simple WooCommerce menu cart is a great way to help boost your site’s appeal while keeping things simple and clutter-free. And in this article, we’ll walk you through the 3 easy steps to get started so that your site doesn’t confuse visitors more than necessary!
What Is A WooCommerce Menu Cart?
If you’ve got a website, you probably have a menu. A menu is just something that organizes your products so that people can find what they’re looking for. There are different kinds of menus, but the most common ones involve a shopping cart.
A shopping cart on your website is essential if you sell goods online. It not only helps customers take their orders and pay for their goods, but it also gives you an idea of your available inventory.
A WooCommerce menu cart is precisely that – it connects your shop to your website’s order fulfillment system. This means that instead of having separate store pages for each product in your store, every product will have its page, and you can list them all on one page simply by adding a menu to your shop!
Why You Need To Add A Simple WooCommerce Menu Cart
Sometimes, the simple changes and tweaks you make to a website improve its usability. One change we made was adding a menu cart to the header.
Ours is a simple one. It just shows the price and quantity in the cart, but it shows everywhere throughout our site and provides a nice quick, and simple method for people to get back to the cart page without us needing to include a sidebar widget everywhere.
In this article, we will show you how to add a simple menu cart to the main menu in your WooCommerce store, just like ours.

It’s a simple change that will significantly improve the user experience of customers on your site.
What you need:
- A WooCommerce store
- WooCommerce Menu Cart plugin by Jeremiah Prummer, Ewout Fernhout
- A configured menu
Step #1: Install & activate WooCommerce Menu Cart
One day, I stumbled upon this plugin while searching for an easy method to insert a menu item with cart details. I also wanted a solution that hid the menu item if nothing was in the cart yet, as there is no point showing it unless there’s something there for them to go ahead and purchase.
WooCommerce Menu Cart is a free plugin that does exactly those things.
A Premium version adds features like flyout menus, additional icons, and a few other features, but this isn’t required for this guide today.
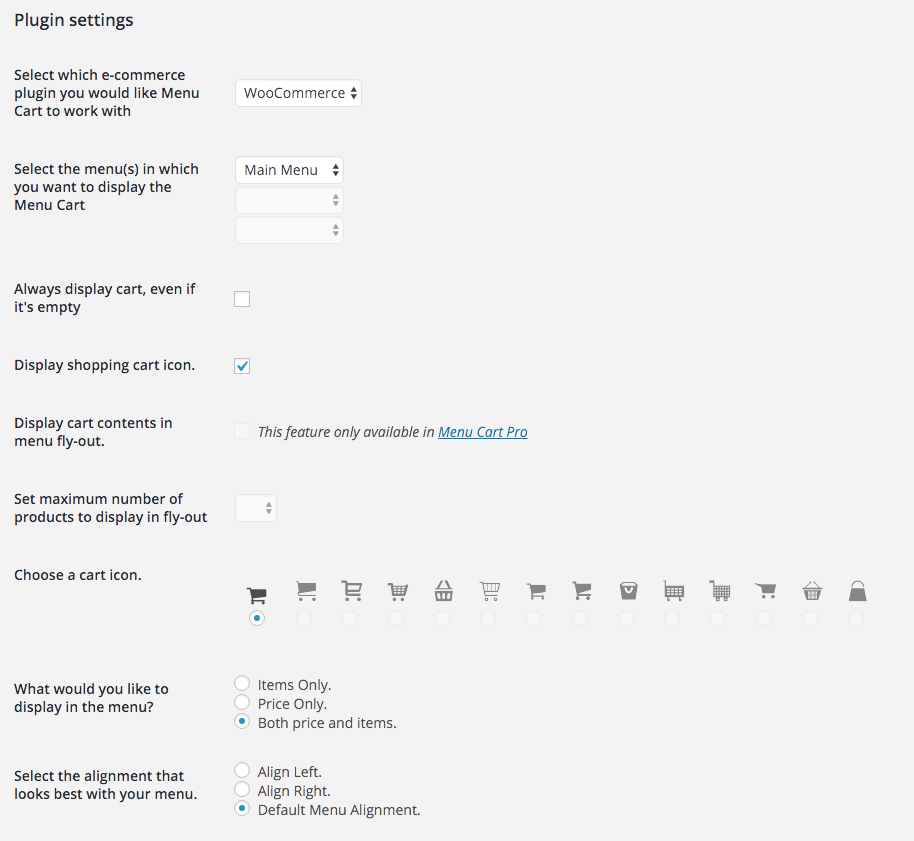
Step #2: Configure the menu cart settings
Here’s where we get into the flexibility of the plugin.
I mentioned previously that I wanted our menu item to hide if there was nothing in the cart. I also wanted to show some brief details about the cart status (the subtotal in our case).
You can use it the same way as us or tweak it to suit your site.
On a more traditional e-commerce site with more physical goods, you may want the menu item to show all the time, even if there’s nothing there. It’s up to you.
At a minimum, all you need to configure on this screen is what menu to attach the cart menu item to. In my case, we have a single main menu, so that was the one I chose.
Step #3: Test the front end!
As always, when you’re messing around with user-facing changes, I highly recommend you test the new menu across multiple browsers.
Test the new menu on IE, Edge, Firefox, Safari, and Chrome, which will cover most users.
But you might also want to ensure it looks good on mobile and tablet browsers, as mobile can account for a significant chunk of your traffic, and you wouldn’t want them to see a broken menu.
I hope this guide helped you set up your simple menu cart!
Conclusion
WooCommerce has become the ultimate e-commerce platform, enabling you to sell anything from wristwatches to weddings. It’s also an essential tool for any online store. Moreover, with so many features and options available, it can be hard to figure out which is best for your store.
Regardless of your store’s size or scope, a simple menu cart will impress your customers with its easy use and flexible options. So here are three easy steps to add a WooCommerce menu cart to transform your store into a sellable destination:
- Install & activate WooCommerce Menu Cart
- Configure the menu cart settings
- Test the front end!
Do you have any questions about WooCommerce menu carts? Comment down below or email us!


I followed the exact step however its not moving into the main menu bar to the right the cart, its underneath the main menu.
Any advise?
You probably have too much in your menu. See if you can remove one other menu item.