Order forms are only as good as the information they include, which must be both accurate and comprehensive. For instance, a poorly made order form may ask customers irrelevant questions about their orders. As a result, the seller may end up shipping to the incorrect address or either too few or too many items.
Because of this, it’s crucial for you as a store owner to check that the questions your order forms ask are appropriate. To prevent confusion on both ends, you must also ensure that they are well-organized and worded clearly.
In this article, we will introduce one of the hottest features of Wholesale Order Form. Additionally, we will demonstrate how simple it is to set up multiple orders by category in WooCommerce. Let’s get started!
Why Do I Need Multiple Order Forms?
Order forms are crucial for purchases, sales, and numerous other procedures, especially for sizable orders and/or high-value transactions. However, while they serve one primary function, order forms perform a variety of complementary roles.
For instance, sellers use order forms to track significant inventory purchases, handle large business orders, pair dispatches with purchases for auditing or bookkeeping, and more.
In contrast, buyers use order forms to manage incoming and pending orders, ensure delivery, manage accounting records, track the arrival and payment of items, and streamline the procurement process.
Therefore, there may be circumstances when having numerous order forms is necessary for the effective management of various issues. Taking advantage of these tools this way will reduce your chances of making mistakes, thus helping you complete successful deliveries regardless of the sales volume.
How To Set Up Multiple Order Forms By Category In WooCommerce
WooCommerce accelerates the process of starting and operating an online business. However, it’s missing one crucial element: the functionality that allows you to sell in bulk (or wholesale).
Therefore, if you want to have multiple order forms on your store, you’ll need a plugin like Wholesale Order Form. This tool allows you to design a wholesale order form that’s more versatile and user-friendly than WooCommerce’s built-in shop pages.
With that in mind, follow the steps below to create multiple order forms!
Step 1: Download or upgrade Wholesale Order Form
First and foremost, to enjoy Wholesale Order Form’s fantastic capabilities, you must install its most recent version. If you already have this plugin, make sure to upgrade it to its current version; otherwise, download the latest version now.
We’re continuously improving Wholesale Order Form to make sure it boasts all the features store owners need to run the e-commerce business of their dreams. The current version is substantially lighter, which makes loading rates a whole lot faster.
Moreover, it comes with a ton of fresh, innovative features, such as the ability to add multiple order forms to your store!
Step 2: Navigate to the order forms list
Previously, you could only have one order form on your online store.
However, we’ve upgraded the feature to give you the ability to create multiple order forms. You may now push to a page using a unique shortcode for each form!
To have multiple order forms by category, all you have to do is create two or more order forms and label them accordingly. From there, you can start defining their category using the builder.
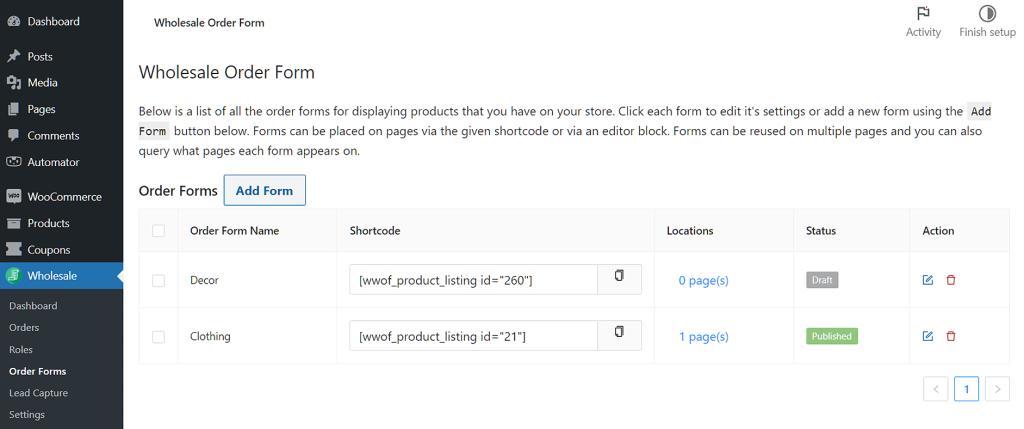
So, how do you build a new form? In your WordPress dashboard, head to Wholesale > Order Forms. This will take you to a page with a list of every order form you’ve created.
You may then see the shortcodes, the form’s position, and whether or not it has been deployed. For more information on the shortcodes available on the order form, see our KB article here.
Step 3: Set the product category
Now, you have to configure your category filter.
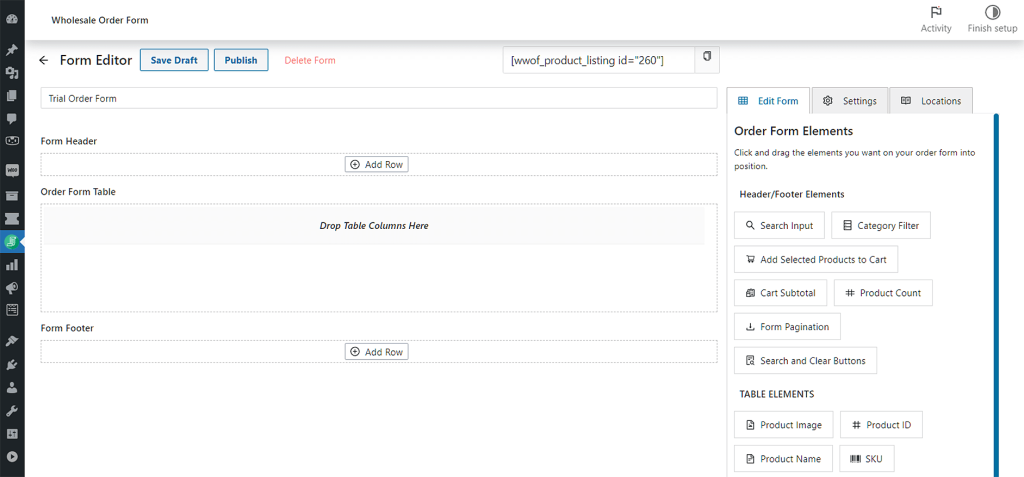
Create a new order form by clicking the Add Form button. This will direct you to a page with three main sections:
- From Header
- Order From Table
- Form Footer
You can expand the header and footer sections by clicking Add Row. Furthermore, you can create any number of columns for each section, then easily drag elements into them. For more information on how to build order forms, check out the following guides:
- How To Create A Simple Wholesale Order Form Online
- How To Make A WooCommerce Bulk Order Form (Easy & Quick)
- 6 Tips To Get The Most Out Of Wholesale Suite’s New Order Form Builder
In this tutorial, we’ll use Clothing and Decor as product categories.
Set up your Category Filter
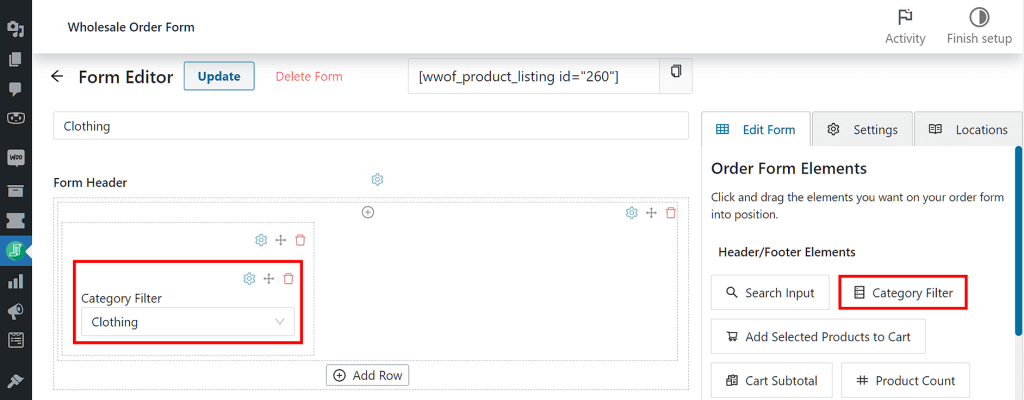
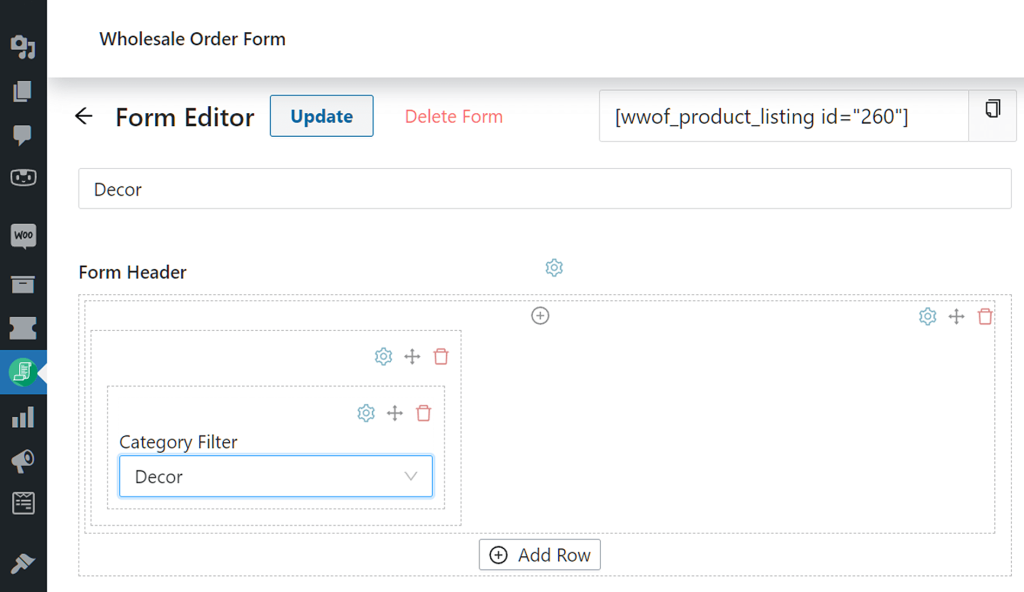
To get started, you’ll have to add a row to the header section, then click the plus symbol to add a column.
Next, go to the Form Editor page’s righthand column and click the Edit Form tab. Then, look for Category Filter and drag and drop it into the newly created column.
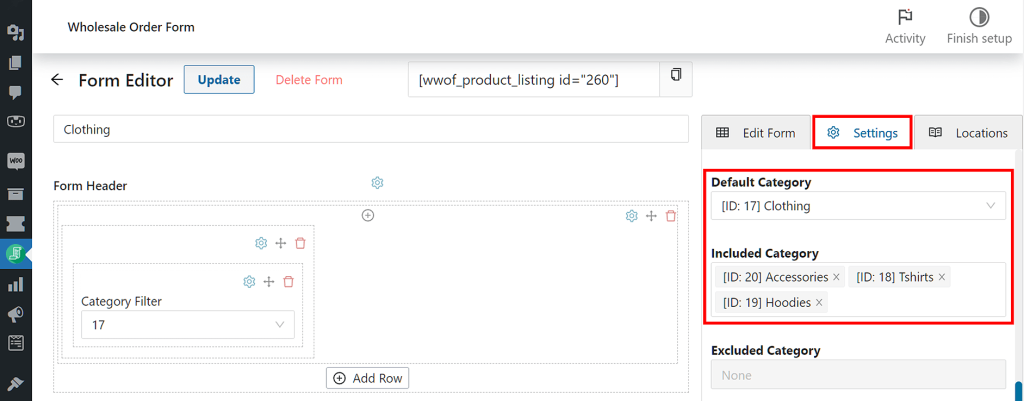
Now, pick a category from the dropdown menu under the Category Filter label. In our case, we picked “Clothing.”
Explore more customization options
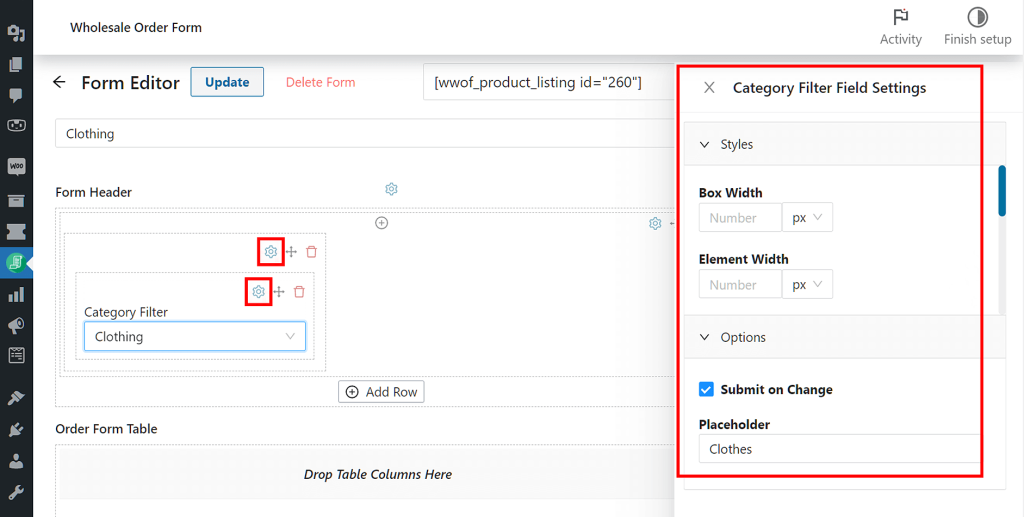
You can further explore the settings for any element or its column. To do this, simply click either of the gear icons above the element’s name and look through the controls for Styles and Options.
As you can see above, you can specify the placeholder text that you wish to show on your order form.
In addition, you can set the default and included categories. Simply head to the Form Editor page’s righthand column and click the Settings tab. Then, select the right product categories for Default Category and Included Category.
Repeat the process to create multiple order forms!
Use the same steps described above to create other order forms. Just remember to name them appropriately to prevent any confusion!
Step 4: Save and publish your order forms!
Once your order forms are ready, the last step is to build a page for you to publish them.
You can do this by simply copying the shortcode that the order form automatically generates, then pasting it into the content field when building the page.
Note that the plugin will create a Wholesale Ordering page and display the form there by default. However, you can disable the Wholesale Ordering page and apply the shortcode elsewhere in your store if you already have a specific destination in mind.
Conclusion
In some cases, having multiple order forms by category is required to efficiently accommodate all types of consumers. By doing it this way, you can deliver successfully regardless of the volume of sales and are less prone to mistakes.
Fortunately, Wholesale Suite’s Order Form can help you set this up easily in four steps:
- Download or upgrade Wholesale Suite Order
- Navigate to the order forms list
- Set the product category
- Save and publish
Do you have questions about having multiple order forms by category? Ask us about it in the comments section below!

