Wholesale customers usually have specific products in mind when they come to shop. It can take as little as 10 seconds for someone to leave a site if they can’t find what they’re looking for right away. This means that guiding shoppers and offering product filters for WooCommerce is crucial for landing sales and upselling.
Product filters are a great way to help shoppers locate the items they want and encourage them to browse other categories and options. Plus, it’s easy to set up product filters for WooCommerce. After all, the popular e-commerce platform comes with this feature, as well as extensions that can take it even further.
In this article, we’ll talk more about what product filters are and why WooCommerce is a great way to implement them. We’ll also walk through how to use this feature to increase sales and reduce the bounce rate on your e-commerce site. Let’s get to it!
What Are Product Filters?
Product filters are used to narrow down search results, so you only see the type of items you’re interested in. Common filters include:
- Department
- Brand
- Size
- Color
- Price range
- Attributes
- Stock status
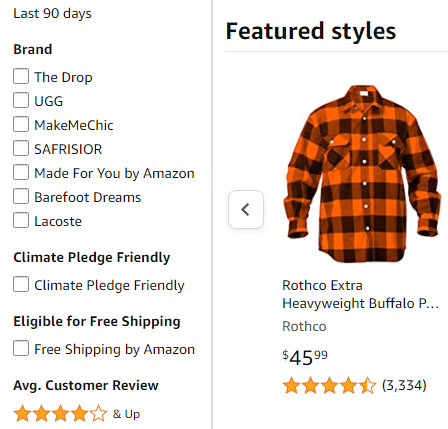
You’ll commonly see product filters in a sidebar menu in search results or on landing pages. Here’s an example of the filters offered for the “clothes” category on Amazon:
Product filters have become commonplace in shops with a large number of products. They make it easier for customers to find what they’re looking for. In turn, this can also improve the user experience and increase conversions.
Usually, you can combine multiple filters to get very specific results. For example, a customer might be able to find small red dresses under $40 by using a combination of size, color, and also price filters.
The Benefits Of Using Product Filters On Your eCommerce Site
Product filters can improve the shopping experience for customers who have specific wants or needs. Filters generally offer better results than search functions alone and can be quicker than going through a maze of menus to get a specific result.
When shopping is easier, customers are able to browse faster and hopefully buy more items. Product filters may even give shoppers ideas they didn’t originally come looking for. An office manager searching for paper products might see the “organizational products” filter nearby and end up shopping in that category as well.
A better shopping experience can even improve your site’s SEO by increasing activity, improving time on site, and lowering your bounce rate (thanks to fewer frustrated customers). All this can result in increased organic traffic and more new leads.
How To Use Product Filters For WooCommerce (3 Tips)
Among WooCommerce’s many great features, product filters are at the top of the list. They can easily be added to search results just about anywhere on your site. You can include them using the post and page editor itself, or add them to your site’s widget areas in the Appearance tab. Here’s how to get started.
1. Add product filter widgets to your sidebar
The quickest and easiest way to implement product filters on your e-commerce site is to add them to your widget areas. To do this, go to Appearance > Widgets in your dashboard. Here you will see your sidebars, footer, and other widget areas offered by your theme.
Adding product filters for WooCommerce via widgets means they’ll be available for customers on all of your site’s pages. The best place for them is usually in your primary sidebar since this will make them highly visible and accessible.
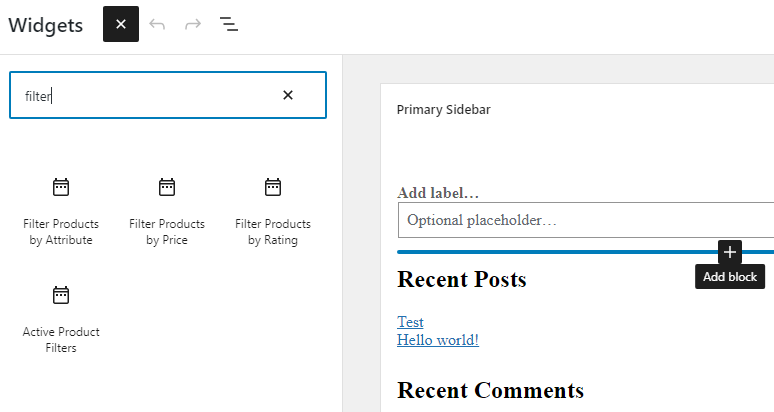
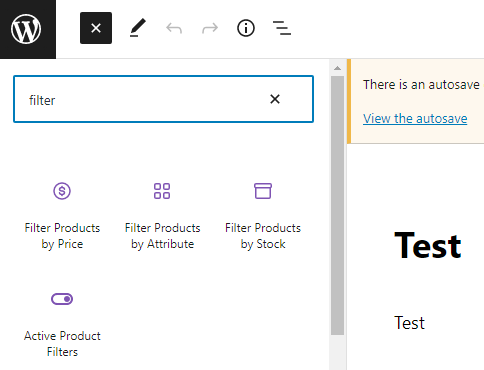
Whatever widget area you choose, click to add a block where you would like your product filters to appear in the sidebar menu. You will then want to scroll down to the Widgets subheading, or simply type “filter” into the search bar:
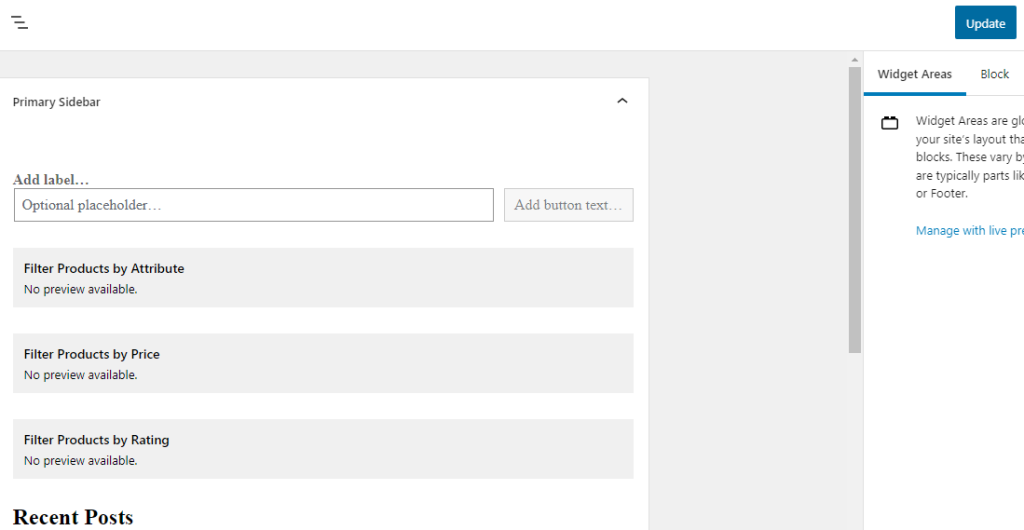
Next, you can then add any (or all) of the following widgets to your sidebar: “Filter Products by Attribute,” “Filter Products by Price,” and “Filter Products by Rating.” Once they’re in place, click on the Update button in the top right corner of the screen:
That’s it! These product filters for WooCommerce will now be a part of your sidebar wherever it appears on your site, allowing users to easily search for the products they want.
2. Add product filter blocks to a specific page
You can also add these product filters directly to relevant pages if you prefer. This way, you’ll be able to control when and where they show up.
To do this, open up the editor for any page or post. Then search for the same blocks we introduced in the previous section. The only difference is that this time they will be located under the WooCommerce subheading:
Then, simply add these blocks wherever you would like them to appear on the page.
You can also use these filters with the Wholesale Suite Order Form if you offer customers the option to buy in bulk. These filters can be especially useful for anyone looking to buy a large number of items with specific prices or attributes.
3. Set up product filter attributes
Unlike price and rating, product attributes allow you some flexibility to determine your own filter options. For example, for clothing, you can use attributes to organize products by size or color, whereas for books you can use them to indicate genres.
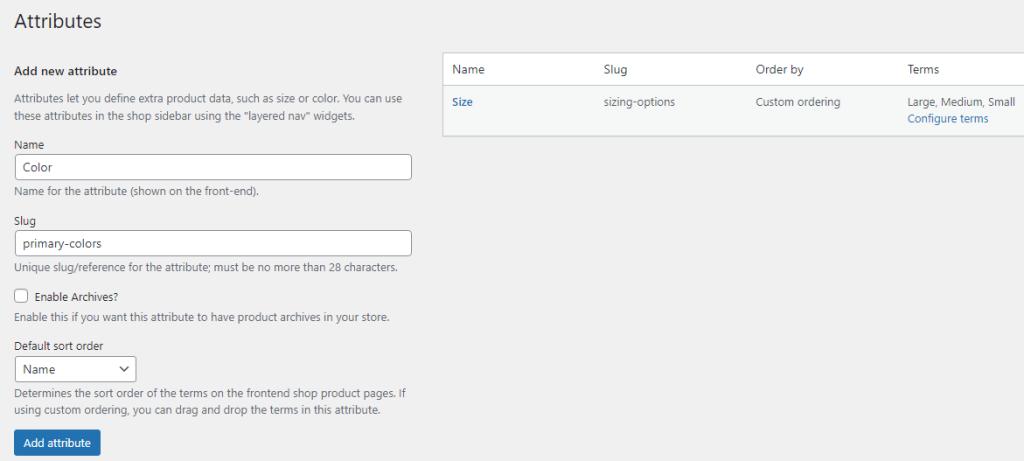
You can create new attributes by going to Products > Attributes. On this page, you can add new attributes, and also manage your existing ones. For example, you might add a “color” attribute for your store’s clothing category.
To do that, all you have to do is type in the name of the attribute, create a unique slug, and also select a sorting option:
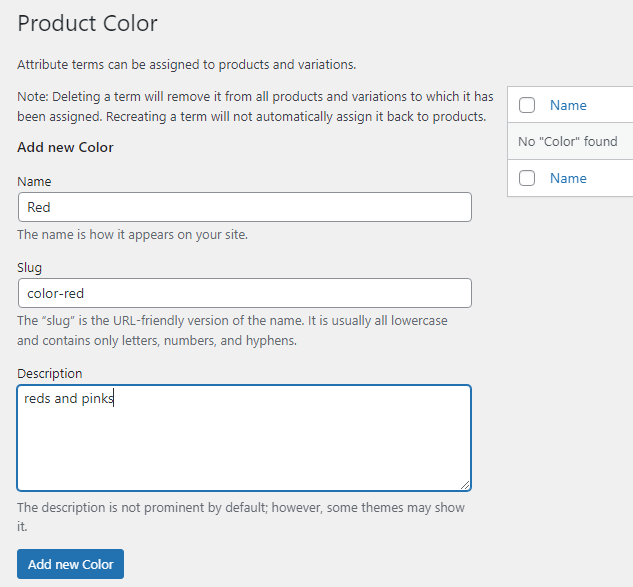
Then you can hit the Add attribute button to add it to the list. You then want to click on the attribute in the top-right corner of the page, or select the Configure terms link. This enables you to assign it to a category:
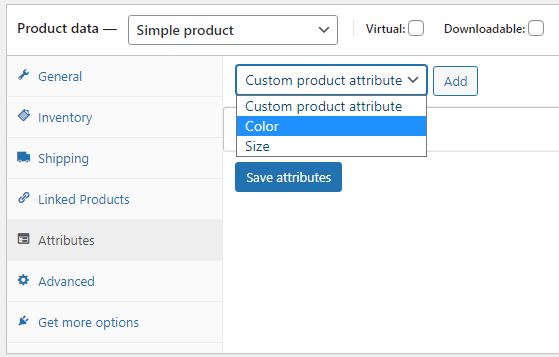
The next step is to apply the new attribute to relevant products. To do that, click on All Products under the Products tab. Then open an item for editing, and scroll down to the box labelled Product data.
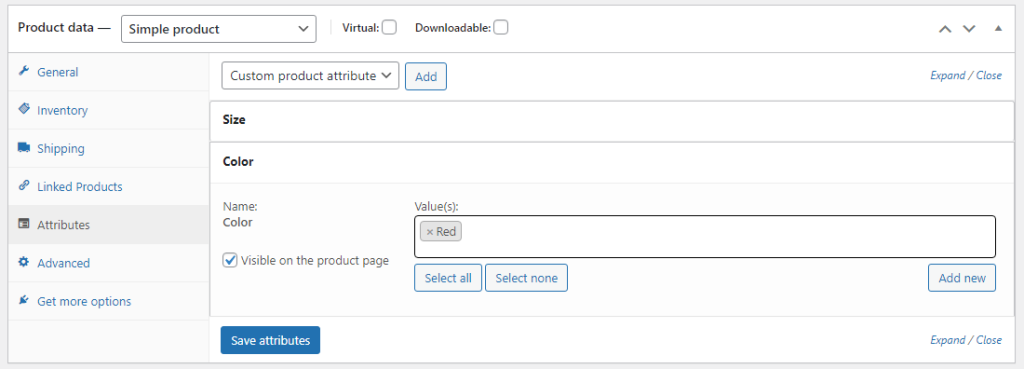
Here, you will see an Attributes tab. Use the drop-down menu under Custom product attribute to select the attribute you just created:
Click on the Add button, then add the specific attribute options relevant to this product under Value(s):
After that, select the Save attributes button to apply those attribute options. Now, this product will show up when the relevant attribute filter is selected.
Conclusion
Using product filters for WooCommerce is a great way to boost sales on your wholesale site. Your customers should have an easier time finding what they are looking for, and will also be encouraged to browse new categories.
To use product filters in your WooCommerce wholesale store, you can:
- Add product filter widgets to your sidebar
- Use blocks to place filters on specific pages
- Set up custom attributes for your products
Do you have any questions about using product filters for WooCommerce? Let us know in the comments section below!

