Running an online store means continually seeking ways to provide customers with the right information at the right time. That’s why we are excited about the new updates for WooCommerce additional information tab and how you can set priority products in your store. We will also share some tips on how to make product tabs more helpful for your store.
Let’s get to it!
How To Add WooCommerce Additional Information Tab And Popup
One of the best parts about this update is how simple it makes sharing product details with customers. In the past, the product info modal in WooCommerce showed only the basics. Customers had to click around or even leave the order form if they wanted more information. That slowed things down and sometimes made people leave without buying.
Now things are easier. With the new feature, store owners can add general information inside the product info modal itself. When customers click on a product name, they see everything right away.
Here is how you can add this general information using WooCommerce custom product tabs:
1. Edit your product and add product specifications
Start by logging in to your WooCommerce store as the admin. This is where you control all the product settings. Go to your product list. Click on the product that needs more details.
Inside the product settings, go to shipping to add information about Weight and Dimensions. Once you finish, save your changes so they appear on the order form.
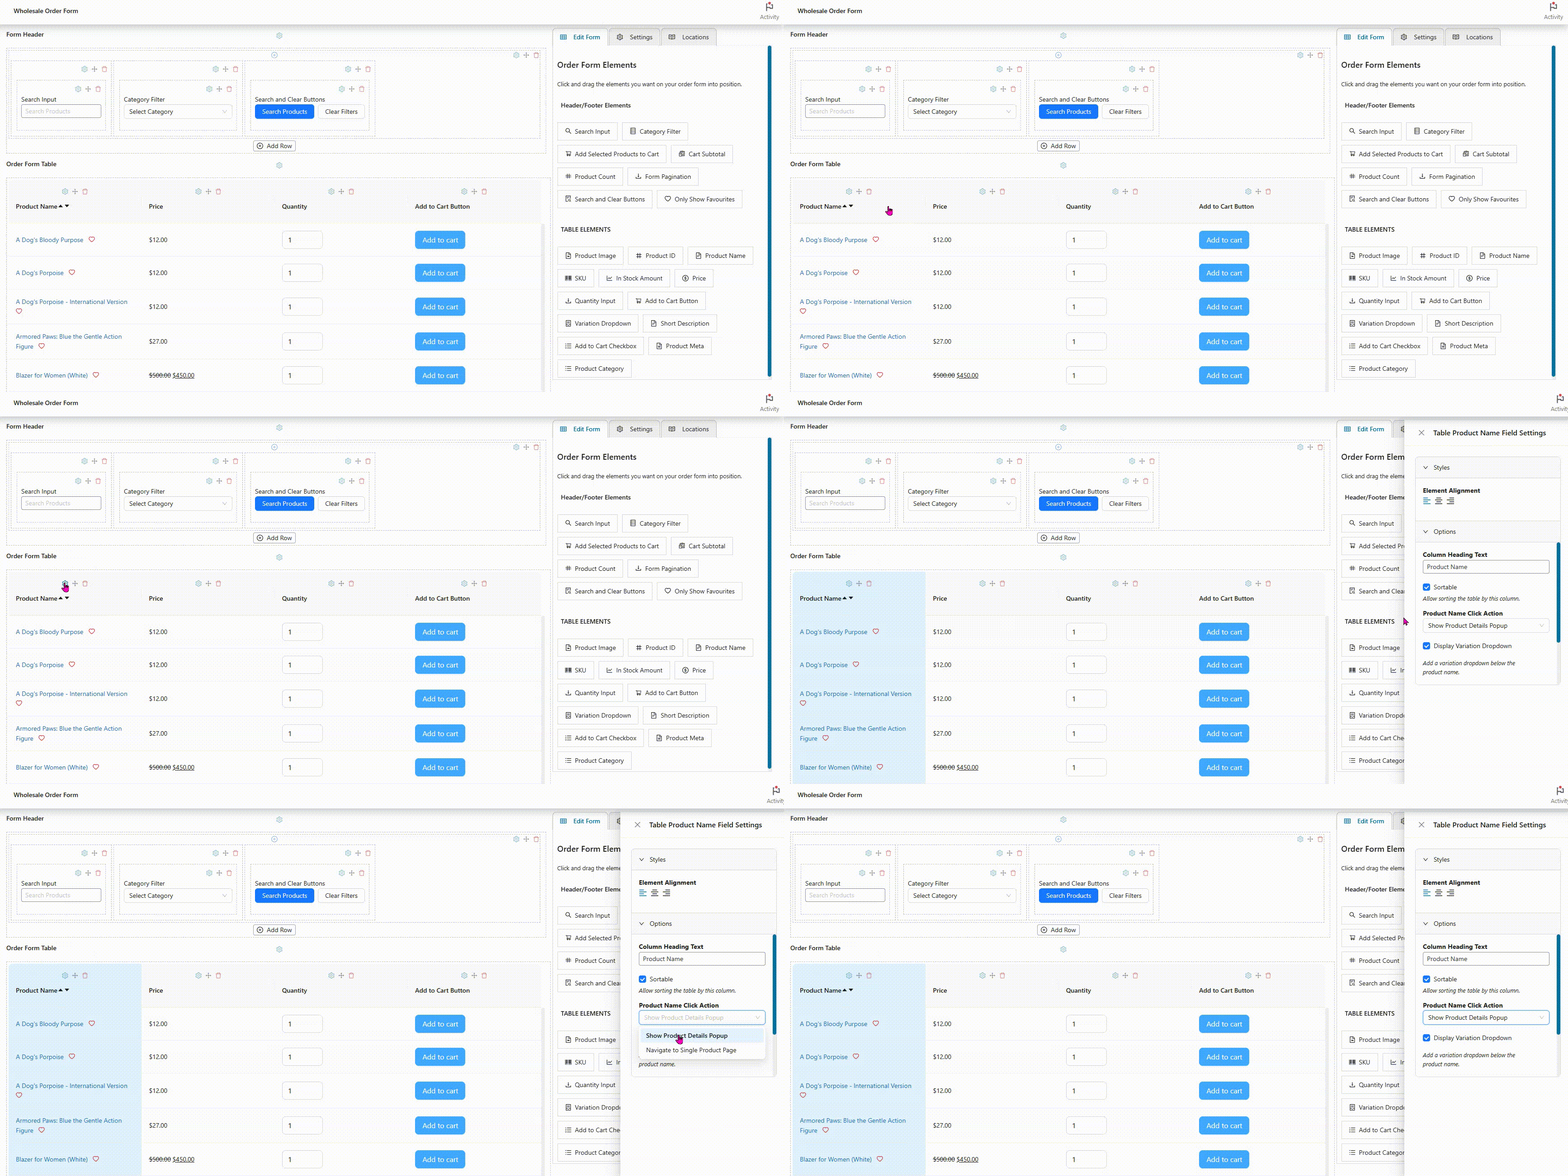
💡 Note: Make sure to turn on the Show Product Details Popup option so the additional information appears. To do this, edit your Order Form and click the settings icon above the Product Name column in the table. A settings panel will slide out from the right side of the screen. Look for the Product Name Click Action option and select Show Product Details Popup from the list.
2. Go to the order form in your store
After saving, open the order form where customers see all the products. Clicking the name of the products opens the information modal. The additional information you added on the backend should now be right there with the product description.
Priority Products On The Form
Here’s another feature that store owners have been wanting for a while: priority products. Before this feature, every product on the order form appeared in the same order, unless a customer had saved favorites. However, sometimes store owners want specific products to appear first for everyone.
This is where priority products come in. When you set a product as a priority item, it appears at the top of the order form for all customers as soon as they log in. It does not matter whether the customer has shopped before or is making their first visit. The products you want to highlight remain at the top, where people can easily see them.
We’ve prepared easy steps for you to turn this feature on. But remember, for the following steps, we’re assuming you already have Wholesale Order Form plugin installed. Here is how you can use this feature:
1. Log in to your WooCommerce store
Log in to your WooCommerce store as the admin so you can edit the settings. From your dashboard, go to Wholesale > Order Form > Edit Order Form > Settings > Priority Products.
2. Select the products you want to prioritize
Type or pick from the list the products you want to appear at the top of the order form.
3. Save your changes
Click Save to apply your changes.
After doing so, we recommend that you open the order form like a customer would (for checking purposes). The products you marked as priority items should now be at the top of the list every single time.
Tips For Making Priority Products And Tabs More Helpful
The new features are great, but there is more you can do with the WooCommerce additional information tab to help your customers. Let me share a few ideas that could help you when running a store.
Add shipping timelines
Customers like knowing when their orders will arrive. Adding delivery timelines inside the WooCommerce additional information tab helps them plan better before checking out. We have seen stores use this, and it saves buyers from having to guess or send extra messages to ask about shipping dates.
Include product care instructions
If you sell items like clothes, furniture, or appliances, adding cleaning or care instructions is always a good idea. It shows customers how to keep their purchases in good shape.
Create a simple FAQ section
Some products always bring the same questions. A small FAQ can answer them upfront. This keeps customers from leaving the page to find answers elsewhere, reducing support requests.
Share return or warranty details
People feel more comfortable making a purchase when they are aware of the return policy or warranty terms. Adding this information means they do not have to search through the whole site to find it.
Use tabs for seasonal information
During sales or holidays, you can add temporary notes for additional information. For instance, stores often use this to tell customers about shipping deadlines for Christmas orders. It keeps everyone informed without changing the main product descriptions.
Conclusion
The recent updates give store owners more control over what customers see when they shop. Adding information through the WooCommerce additional information tab keeps more precise details in one place, so customers do not have to search all over the site.
The new priority products feature is just as valuable. It places the right products at the top of the order form, so customers see them immediately. Whether it is a best seller, a seasonal item, or something you want to highlight, it is easy to make it stand out.
Here’s a quick recap on what we discussed in this article:
- How to add WooCommerce additional information tab and popup
- Priority products on the form
- Tips for making priority products and tabs more helpful
Using the WooCommerce additional information tab this way helps create a better shopping experience without adding extra steps for the buyer. If you have not tried these updates yet, now is the perfect time! Add the details that matter, set your priority products, and see how much smoother your order form becomes for your customers.
Do you have any questions regarding these new features? Let us know in the comments!


