If you regularly sell your products in large quantities, your store needs a different solution than most online shops. This solution is a WooCommerce bulk order form.
Without a WooCommerce bulk order form, your customers probably have to navigate through individual product pages. Unfortunately, because this can be time-consuming and frustrating, it may cost you potential sales.
Luckily, there is a way you can improve your customers’ purchasing experience and make the process more efficient. With our WooCommerce Wholesale Order Form plugin, you can easily set up streamlined bulk buying functionality on your website.
In this post, we’ll show you how to create a WooCommerce bulk order form. Let’s go!
Why You Need A WooCommerce Bulk Order Form
If you are a wholesaler, a WooCommerce bulk order form is a must. After all, your customers probably already know what they’re looking for, so going through dozens of individual product pages will only prove cumbersome.
By enabling them to quickly and easily make their selections through a dedicated form, they’ll be encouraged to buy more items. It’s a smart way to increase your revenue by showing your customers all the relevant information they need in one place.
Apart from wholesalers who use WooCommerce, there are several other types of businesses that might find bulk order forms beneficial, such as:
- Office supply companies
- Online grocery stores
- Catering services
- Takeaway restaurants
Overall, if your products are self-explanatory and your customers usually purchase multiple items at a time, you’ll save them a lot of hassle by setting up bulk buying functionality.
How To Make A WooCommerce Bulk Order Form (In 5 Steps)
Now that we’ve covered the benefits of using a WooCommerce bulk order form, we’ll show you how to create one. Note that you’ll need to download, install, and activate our WooCommerce Wholesale Order Form plugin before following the steps below. Let’s dive right in!
Step 1: Create a new order form
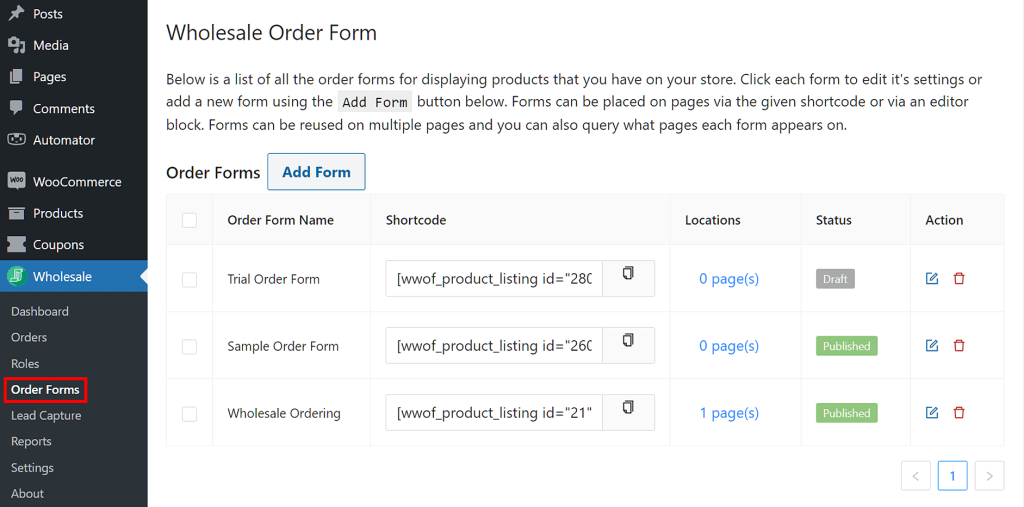
First, go to Wholesale > Order Forms. This will redirect you to your Wholesale Order Form page where you can either set up one or multiple order forms in your store:
In this tab, you can view the shortcodes, the location of the form, and whether or not it has been published.
Note that you can create multiple order forms, each with its own shortcode that can be posted anywhere on your site using the editor block. You can also query which pages each form appears on and reuse forms across several pages.
Learn more about the shortcodes on the Order Form by visiting our Knowledge Base page here.
Step 2: Customize your bulk order form display settings
In this step, you’ll have the option to fully customize and personalize your order form. Don’t worry, though, because this will be easy thanks to Wholesale Suite’s new form builder!
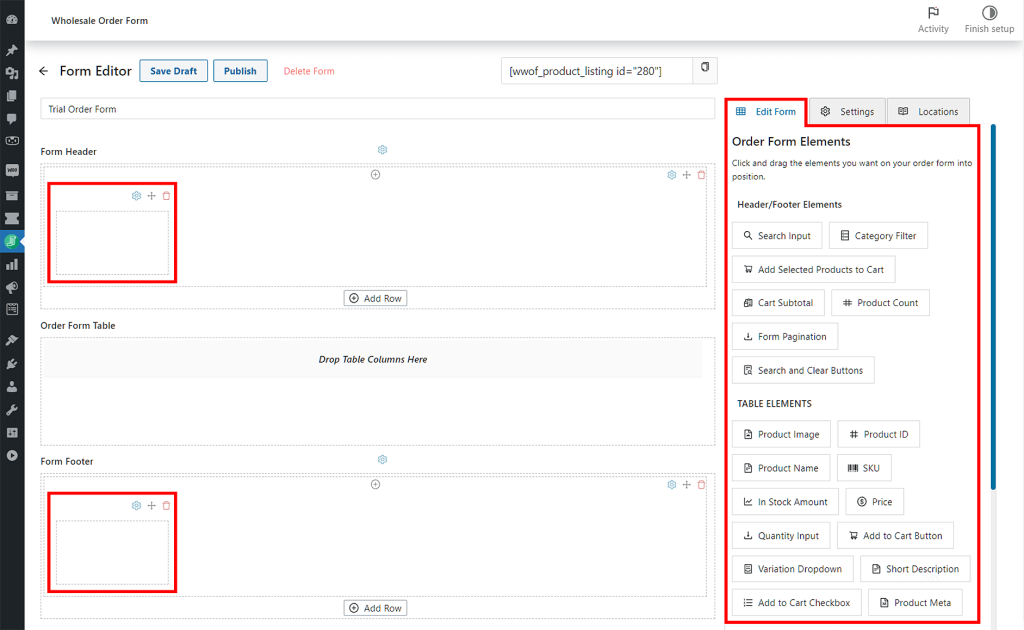
Once you’ve added a new order form, you’ll be redirected to the Form Editor page where you’ll see three main sections:
- Form Header
- Order Form Table
- Form Footer
To modify the Form Header and Form Footer, create rows in each section by clicking Add Row. Next, create columns in each row by pressing the + icon at the top of the row. Then, drag your preferred Header/Footer Elements into these columns.
Modifying the Order Form Table is simpler; simply drag Table Elements into the section to automatically create columns of elements.
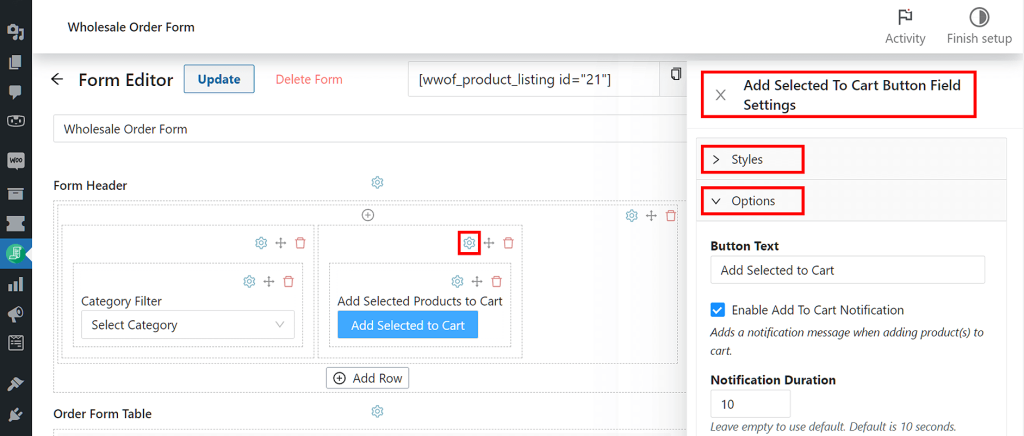
Next, if you want to personalize these elements further, click the gear icon above a column element’s name. Basically, this displays the element’s configuration and styling choices on the right side. For example, in the image below, we clicked the Add Selected Products to Cart Button’s gear icon to access its Field Settings, which consists of Styles and Options:
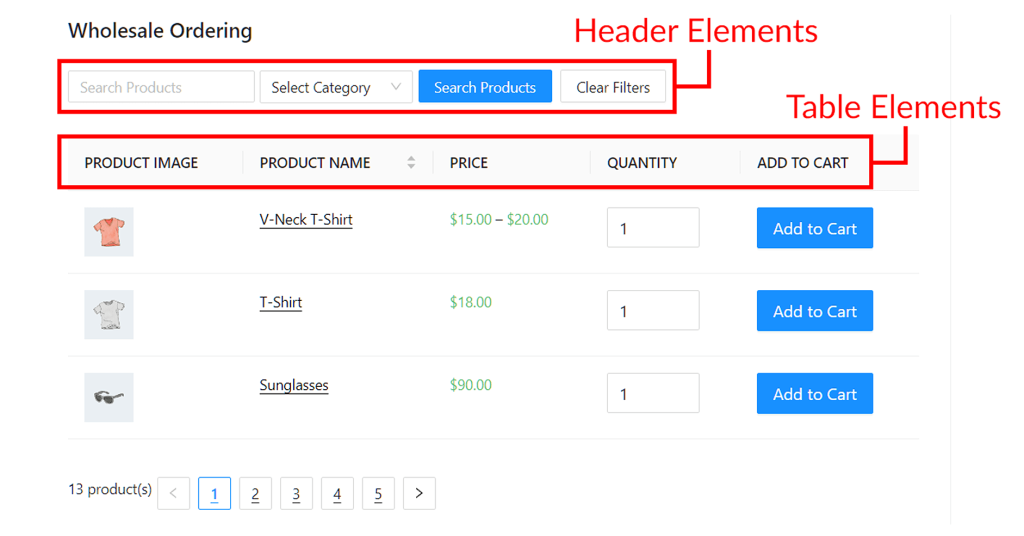
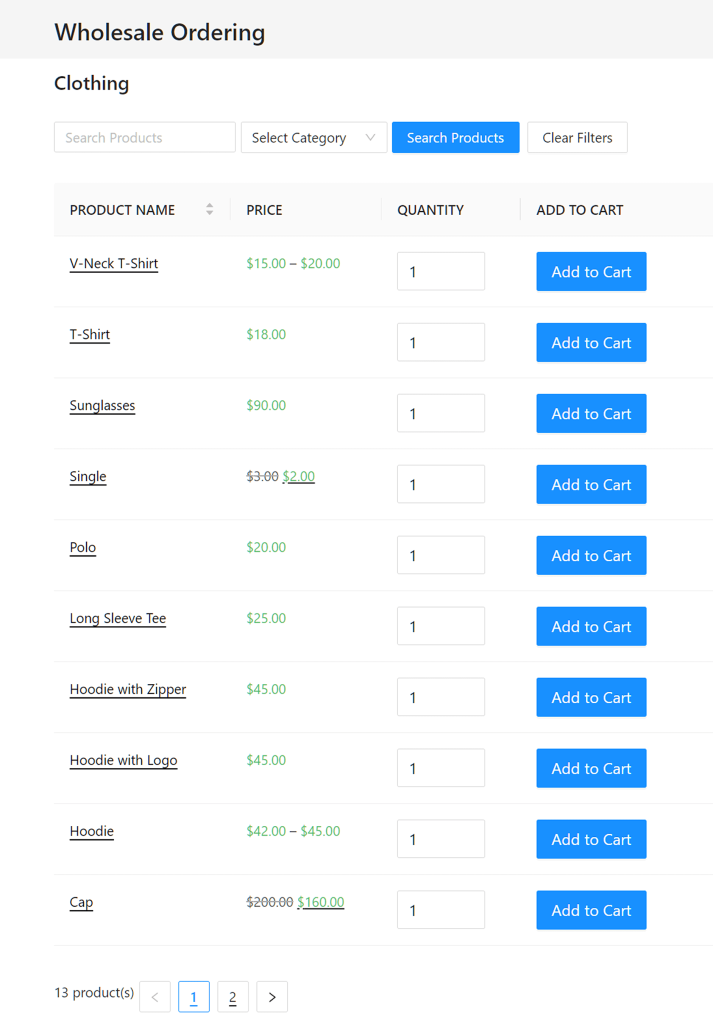
Let’s say you add the Search Input, Category Filter, and Search & Clear Buttons elements to your order form’s header. Then, you customize your table to display the Product image, Product Name, Price, Quantity Input, and Add to Cart Button.
This is what it will look like on the front end:
You’re free to experiment with these elements to see what order form arrangement or structure works best for your business. Remember: you want to create an interface that is simple and easy to use for your customers.
Step 3: Configure your order form settings
Once you’re all set with your display settings, you may want to delve deeper into your order form settings. If you click the Settings tab next to Edit Form on the same page, you’ll see several default settings available. Some of these are:
- Product Sorting
- Product Sorting By
- Lazy Loading
- Show Variations Individually
- Zero Inventory
- Include Products
- Exclude Products
The functionality of your order form will be determined by the combination of these options.
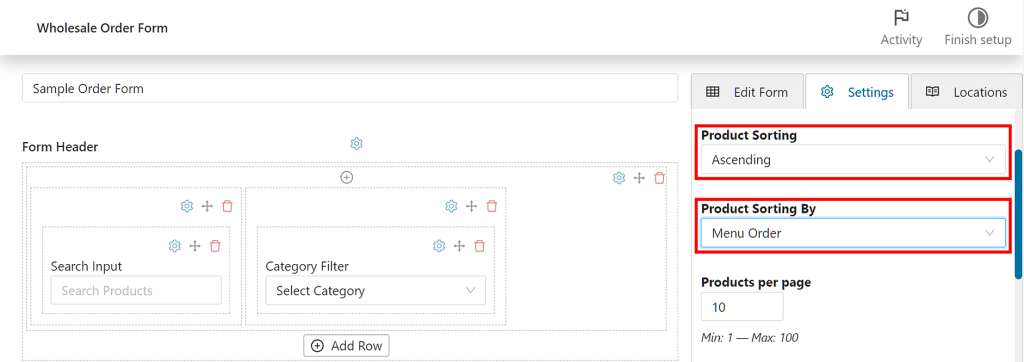
However, because we’re concentrating on bulk transactions, you might want to start by configuring your product sorting settings:
Product Sorting
Product Sorting allows you to standardize how your products will be displayed during ordering. You can arrange your products in Ascending order or from lowest to highest, or in Descending order or from highest to lowest.
You can also specify the category that your products will be sorted into. You have five options:
- WooCommerce Default: This shows your items in the order that they appear on the Products > All Products page.
- Menu Order (Custom Ordering): This is preferable if you want more customizable ordering on your order form.
- Name: Pick this to arrange your products alphabetically.
- Sort by Date: This lets you sort your products according to the date you created them.
- SKU: Select this to organize your products according to their stock-keeping unit.
Lazy Loading
You might also want to enable this feature so that users don’t have to switch pages to see additional products.
All you have to do is to tick the Lazy Loading checkbox:
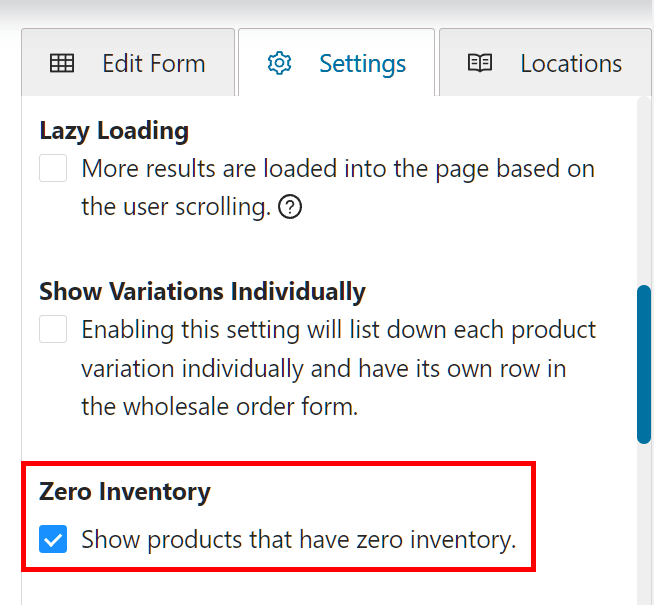
Zero Inventory
While we don’t advise enabling this feature, there may be instances where you’d want to display items that are out of stock.
To let products with no inventory be shown in the form, tick the Zero Inventory checkbox.
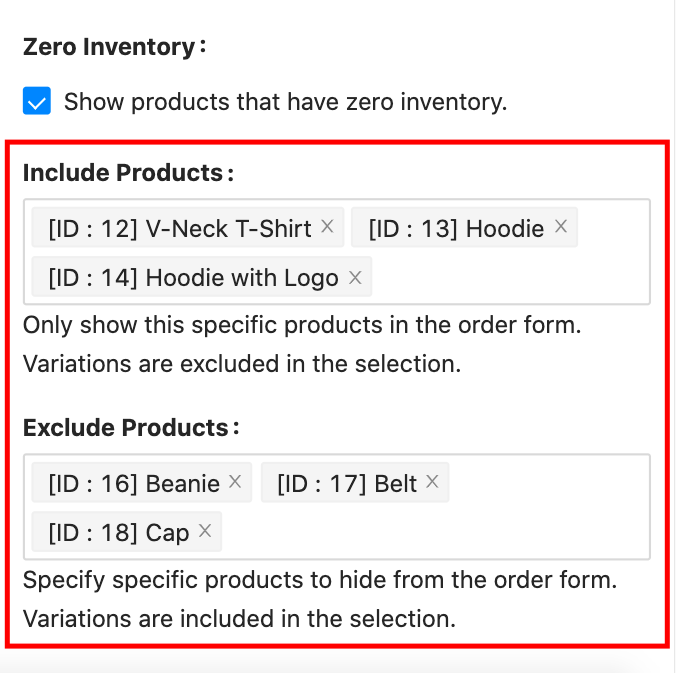
Include & Exclude Products
If you’re creating a bulk order form, you may have products that you want to either include or exclude from the order form. You may do so by setting up the Include Products or Exclude Products setting:
Step 4: Set your order form permissions
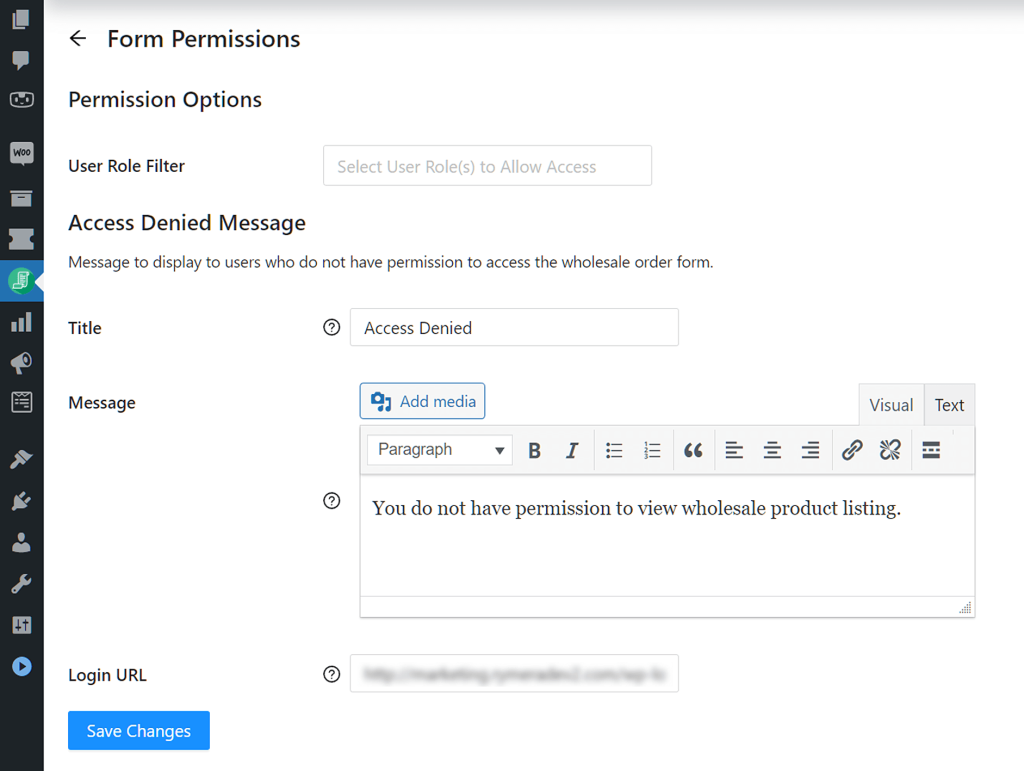
Next, click Form Permissions also under the Form Editor page’s Settings tab. On this screen, you can restrict specific users from accessing your form. In addition, you can set up your Access Denied Message:
This option will apply if your website has an area allocated to wholesale only. Your regular retail customers will see your custom message explaining that the content is restricted.
You can even redirect them to a registration form where they can upgrade to wholesale customer accounts. Our Wholesale Lead Capture Plugin can help you with that.
Step 5: Display your form and start accepting orders
Lastly, include the [wwof_product_listing] shortcode on the page where you want your form to appear.
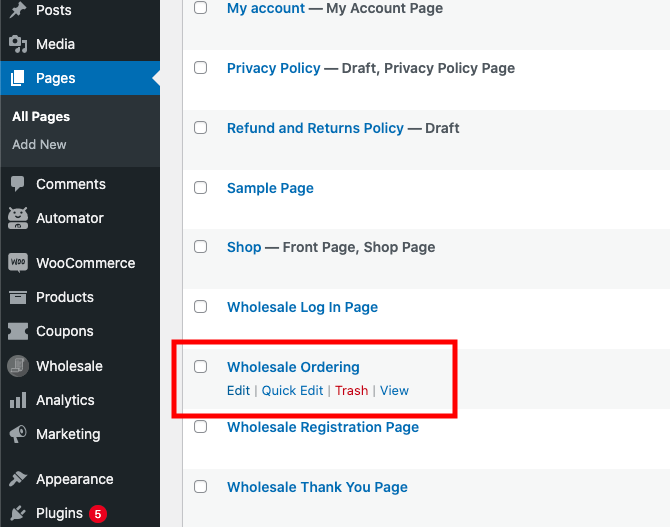
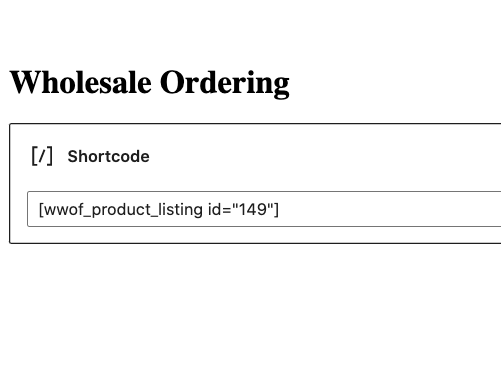
Note that the plugin will automatically create a Wholesale Ordering page and display the form there by default:
However, you can use the shortcode anywhere else on your website and disable the Wholesale Ordering page if you already have a dedicated location in mind.
Conclusion
Having to visit individual product pages works well if your customers only purchase one or two items per visit. However, if you usually sell merchandise in large quantities, you need to extend the functionality of your shop and enable bulk buying via a WooCommerce bulk order form.
In this article, we’ve shown you how to do this using WooCommerce Wholesale Order Form in five easy steps:
- Create a new order form
- Customize your bulk order form display settings
- Configure your order form settings
- Set your order form permissions
- Display your form and start accepting orders
Do you have questions about using a WooCommerce bulk order form on your website? Ask us about it in the comments section below!




We have your paid version of the bulk ordering form on https://hoolies.co.za/wholesale-ordering/
My issue is that our customers are complaining that it is too slow.
Each time they add a variation, it takes long to load to the cart.
Is there a way to speed this up?
Hey Adri, thanks for the comment! Can you get in touch with the support team, we’ll be in a better position to spot any issues there and give you proper support.