
This is a guide on how to create the best WooCommerce product images for your store so that you can sell more.
Customers receive a lot of subtext from the visual communication of your site. Your product images tell the customer a lot about the product and are an important part of the product page design.
The way you display your product images is super important because it’s the only way customers can digest what it looks like. It can change the way they think in an instant.
That’s why it’s critically important that you have top quality WooCommerce product images on your product pages, category archives and shop archive.
3 Steps To Amazing WooCommerce Product Images
There are three steps you need to take if you want to provide the absolute best product images to your customers on your WooCommerce store.
- High Image Quality In The Right Dimensions
- Showing Different View Points
- Optimizing Load Speed
By mastering these three aspects of your product images your site will be better than 90% of other stores out there, giving your customers a superior experience in your store.
1. High Image Quality In The Right Dimensions
Are your product images grainy, blurred or discolored? Are they hard to see? Is the lighting bad?
All of these things affect the initial impression of the product so it’s important that your WooCommerce product images are the correct resolution and are of high quality.
What size should product images be?
The minimum resolution you should be using for your WooCommerce product images is 800px x 800px. We recommend you aim higher than that though because the higher quality your images are the better they will be perceived.
Whether you want it to be or not, product image quality is a big reflector of the quality of the product itself in the customer’s mind.
Here are some top tips on how to improve your product image quality:
Use A Photo Light Box
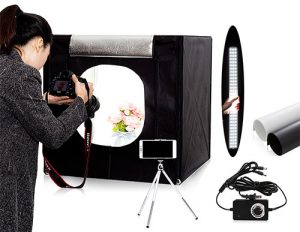
A photo lightbox is a special box that is often made of white, non-reflective material and provides a neutral and unbroken white background for your product images.
It is lit from the inside with ultra-bright white LEDs (or other comparable lights) which cancel out shadows that are cast from other light sources.
These two things combined mean that you can get a professional-looking photograph of your product without using expensive cameras or lighting setups.
If you are on a budget (and even if you aren’t), it really is the best way to get consistently good pictures of your products.
So how much does a photo booth cost?
We picked up photo lightboxes from Aliexpress, eBay or Amazon for around $70-100 USD.
Adjust The Levels Of Your Photos
If you have access to Photoshop (or Lightroom or similar program) you should be able to open up your photograph and adjust what is called the Levels of the photo.
The Levels let you tune the dark point, the light point and the mid-tones of your image which means that you can do things like adding contrast, improving the saturation, eliminating excess image data. This is done by manipulating the histogram of the image.
That might sound like Greek to you if you aren’t familiar with those terms, but if you have some basic photoshop skills, then check out the following video for a fantastic explanation by Ed from Photos In Color.
If you don’t have access to a fancy image editing suite like Photoshop you can do a similar activity in the excellent online image editor Pixlr. Watch the video anyway and you’ll get a better understanding of what you’re actually manipulating.
2. Showing Different View Points
Your product’s images can have an enormous impact on whether your customers choose to purchase or not.
That is why it is important to show different viewpoints of the product so that customers who would otherwise not be able to pick up and examine the item as they would in the store can get a holistic view (as much as possible) of what they’re buying.
It’s even more important when it comes to items that would traditionally only have been sold face to face due to needing to visually inspect it, such as clothing and shoes and goods that expire (food, flowers, etc).
How do I change the product image in WooCommerce?
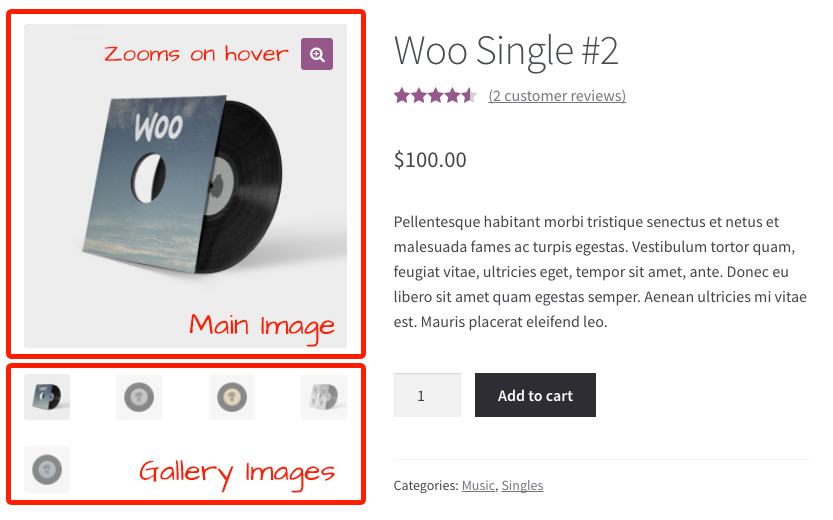
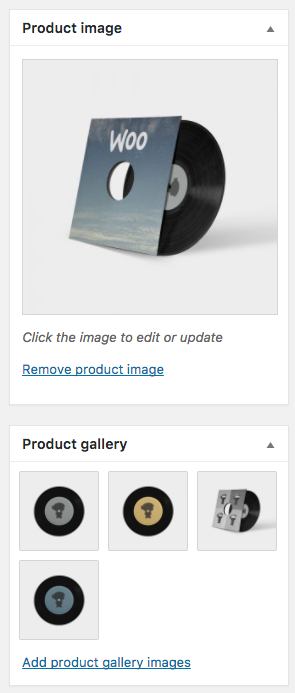
You can add additional WooCommerce product images to your products by uploading them to the product edit page.
If you manage a large catalog you can also upload a whole collection and upload them via CSV using the inbuilt product CSV importing feature of WooCommerce.
You just have to upload them to a publicly accessible URL first, a great choice is using Dropbox and grabbing the public URL of the image file for entry into your CSV.
In the later versions of WooCommerce, they have introduced native zooming on hover which is a great addition especially if you take higher definition images as that will help your customers see the finer details of the product.
You can also look into using a 360º viewer plugin which will let you upload a number of images that build up a 3D view of the product.
3. Optimizing Load Speed
The final part of having the best WooCommerce product images for your store is to focus on optimizing images so as to reduce load speed.
In this day and age, there is a multitude of different connection speeds and devices so serving images that are optimized has become more important than ever.
What is the best size for WooCommerce product images?
While you don’t want to dip below that 800px x 800px image resolution you also don’t want to go the other way and upload overly large images that will slow down people’s web browsers.
Additionally, images with low resolution or the wrong size can damage your website’s reputation. This is why it’s important to optimize website images.
File Optimization
First and foremost, the optimization of images means to reduce file size as much as possible while keeping the image quality as high as possible.
Beyond optimizing your photos in Photoshop (yes, you can save them at 80% quality and still get away with it and this will help a lot with the file size) you might need to look at using another tool to strip excess data from your final image files and compress them further.
For this, I recommend using a WordPress plugin called WP Smush.it. This free tool processes your image files, eliminating excess redundant image data (which most image files contain), resizes to the proper size and compresses the final image size before saving it to your media library again.
In my experience, some people will experience a 10-50% decrease in page load time due to the reduced file size of their images. It can be that effective.
The other thing you can look at doing is serving your media assets from a CDN (Content Delivery Network).
CDN’s are optimized for delivering static assets like images. Instead of overloading your server with requests for image files, once set up, your site will instruct the person’s browser to request the image files from the CDN’s servers instead.
These companies are set up specifically to handle millions of file requests in an extremely efficient manner. Through their powerful network, you can deliver your product images (and other images used on your site) to users extremely fast while taking the load off your own server.
There are a number of CDN services you can use:
- Cloudflare – Starting at $20/mo
- MaxCDN – Starting at $9/mo
- KeyCDN – Starting at $40/year (pay per GB)
The above services are quite easily configured with a caching plugin such as WP Super Cache.
Though the best way to reduce loading times is to eliminate images, it’s impossible to eliminate all images from your site and often undesirable to do so, especially in an e-commerce situation where having clear and useful product images is paramount.
But you should look at compressing your product images, reducing image quality where possible (enough that it reduces file size but not enough to be noticeable to the eye), and serving them appropriately from a CDN service if your traffic warrants it.
Master Your WooCommerce Product Images – Your Customers Will Thank You For It
So, it’s over to you. Are you ready to master your WooCommerce product images?
You’ll need to:
- Have high image quality in the right dimensions
- Show product images in different viewpoints
- Optimize the loading speed of your images
Creating the perfect WooCommerce product images is a big task, but once you do, your customers will thank you for the extra effort as it makes their purchasing decision much easier.




Thank you, I’m just setting up a WooCommerce website and was wondering the best quality and size. I will try Smush as well
Hi Angela, it depends on what your products are and how much detail you need to show. Shoot for at least 1000px wide as that will zoom nicely on most monitors. For more detail, you can go larger.
Hi, can you write me the appropriate image size for woocommerce store?
Its in the article Rupchand, check the heading “What size should product images be?” above :)
Hi Josh, thanks for this article. What about products that will have people wearing them. For example, T-shirts. Should I still keep the image square if someone will be standing while wearing the product? I am selling a mixture of digital and physical products. Thanks for your response.
For shirts, definitely take a look at what some of the bigger t-shirt stores like teespring (who show just the torso with the head chopped off) and threadless (who edit out the head). Most clothing stores will zoomed in on the item of interest. Hope this might give you some ideas!
Thnks for information
No problem Viko!