As wholesale customers who purchase a store’s worth of products, stockists can be an extremely profitable audience. However, it’s hard to sell your wares if the customers can’t find you. This struggle can lead to confused shoppers and slow business.
Fortunately, a little bit of organization can go a long way in this field. A stockists directory for WooCommerce can be all visitors need to make essential business decisions. By creating one of your own, you can meet the needs of stockists and vendors alike.
In this article, we’ll explore a few reasons you might want to create a business directory for WooCommerce stockists. Then we’ll show you how to build one in just five steps.
Let’s dive right in!
Why You Might Want To Create A Stockists Directory With WooCommerce
You probably don’t need us to tell you that customers are essential to running a successful wholesale business. However, advertising your products isn’t always easy. Finding new people to reach out to can be time-consuming.
That’s where a stockists directory for WooCommerce stores comes in. Directories like these can neatly organize all of a customer’s options.
Furthermore, if you’re the one running the directory, it’s a prime chance to attract more wholesale customers. Users will visit the page for the information you provide. Thus, they may be more inclined to choose your service, as it has already provided concrete value and built up trust.
In addition to these benefits, a business directory WooCommerce resource can also offer other advantages, such as:
- Providing you with income from other companies who pay to be featured
- Advertising any business partners you may work with
- Increasing any revenue generated from on-site advertising
Fortunately, this process is also easy. By committing just a little bit of time and effort, you can start becoming a leader in this field.
How To Create A Stockists Business Directory In WooCommerce (In 5 Steps)
Ready to get started? Here’s how you can build your directory in just five easy steps.
Step 1: Install and set up the Business Directory Plugin
If you’re going to make a powerful directory to support your WooCommerce site, you’ll probably want to choose the best tools. For this job, we recommend Business Directory Plugin:

We like Business Directory Plugin because it’s an all-in-one solution. There’s no need to juggle several different tools – you can get pretty much everything you need in the same place. As such, we’ll be using it for the rest of this walkthrough.
However, it’s also not your only option. There are lots of high-quality directory plugins out there, so feel free to browse them to find your best fit.
If you decide to go with Business Directory Plugin, purchase and download your copy. Then install and activate it on your site.
When you’re finished, it’s time to do some setup work. First, you’ll need to make sure you have the directory and submission pages in place. The plugin should do this automatically, but if it doesn’t, you can just add the following shortcodes to new pages:
- [businessdirectory]
- [businessdirectory-submit-listing]
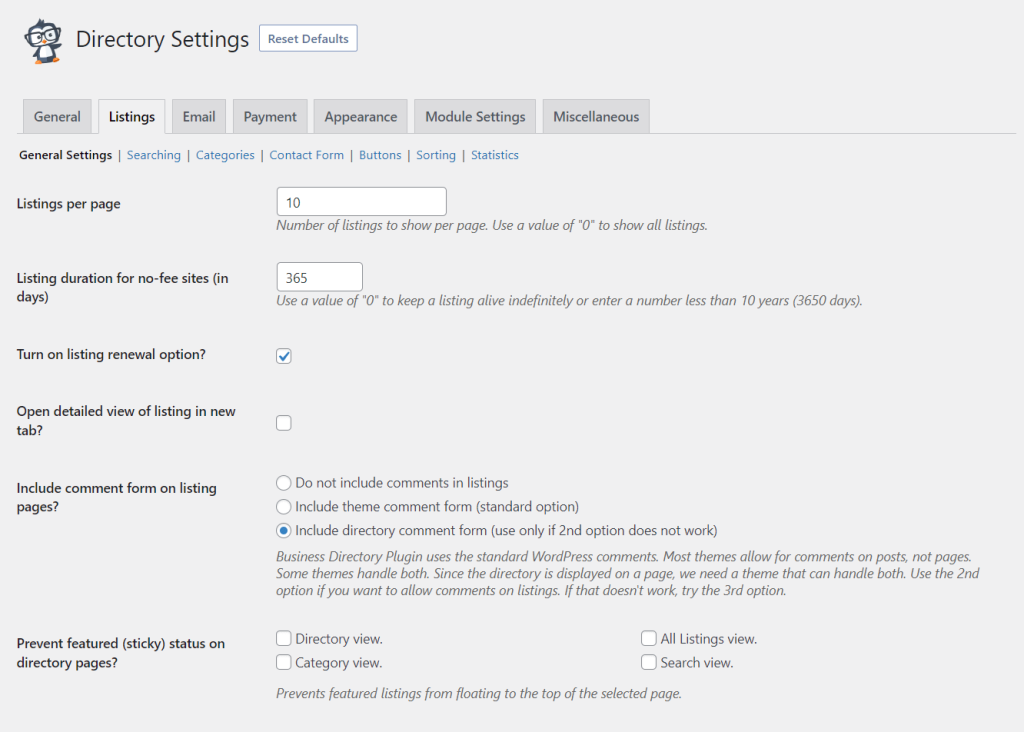
Afterwards, it’s time to adjust some settings. Just as with creating your wholesale B2B website, you can always go back and change these options later. Start by going to Directory > Settings > Listings:
There are plenty of options here, so feel free to explore them and take your time. Here are a few that you might want to start with:
- Enable commenting to increase user engagement
- Change the labels from listing to vendor
- Decide how you’d like to sort your listings
Save your work. When you’re happy with your choices, continue to the next step.
Step 2: Curate your stockist directory form fields
Business Directory Plugin comes with built-in form fields to help you get started quickly. These defaults cover the basics, such as names, images, and contact information.
However, since you’re building a business directory for WooCommerce wholesalers, you might want to cater to the needs of stockists in particular. As such, we’ll go ahead and customize a few of these fields.
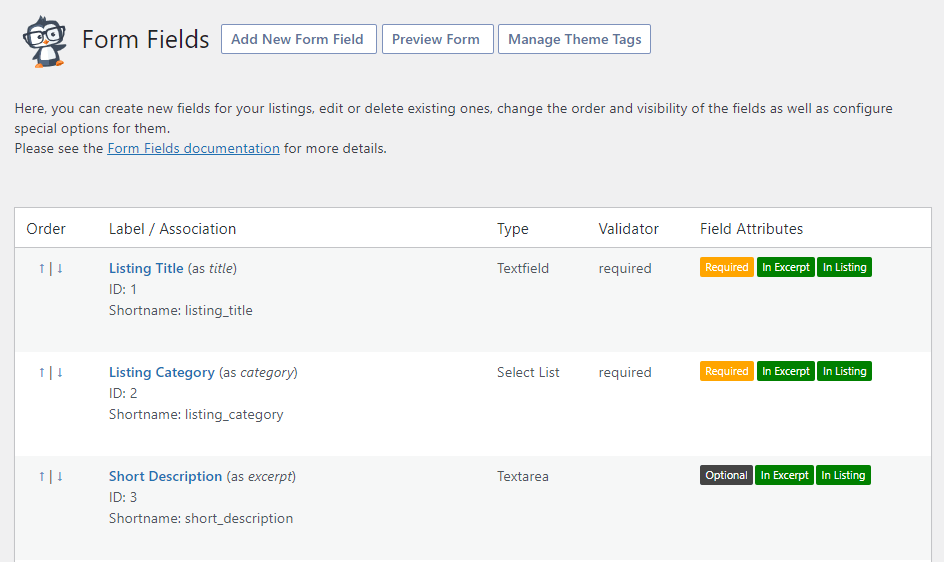
To do so, go to Directory > Form Fields:
Let’s begin with a few basics. You can use the arrows on the left-hand side of each field to rearrange them. You can also mouse over these to edit or delete any existing ones.
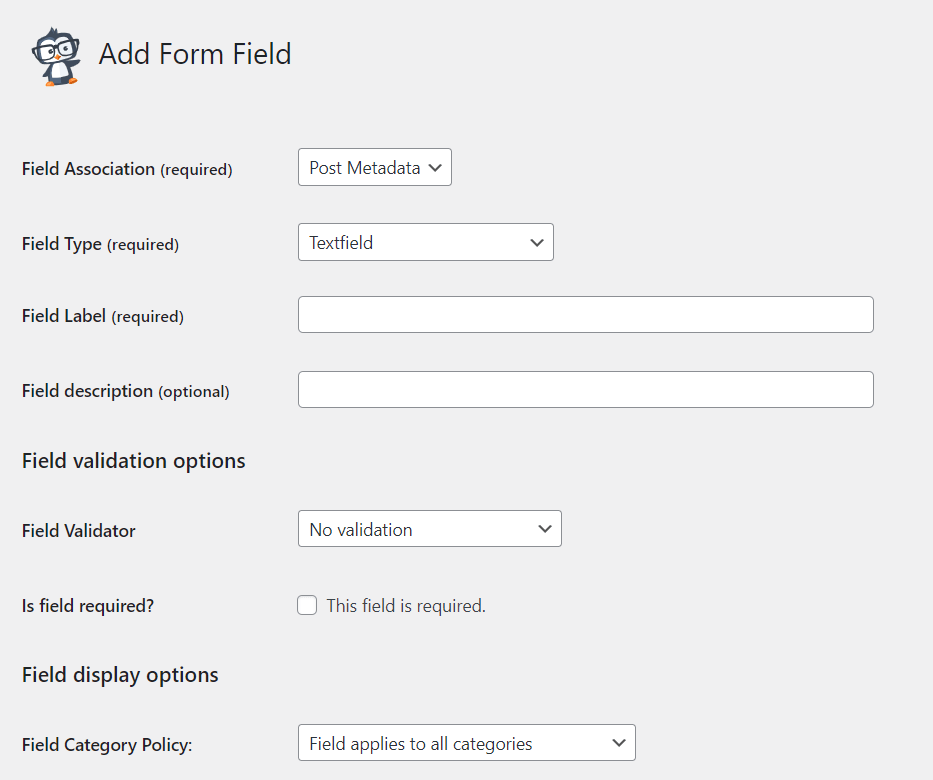
If you’d like to add custom fields, the process is fairly simple. Click Add New Form Field at the top of this page. You should then see this screen:
Now, you can add whatever you need. For example, you could include a field to display each store’s average price. This can help stockists determine if a store meets its budget.
On the other hand, you could also choose to display the minimum order quantity. That way, you can help match similarly-sized vendors and shoppers.
Whatever you include, we recommend that you keep these forms as simple as possible. This helps to cut down on friction and make the submission process simpler. It can also make it easier for visitors to digest a listing’s information.
Step 3: Add fee plans
Next, we’ll move on to adding different fee plans. This is essential if you’re looking to monetize your directory – other stores that feel like they’re in a rut will likely be willing to pay to be included.
The benefits of charging for fee plans also apply to your stockist customers. If vendors are paying for a spot on your list, those who are responsive and active in customer service are more likely to apply.
Business Directory Plugin starts you off with a default fee plan. Even if you don’t want to charge those submitting listings, you’ll need the ‘no-charge’ plan to set it up. However, you can edit the details of this one if you want.
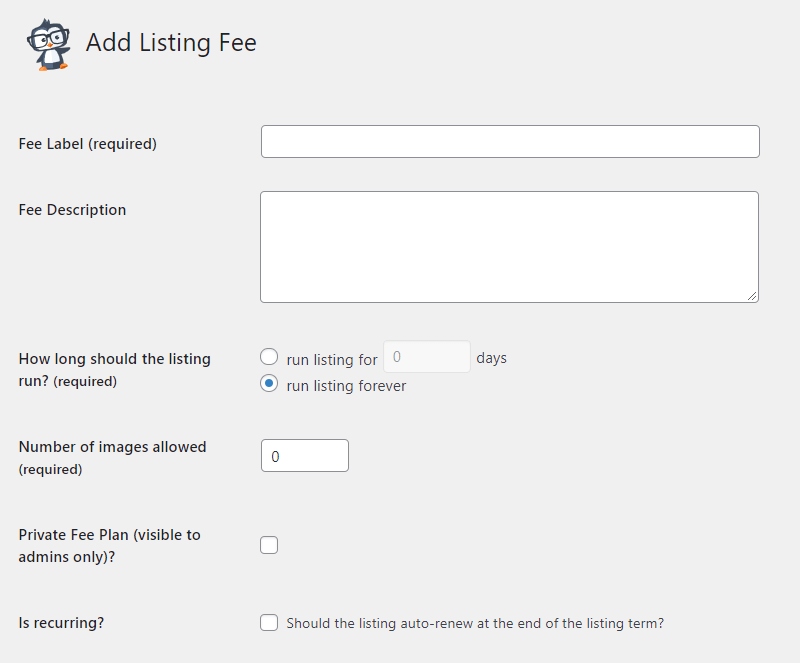
To start building a paid plan, you can go to Directory > Fee Plans > Add New Listing Fee:
Fill in the fields to build your directory fee plans. We recommend that you use different features for each plan to offer individual value. Some that you may want to consider include:
- Featured plans that display promoted listings at the top
- Recurring plans to make payment easier for stores
- Plans that allow more images than usual, so businesses can show off their stock
We also recommend that you offer cheaper or free plans for smaller WooCommerce vendors. Not only will you be appealing to stores with a limited budget, but stockists that need smaller amounts of product will likely appreciate this as well.
Repeat these steps for as many plans as you need. Then, make sure you’ve saved them all and move on.
Step 4: Add categories and search functions
Organization is key for any website. However, it can be particularly important for stockists.
That’s because wholesaler purchases tend to be large. That means they also tend to be expensive. Thus, stockists will appreciate being able to efficiently search for what they need.
As such, we’ll be adding two different features to the stockists’ directory for WooCommerce users: categories and search functions. Categories, in particular, can help appeal to different types of user groups, so we’ll start with those.
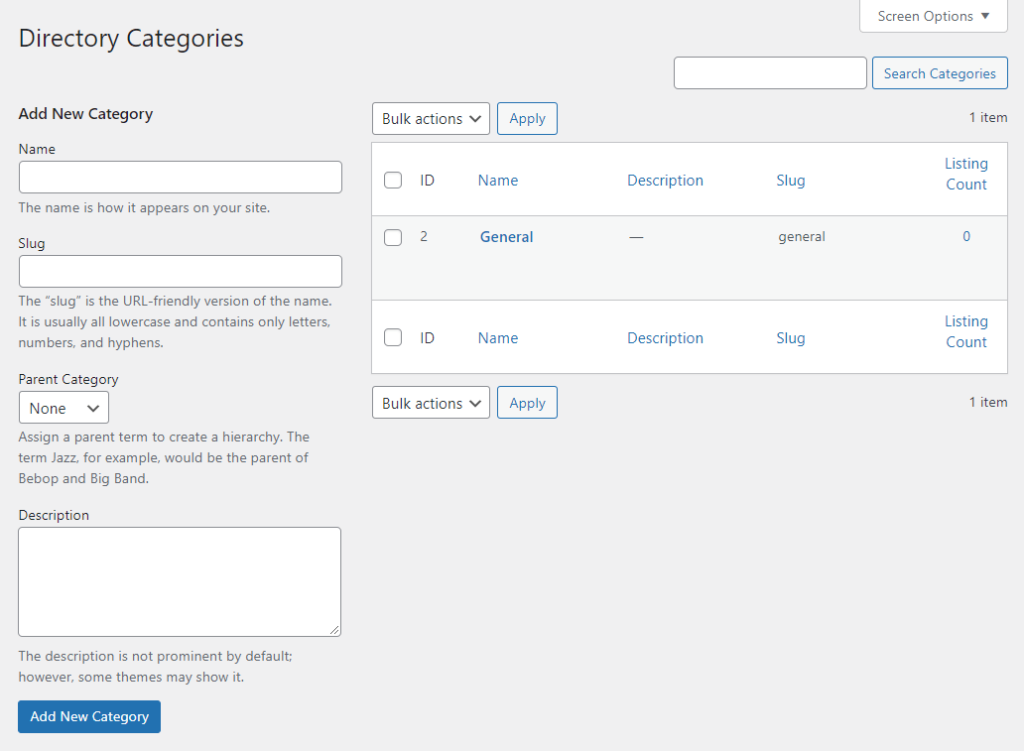
Go to Directory > Directory Categories:
Add the categories that best suit your directory. Even if you’re working within a niche, these can be crucial for helping users move around your site. If you’re not sure which ones you need, feel free to include an Other option and add new ones later.
We also recommend that you make good use of the child categories. This can cut down on walls of text that might otherwise intimidate visitors.
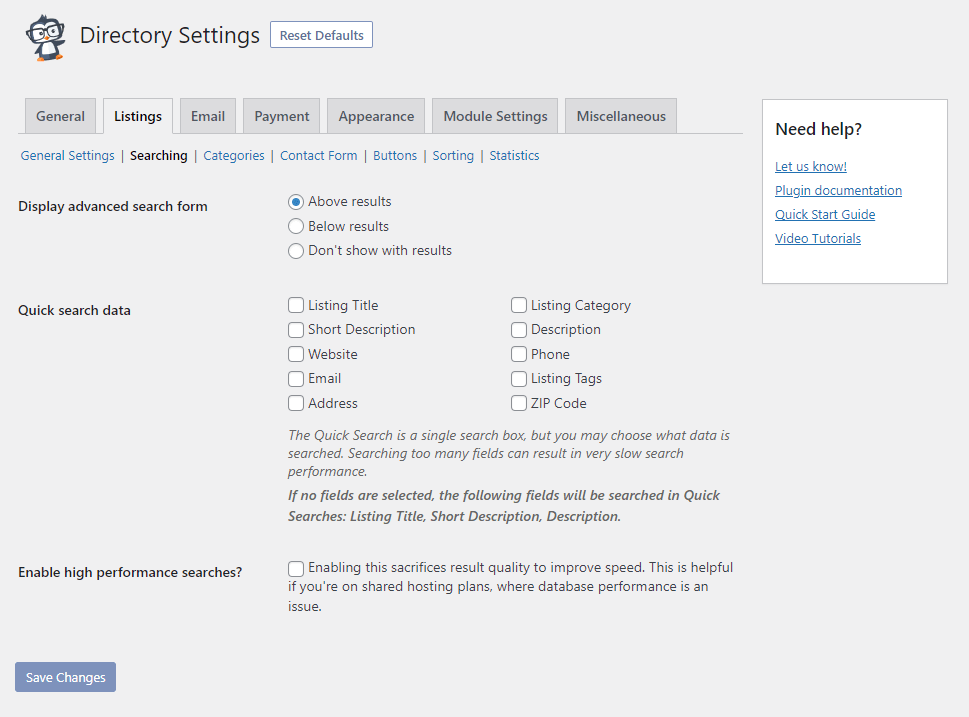
Next, let’s take a look at the search-related settings. There’s a default search feature, but you can customize it to fit the needs of your stockists. You can get started with the process by going to Directory > Settings > Listings > Searching:
There are a lot of possibilities on this page. However, we recommend that you only choose the search fields that are most relevant to stockists. That way, the page will load more quickly.
This page will set up the basic quick search for your users. However, if the quick search comes up empty, never fear! Users will be automatically redirected to an advanced search module by default.
If you want to disable that feature, simply find Display advanced search form near the top. Then you can select the option you need.
Step 5: Add advanced features
By now, you should have a fully-functioning stockists directory for WooCommerce users. However, if you want to put your site above the crowd, you might also want to use Business Directory Plugin’s modules to add more features.
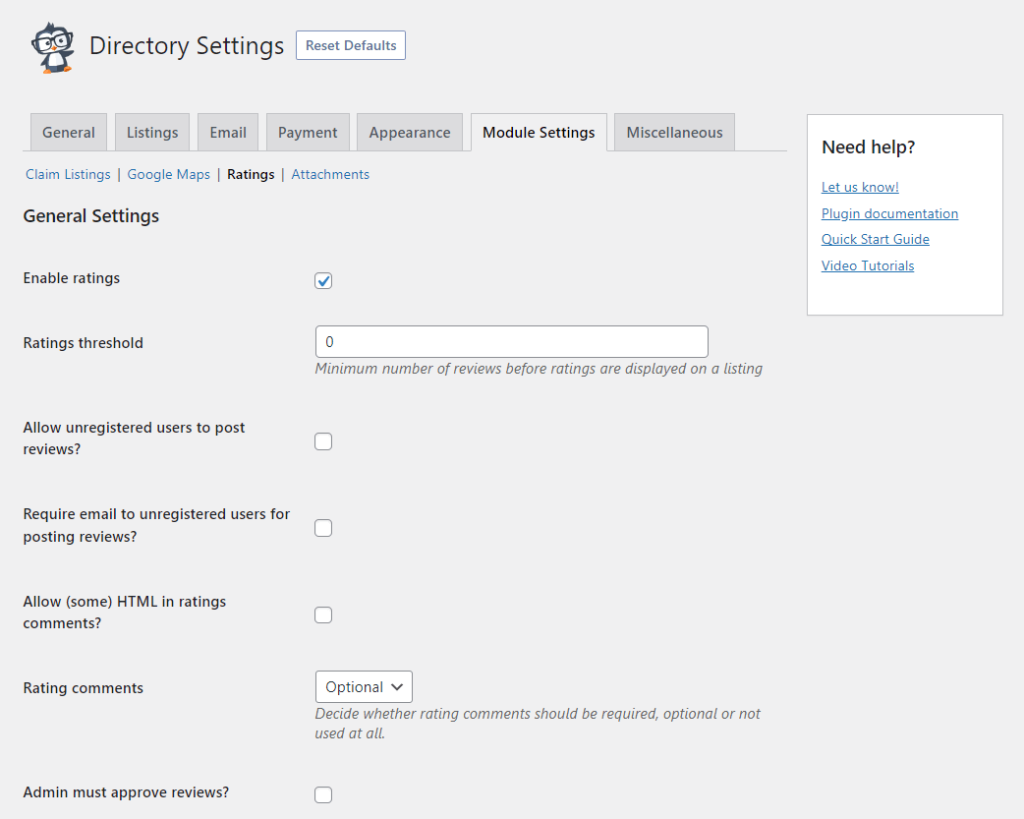
For example, we highly recommend adding ratings and reviews to listings. This can help stockists understand what experiences their fellow shoppers have had with certain vendors. As a bonus, it also shows up in Google searches for quicker results.
Once you’ve installed the module under Directory > Modules, you can access the settings with Directory > Settings > Module Settings > Ratings:
Fill in the settings as necessary. We recommend that you add a threshold for how many reviews must be collected before they’re published. That way, a single bad review can’t ruin a listing’s chances of success.
You might also want to use the Google Maps module. There are a few benefits to this, including:
- Showing the physical location for any stockists who prefer to pick up products
- Providing a snapshot of how expensive shipping costs might be
- Help visitors find vendors even in rural areas
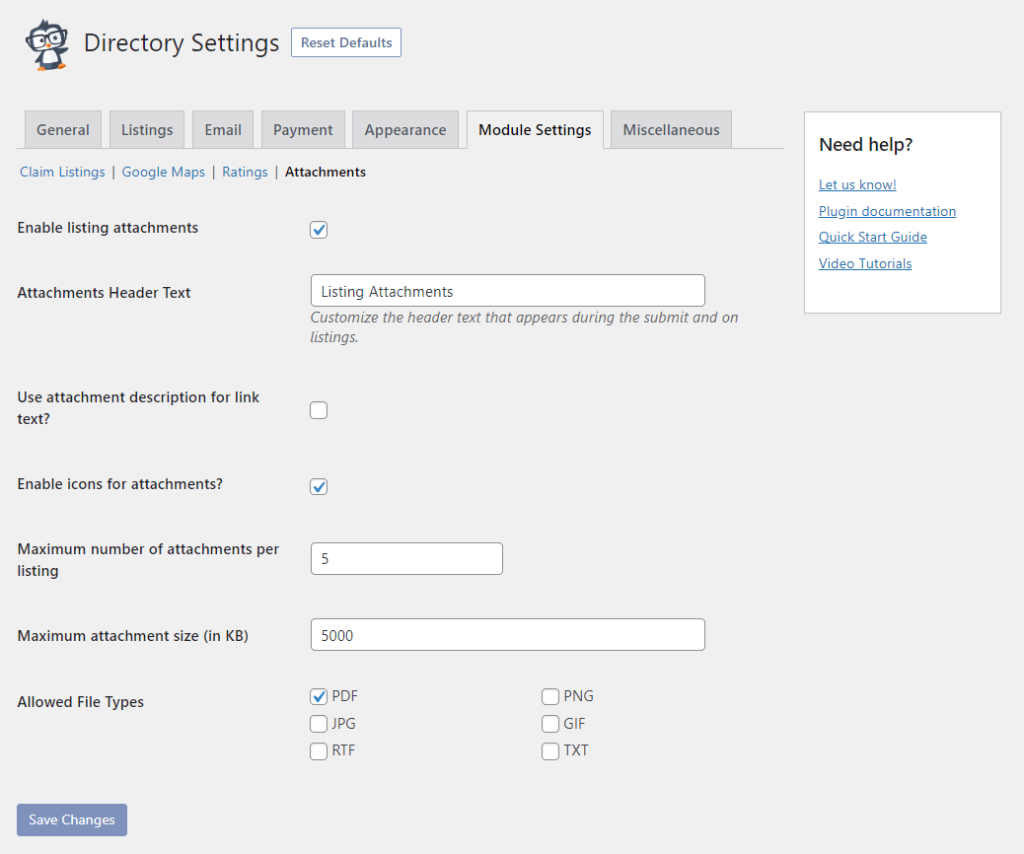
Finally, you might want to consider adding the Attachments module as well. Stockists might want to preview a vendor’s full product catalog before inquiring. This enables vendors to upload that catalog, so you don’t have to send users away from your site.
You can also control the format of that catalog. Simply go to Directory Settings > Module Settings > Attachments:
Choose the file types you want to allow. Consider also limiting the file upload size. That way your website won’t get too bogged down with data. Remember to save your work when you’re done.
Conclusion
A stockists directory for WooCommerce users represents a lot of potential. Whether you want to boost marketing efforts or your income, these connections might do the trick. Fortunately, setting one up can be easy with a powerful tool like Business Directory Plugin.
In this article, we covered how to create your business directory for wholesale WooCommerce users:
- Install and set up Business Directory Plugin
- Curate your form fields to suit stockists
- Add fee plans to your directory
- Organize your site with categories and search functionality
- Add advanced features to improve the user experience
Do you have any questions about starting your own wholesale-centric directory? Let us know in the comments section below!

