There’s a lot of work that goes into running an online store. However, knowing how to properly organize and configure the available settings to manage your customers and offerings better can make it significantly easier. One way to do this is by creating WooCommerce user groups.
In case you’re unfamiliar, the e-commerce platform lets you group users together based on certain attributes. That way, you can apply certain rules, restrictions, and specifications based on similarities. For example, if you want to give first-time customers a discount but not returning shoppers, user groups could help you do so with ease.
In this post, we’ll briefly discuss why you might want to have multiple WooCommerce user groups. Then we’ll explain how user groups work and how many you can have before showing you how to create them step by step. Let’s get started!
Why You Might Want To Have Multiple User Groups
Being such a powerful and robust plugin, WooCommerce comes with a lot of built-in functionality for running your online store. However, some features may not be immediately obvious. For example, you may not even realize that you can group your users.
There are a handful of reasons you might want to do this. First, it makes for a well-organized store. It also makes marketing and promotion easier. By creating user groups, you’re able to narrow down your audience according to specific properties and features.
As a result, you can target each group more successfully. For example, a primary reason to have multiple user groups is for pricing purposes. Let’s say you want to offer your wholesale customers a discount for buying in bulk. Having user groups can help you do that so you can differentiate them from your retail customers.
This type of focused-based approach can also enhance the customer experience. By creating different roles and groups, you can provide each category with more specific and relative offerings.
How many users can WooCommerce handle?
Before you get started with creating WooCommerce user groups, you might be wondering how many users the plugin actually lets you have. The short answer is that you can have an unlimited amount.
However, it’s important to note that you should have good hosting for larger amounts of users. Otherwise, your performance might suffer, which can hamper the User Experience (UX) and, in turn, your sales.
How To Create WooCommerce User Groups (Step by Step)
Now that you understand a little bit more about why you would want to create WooCommerce user groups, it’s time to learn how you can do so. By default, WooCommerce lets you create two roles: store owner and customer. Once your customers register with your shop, they’ll automatically be assigned the role of a customer.
Once you have your customers, you can further segment them into groups. However, in order to do so, you’ll need to use a plugin. Some popular options include Groups for WooCommerce, Groups, and our Wholesale Suite plugin. Let’s take a look at how to do this using the latter.
Step 1: Download and install Wholesale Prices Premium
The easiest way to organize WooCommerce wholesale user groups is to use our premium plugin. With WooCommerce Wholesale Prices, you can create wholesale customer roles, apply wholesale discounts, hide prices from retail shoppers, and more.
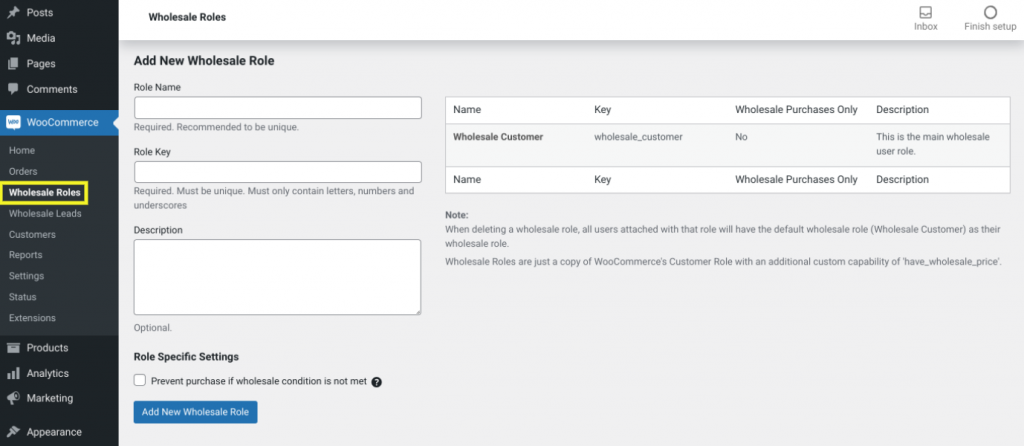
Once you purchase and download the tool, you can install and activate it on your site by navigating to Plugins > Add New > Upload Plugin. After you activate it, the plugin will automatically create a Wholesale Customer role.
You can find it by browsing to WooCommerce > Wholesale Roles:
To modify the role, you can hover over the name, then select the Edit link underneath it.
Step 2: Add more user roles
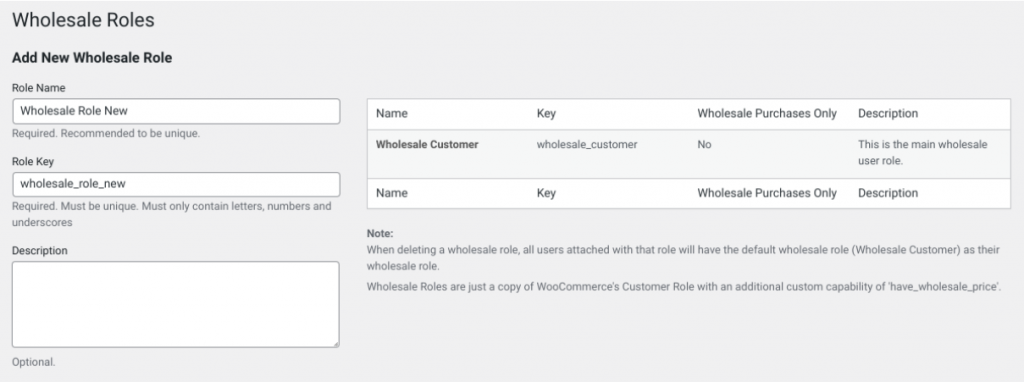
Perhaps you only want retail and wholesale customer roles. If so, you can move onto the next step. However, if you want to add more, you can also do so by filling out the Role Name, Role Key, and Description fields to the left of the screen.
While the description is optional, the Role Name and Role Key fields are required. It’s also important to make them specific and unique. Let’s say you want to create different WooCommerce user groups based on your customers’ membership tiers. You could add a separate role for “Starter”, “Business”, “Pro”, and so on:
When you’re done, you can select the option for Role Specific Settings. If enabled, you will be able to prevent certain purchases based on the customer role. For example, if a certain wholesale condition is not met, such as a minimum total amount, the user won’t be able to select the product or complete the purchase.
Finally, you can click on the Add New Whole Role button at the bottom. Repeat this process for as many customer roles as you would like to add.
Step 3: Assign your users to wholesale customer roles
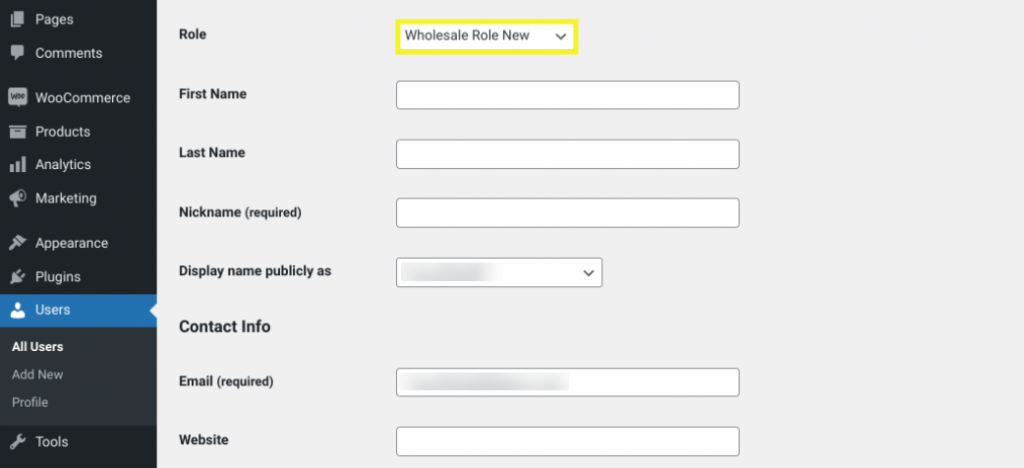
The next step is to assign your buyers to wholesale customer roles. To do so, you can navigate to Users > All Users from your WordPress dashboard. Select the user you want to modify, then click on the Edit link:
On this screen, select the Role drop-down menu and select the role you want to apply for that user. Remember to select Update User Role when you’re done.
Step 4: Create user group discounts and coupons
Once you have your new roles set up, you can begin offering certain pricing promotions and discounts based on the group they belong to. The easiest way to do so is to combine our plugin with the Advanced Coupons plugin. For a step-by-step tutorial, we recommend following the guide on how to create WooCommerce user group discounts.
Conclusion
Running an e-commerce store can be chaotic and challenging. However, managing it becomes a lot easier when you have the right organizational strategies in place. This is why we recommend creating WooCommerce user groups.
Fortunately, creating distinct WooCommerce user groups is a breeze by using Wholesale Prices Premium. In this guide, we’ve uncovered four easy steps to help you do just that:
- Download and install Wholesale Prices Premium
- Create more user roles
- Assign your users to wholesale customer roles
- Set user group discounts and coupons
Grouping customers together based on certain features, properties and attributes can make it easier to apply certain rules and restrictions. Moreover, by using Wholesale Suite and the Advanced Coupons plugin, you can easily create pricing tiers and coupons for different user groups.
Do you have any questions about creating user groups in WooCommerce? Let us know in the comments section below!

