If you’re serious about growing your wholesale business, setting up a WooCommerce trade account could be the perfect next step. A WooCommerce trade account makes it easier for you to manage wholesale customers, streamline large orders, and offer flexible payment options — all while keeping control over your sales process.
WooCommerce, one of the most trusted e-commerce platforms today, gives you the foundation you need. With the help of Wholesale Suite, you can extend WooCommerce’s capabilities to create a full-featured WooCommerce trade account system that fits your business perfectly.
In this article, we’ll walk you through what a wholesale trade account is, why it matters, and how you can set up your own WooCommerce trade account quickly and easily using WooCommerce and Wholesale Suite.
Let’s begin!
An Introduction To Wholesale Trade Accounts
If you’re already operating in the wholesale world, you know that selling to retailers comes with its own set of challenges. Unlike selling directly to consumers, wholesale customers typically require stock on hand before they begin generating revenue.
This is where a WooCommerce trade account becomes essential. A trade account enables your retail customers to place orders now and pay for them later, providing them with the flexibility to stock up without immediate financial pressure.
When retailers use a WooCommerce trade account, they can charge orders to their account and settle payments at a later date. As the wholesaler, you have the opportunity to charge interest on outstanding balances, helping you earn a little extra while giving your customers valuable breathing room.
It’s a win-win: you maintain steady cash flow (even with deferred payments), and your customers can grow their businesses without being limited by upfront costs. Many retailers continue to use their WooCommerce trade account long after launch because it simplifies their ordering process and helps them manage their cash flow efficiently.
Why You Might Want To Set Up Your Trade Accounts With WooCommerce
While there are certainly advantages to offering trade accounts to your wholesale customers, managing those accounts is another story. There are a lot of moving pieces at play here, including:
- Trade account applications: When offering a WooCommerce trade account, it is crucial to screen applicants thoroughly. You’re essentially extending credit, so you’ll want to assess the reliability of your wholesale customers before approving their accounts.
- Collecting payments: A WooCommerce trade account system must accurately track outstanding balances and due dates. Since payments are deferred, having a reliable system helps you avoid missed or overdue invoices.
- Accepting and fulfilling orders: Like all wholesale orders, those charged to trade accounts will be bulk purchases. Fulfilling these orders accurately and in a timely manner is key.
Rather than juggling all these tasks manually, the best approach is to automate and organize your trade account system directly within WooCommerce.
By combining WooCommerce with Wholesale Suite, you can easily create and manage a WooCommerce trade account system right from your WordPress dashboard. Our plugins extend WooCommerce’s native functionality, helping you streamline administrative tasks, stay on top of customer accounts, and deliver a smoother wholesale buying experience.
How To Make A WooCommerce Trade Account (In 6 Steps)
If you’re ready to create your own WooCommerce trade account system, you’ll first need to purchase, install, and activate our Wholesale Suite plugins. We will assume you have already done so before proceeding with the steps below.
Step 1: Define the terms of your trade accounts
First, it is essential to determine the terms for using your trade accounts. Making up the rules as you go along will only lead to confusion – it’s better to be prepared.
A few questions to ask yourself at this stage include:
- What will be the requirements for opening a trade account?
- Will you charge interest on trade credit, and if so, what rate will be applied?
- What will your payment schedule look like?
- What payment methods will you offer?
- Will there be a limit on the amount customers can charge to their trade accounts, and if so, what is that limit?
Make sure to put the answers to these questions, as well as any other rules, in writing and include them in your Terms & Conditions. Every wholesale customer who opens a trade account should be aware of these requirements before signing up, ensuring clear expectations from the outset.
Step 2: Create a trade account user role
With your rules clearly defined, you can focus on creating your WooCommerce trade account system. The best place to start is by creating a new wholesale customer role.
Your trade accounts will likely require different settings than your standard wholesale customer accounts. Fortunately, it’s easy to set up this with Wholesale Suite.
Navigate to WordPress Dashboard > Wholesale > Roles. Here you can create a new user role for your trade account holders:
You will use this role to implement various settings for your trade accounts in the steps to follow.
Step 3: Set your trade account prices
Next, you’ll need to set your wholesale prices for your trade account holders. How you want to go about this is up to you. Some options include:
- Providing the same discount you give your other wholesale customers
- Increasing your discount to incentivize buyers to sign up for trade accounts
- Decreasing your discount as an alternative to charging interest
Regardless of which route you choose to take, you can set your trade account prices by going to Wholesale > Settings > Wholesale Prices > Discount.
Under General Discount Options, select your trade account user role from the dropdown and enter your percentage discount. Then click on Add Mapping:
You can also specify pricing on a per-product, per-category, or per-user basis, depending on your needs.
Step 4: Configure your trade account payment options
Then you’ll need to enable the payment methods you want your trade account holders to use. If you’ve set your pricing in a way that doesn’t require charging interest, this is straightforward.
For those who do wish to charge interest, we recommend installing WooCommerce Invoice Solution. This will enable you to seamlessly take orders on your WooCommerce site, then generate an invoice in your preferred accounting software (such as Quickbooks or Xero) that lists when payment is due and how much interest the customer owes.
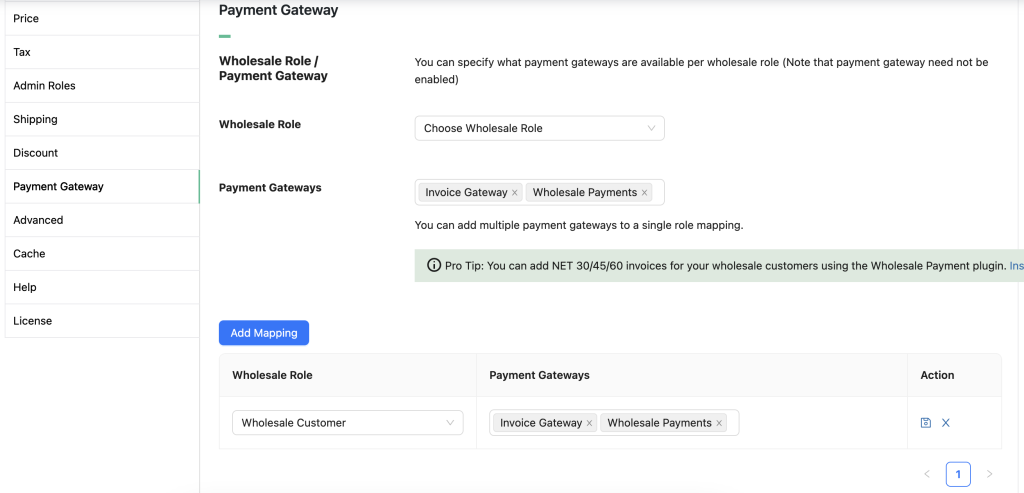
To set your WooCommerce trade account payment methods, go to Wholesale > Settings > Wholesale Prices > Payment Gateway:
Under Wholesale Role/Payment Gateway, select your trade account role from the dropdown, then list the available payment methods in the field below. Click on Add Mapping to save your changes.
Step 5: Enable wholesale customers to apply for trade accounts
At this point, you have all the makings of a basic WooCommerce trade account system. You can now start accepting applications and enable wholesale customers to create their trade accounts.
To get a jump start on this process, you can use our WooCommerce Wholesale Lead Capture plugin, which comes bundled with Wholesale Suite. It generates forms for your site to help you create registration and trade login pages.
You’ll find all the settings you need to create your new trade account registration and login pages in Wholesale > Settings > Wholesale Lead Capture > General > Lead Actions:
In the General tab, make sure to scroll down to Lead Actions and set the New Lead Role dropdown to your trade account role. Select Manual Approval Required here as well, so you can screen applicants before granting them access to their trade accounts.
You can view the default information included in your registration form by clicking on Wholesale Lead Capture > Registration Form. You can also create additional fields and then add them to your mapping:
This feature is handy for requiring details such as bank information, references, and tax information. You can use this information to determine whether the applicant is a ‘safe’ risk.
Step 6: Process trade account orders with wholesale order forms
As you begin approving applicants, your WooCommerce trade account orders will start to arrive. One of the simplest ways to manage them is with order forms.
This makes it easier for your trade account holders to place bulk orders and streamlines the process, too. You can set up an order form in just a few minutes with our WooCommerce Wholesale Order Form plugin.
Just navigate to Wholesale > Order Forms to customize your form:
You can edit the pre-made order form or create a custom one. Once you’re done, don’t forget to save your changes.
Other Articles You May Read
Frequently Asked Questions
Is WooCommerce free for sellers?
Yes, WooCommerce is free for sellers to use. It’s a free plugin you can install on any WordPress site. You can start selling products without incurring any upfront costs. However, you might need to pay for additional features, such as premium themes, payment gateways, or plugins like Wholesale Suite — especially if you’re running a wholesale business and want to set up a WooCommerce trade account system.
How do I buy WooCommerce without an account?
You don’t need to “buy” WooCommerce; it’s a free plugin. But if you’re purchasing premium extensions from the WooCommerce Marketplace, you’ll need to create a WooCommerce.com account to complete the transaction. Technically, you cannot buy premium WooCommerce features without an account.
How to create a customer account in WooCommerce?
Customers can create an account on your WooCommerce store through the registration page. To do this, just enable “Allow customers to create an account on the My Account page” in your WooCommerce settings. Suppose you’re running a wholesale store and want to screen applicants before giving access to special pricing or a WooCommerce trade account. In that case, we highly recommend using the Wholesale Lead Capture plugin. It allows you to create a custom registration form, collect detailed business information, and manually or automatically approve wholesale users before they can start ordering.
Conclusion
Once you set up a WooCommerce trade account system with Wholesale Suite, you can easily manage delayed payments for your customers. This will enable retailers who might otherwise lack the capital to source their products from you to do so with ease.
In this post, we shared six basic steps for creating WooCommerce trade accounts for your wholesale site:
- Define the terms of your trade accounts
- Create a trade account user role
- Set your trade account prices
- Configure your trade account payment options
- Enable wholesale customers to apply for trade accounts
- Process trade account orders with wholesale order forms
Do you have any questions about WooCommerce trade accounts? Ask away in the comments section below!


lovely plugin. :)
This is the first time I am coming across Trade Account plugin and I must say this plugin has great features and potential.
Well, I aren’t in the wholesale business but I am now considering it now.
Wow!
Thanks for the comment Lui :)
This info really helps. Thanks.
Glad you found it helpful KariLorr :)
So far so good!
Helpful post
love plugin
woww
Thanks for leaving a comment Putra :)
Interesting stuff!
Thanks Nina :)
Insightful
Appreciate you stopping by Theophilus!
This is a very informative website.
Thanks Karen :)
Very detailed information. Thanks.
Appreciate the kind comment Anthony!
Thanks for the information.
Thanks for stopping by Jakaria
Thanks for info!
Thanks Shellie :)
Very well written and informative… great to see Aussies doing great work like this! Time to try this out!
Cheers Alex! Glad you liked the article, welcome aboard :)