In the grand scheme of things, header and footer elements may seem of negligible importance to your wholesale business.
However, these elements play a crucial role in enhancing the functionality and user experience of your wholesale order form. For one thing, they allow you to display crucial information at the top and bottom sections of your form. For another, they let customers control how they view your product catalog. Both of these benefits can enhance customer convenience, which, in turn, can lead to improved sales, a higher conversion rate, and greater overall revenue.
Thankfully, with the Wholesale Order Form plugin, you can easily incorporate a variety of useful elements into your form.
In this article, we’ll explore the seven header and footer elements that Wholesale Order Form comes with. In addition, we’ll guide you through the process of adding these elements to your order form. So let’s dive in!
7 Header And Footer Elements You Can Add To Your Wholesale Order Form
Wholesale Order Form gives you access to seven header and footer elements. Here they are in no particular order:
1. Search Input
Search Input is among the most important header and footer elements you can put on your order form. After all, it gives customers the ability to look for specific products they want.
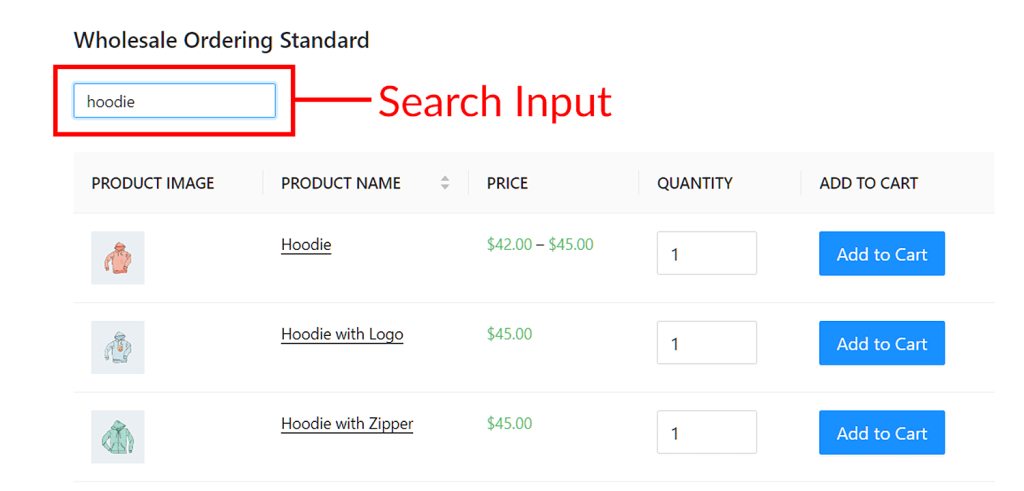
This option creates a search bar on the front end. This is an entry field that customers can fill with keywords or keyphrases as they’re looking for items.
For example, let’s say you’re running a clothing store, and a customer wishes to buy hoodies. To search for hoodies, they type the word “hoodie” in the entry field, then press the “Enter” key on their keyboard. This instructs the order form to modify your product list so that it only displays items whose product name contains the word “hoodie.” As a result, the shopper enjoys a more convenient hoodie-hunting experience:
Take note that Search Input is highly sensitive to keywords and keyphrases. In other words, it only displays products whose product name includes the exact keyword or keyphrase the customer types into the search bar.
For this reason, it’s best to use Search Input in combination with another search function known as Category Filter. Speaking of…
2. Category Filter
Like Search Input, Category Filter makes it easier for customers to search for desired products.
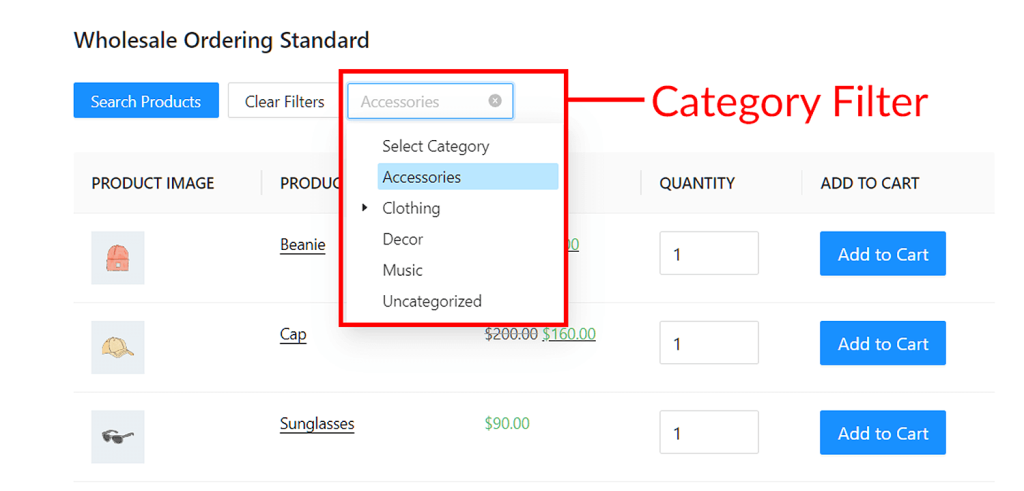
This option creates a dropdown menu on the front end. When clicked, the menu reveals all the product categories available in your store.
Suppose a customer is looking for accessories in your clothing store. First, they have to click the dropdown menu and select “Accessories.” Then, to display a list of products under the “Accessories” category, they have to press the Search button.
What’s the Search button? Why, it’s the next element on this list!
3. Search and Clear Buttons
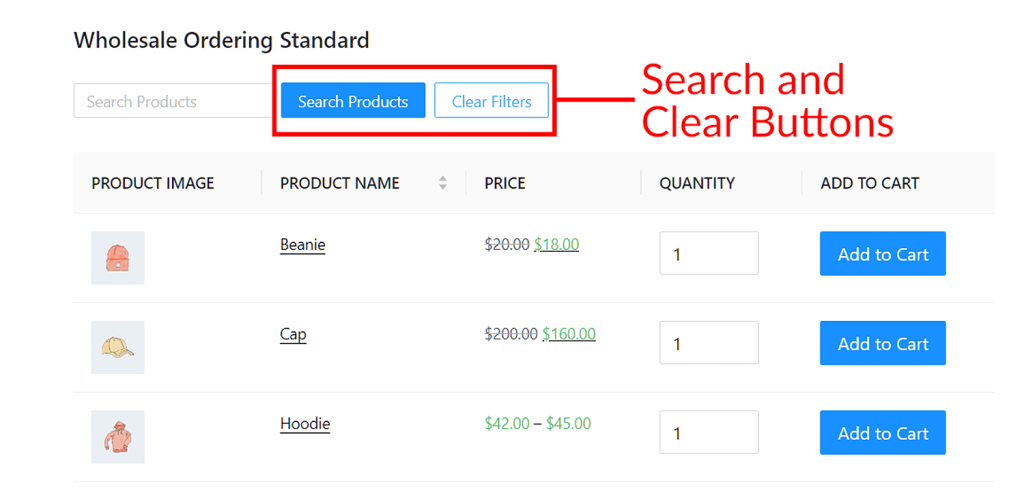
This option creates two buttons on the front end: Search and Clear Filters.
Search works like the “Enter” key on a keyboard. We mentioned earlier that, upon entering a term in the search bar, a customer has to press their keyboard’s “Enter” key to instruct the order form to give them a list of desired products. However, they can click the Search button instead to achieve the same effect.
As for the Clear Filters button, it undoes the Search Input or Category Filter action to restore the order form’s product list to its default state. For example, if a customer enters the keyword “beanie” into the search bar, the product list removes all items but the beanie. Pressing Clear Filters simply tells the order form to display your entire product list again.
4. Product Count
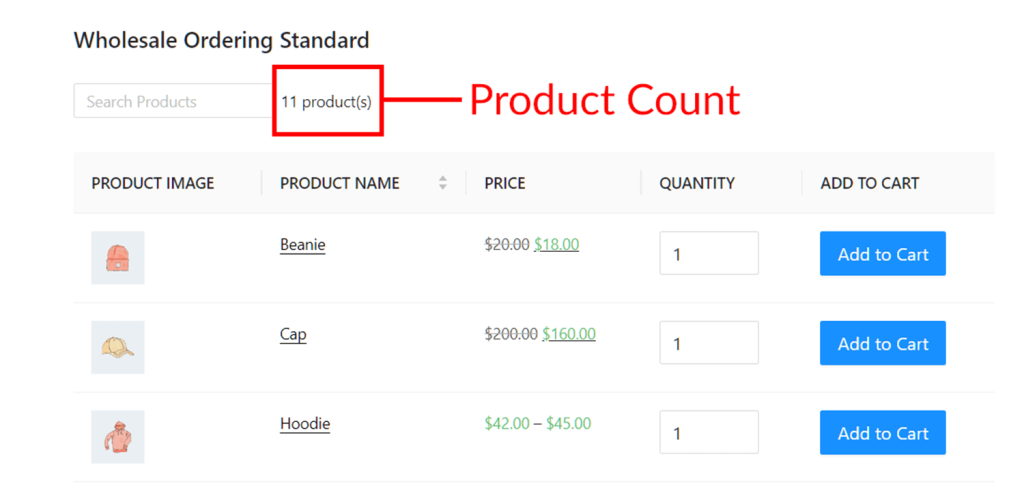
This simply displays the total number of products in your product catalog. This is regardless of how many products your order form currently displays on the page.
For example, if your product catalog contains 11 products, Product Count will display the message “11 product(s)” even if the page is only showing three of those products:
5. Form Pagination
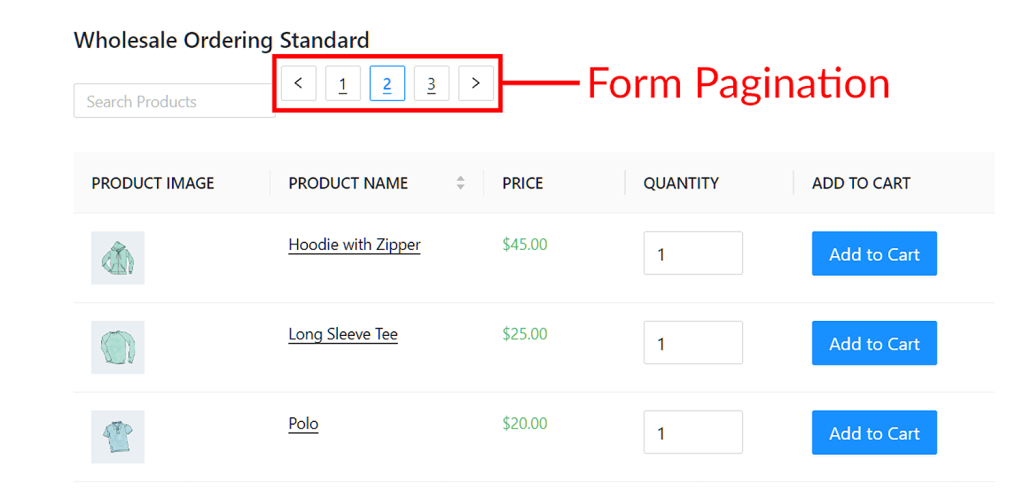
This option separates your product list into pages. In addition, it gives users clickable page numbers on the front end so that they can jump between pages.
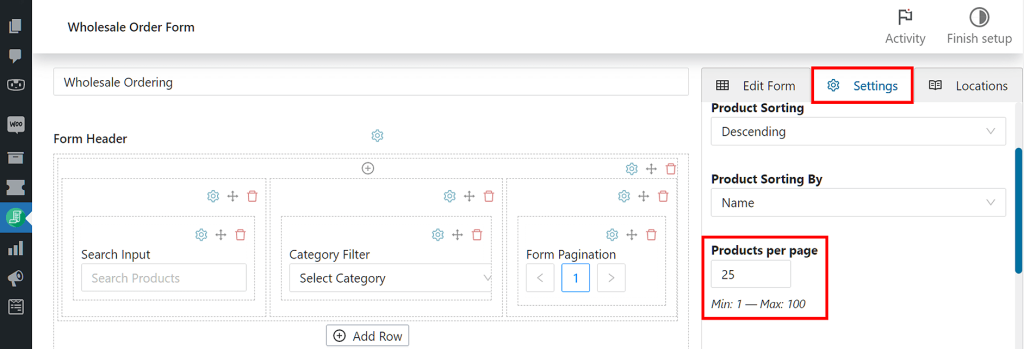
Form Pagination works best with the Products Per Page option, which is found under the Settings tab on the right side of the Form Editor page. Basically, Products Per Page determines how many items each page lists.
For example, let’s say you have 11 products, and you set Products Per Page to 4. This will list only 4 items per page for a total of 3 pages.
Also, take note that the Lazy Loading option (also under Settings) disables Form Pagination. For more on Form Pagination VS. Lazy Loading, read our article “2 Amazing Ways To Display Your WooCommerce Product List.”
6. Cart Subtotal
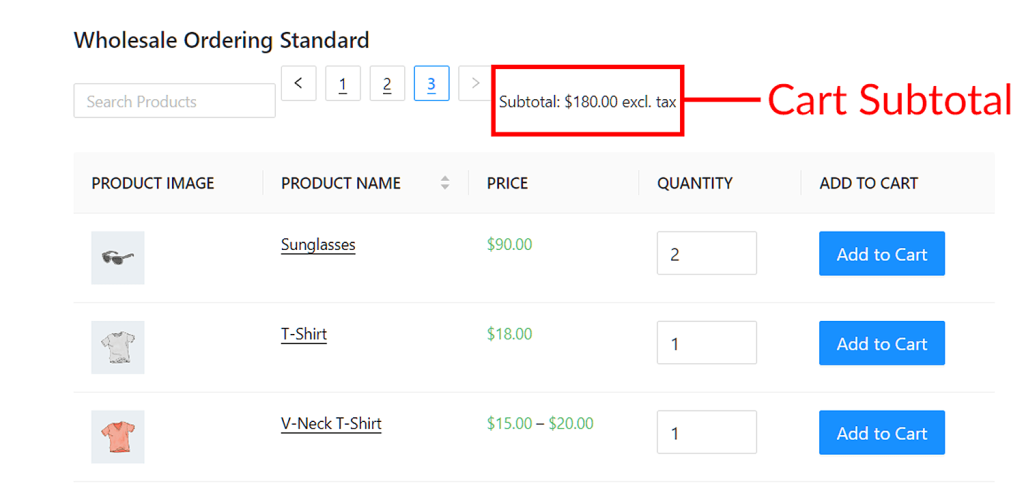
Cart Subtotal displays the cost of all the items you’ve added to your cart minus taxes.
For example, if a customer buys a pair of $90 sunglasses, Cart Subtotal will display “Subtotal: $180.00 excl. tax”:
To see the cost plus taxes, the customer has to visit their cart.
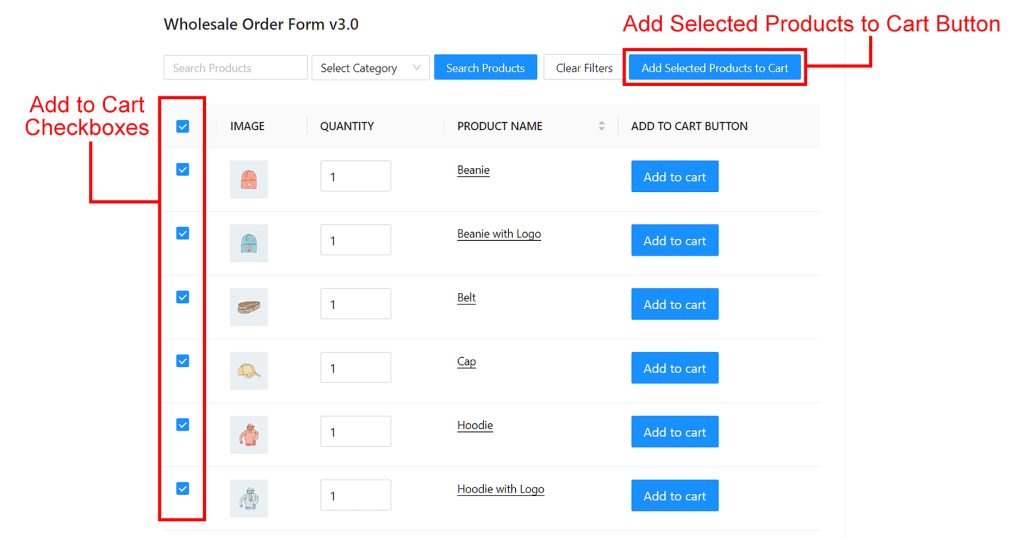
7. Add Selected Products to Cart
This option works alongside the table element Add to Cart Checkbox. Simply put, it allows customers to quickly add desired products to their cart.
We discuss Add Selected Products to Cart in more detail in the article “How To Use The Add Selected Products To Cart Option (In 3 Steps).”
Take note!
With the introduction of Wholesale Order Form Version 3.0, you now have the ability to add identical header and footer elements to both the header and footer sections of your order form.
For example, you can place the Search Input element in the header and footer sections simultaneously. This can be helpful if you have an extremely long list of products on one page, as the user won’t have to scroll up and down said page to access the information or controls provided by either section.
How To Add Header And Footer Elements To Your Wholesale Order Form (In 3 Easy Steps)
As we’ve established, header and footer elements are necessary for your wholesale order form to be complete. Thankfully, implementing these elements in your online store is easy. All you need are the following tools:
- The WooCommerce e-commerce platform
- The latest version of our Wholesale Order Form plugin
Therefore, before proceeding with the tutorial, ensure you’ve already installed and activated WooCommerce and Wholesale Order Form. Moreover, make sure to update Wholesale Order Form to its latest version.
With that in mind, let’s begin the tutorial!
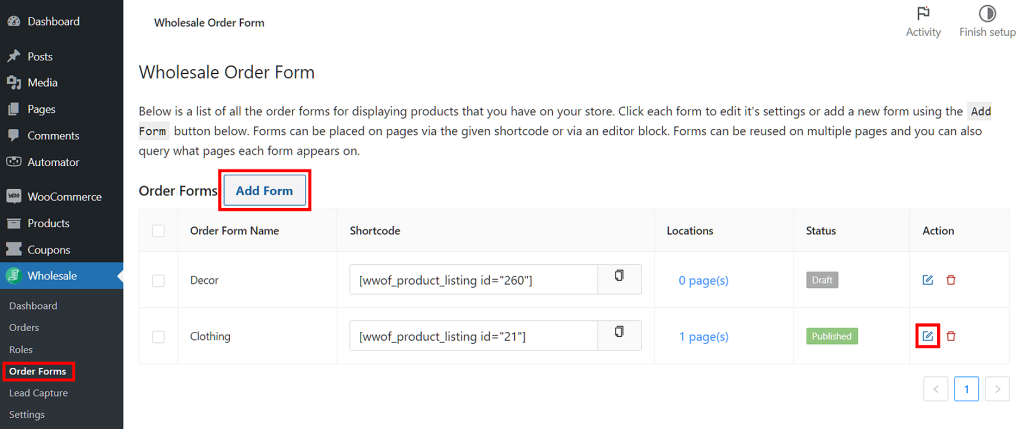
Step 1: Navigate to the Form Editor page
On your WordPress dashboard, head to Wholesale > Order Forms. Then, you have two choices: either create a new form by clicking Add Form or edit an existing form by clicking its edit button.
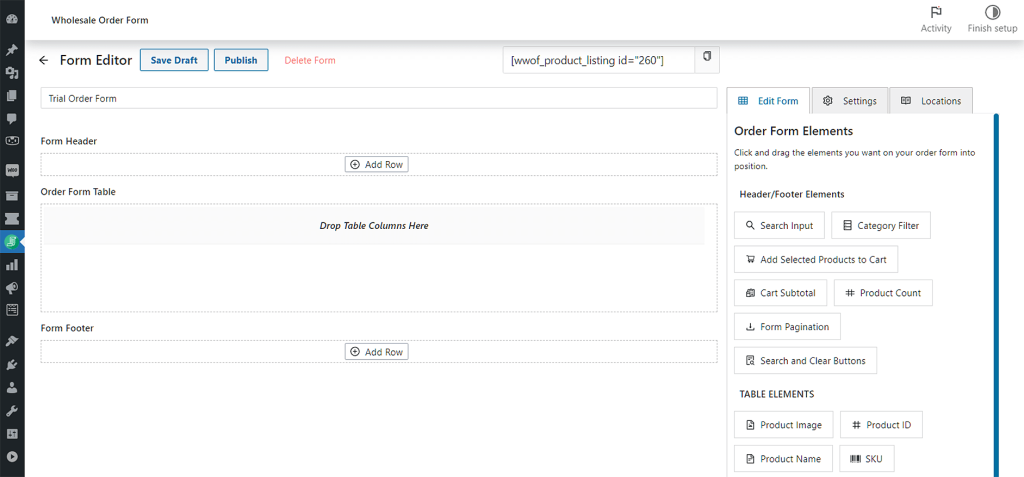
Whatever your choice, you’ll be redirected to the Form Editor page.
Step 2: Insert header and footer elements into the header and footer sections
Now, you can start inserting header and footer elements into your wholesale order form’s header and footer sections.
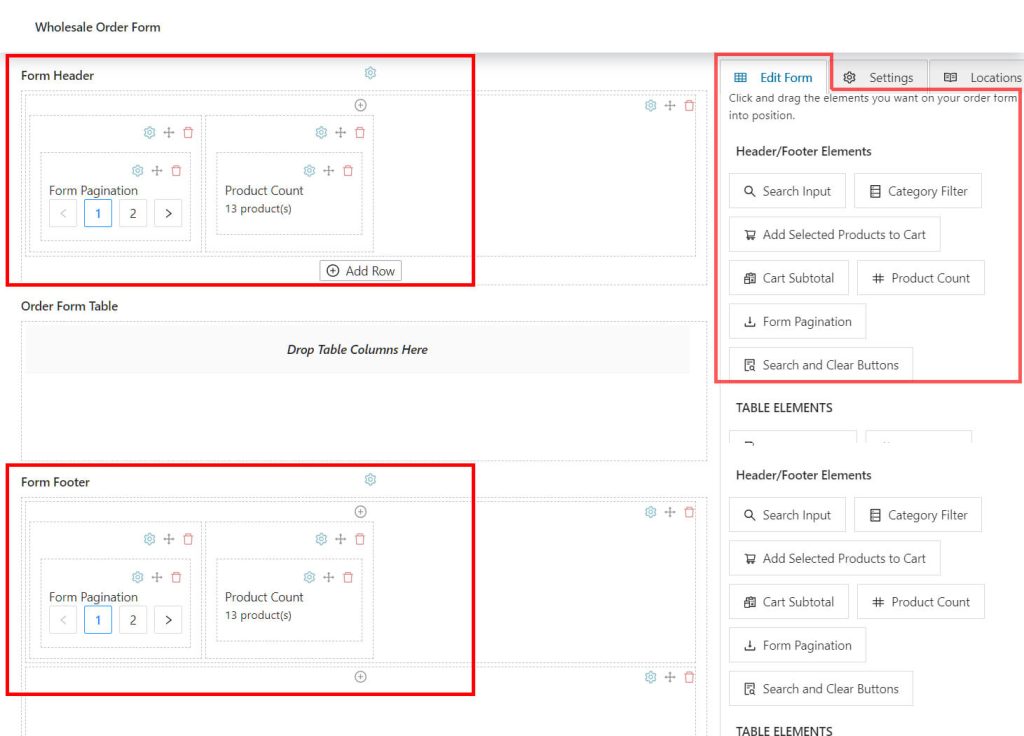
Go to the right side of your Form Editor page and click the Edit Form tab. Next, under Header/Footer Elements, drag and drop your desired elements into your form’s Form Header section, Form Footer section, or both.
For example, in the table below, we inserted Form Pagination and Product Count into both the Form Header and Form Footer sections.
Step 3: Customize your header and footer elements
Wholesale Order Form allows you to customize each header and footer element to a considerable degree.
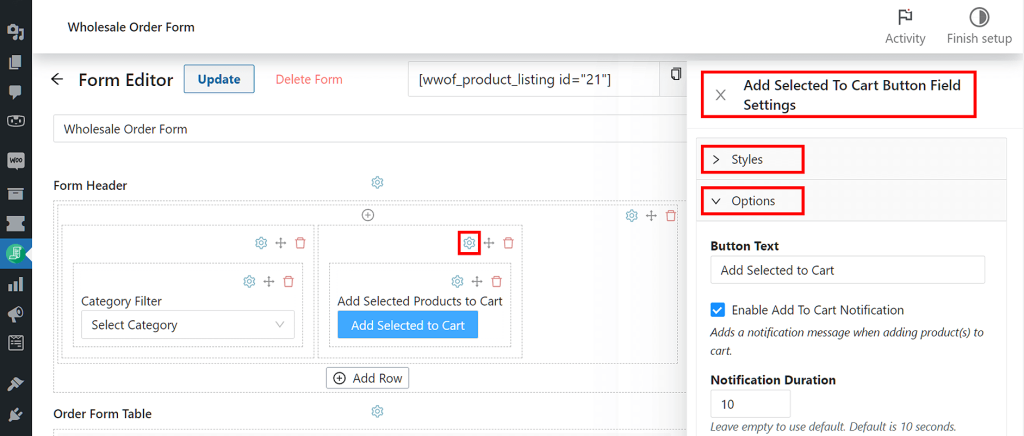
To edit an element, click the gear icon in its column. This gives you access to its Field Settings, which boasts controls for Styles and Options:
Styles allows you to customize the element’s appearance on the front end. For example, you can alter its color and alignment.
On the other hand, Options lets you change the information the element displays. For instance, you can change the text that appears on the Add Selected Product To Cart button.
Customize these Field Settings until you’re happy with how your header and footer elements behave on the front end. Once you’re done, save your work by clicking the Update or Publish button near the top of the Form Editor page.
And voila! You now have a wholesale order form with header and footer elements.
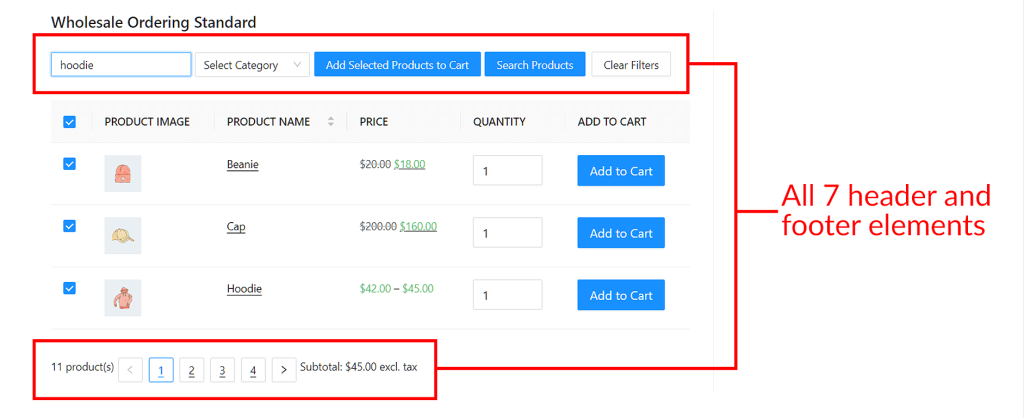
If you’re curious how a form with all seven header and footer elements looks like on the front end, it should be something like this:
Would you like to know more about how to create wholesale order forms? Then we recommend reading the following guides:
- How To Create A Simple Wholesale Order Form Online
- A Step-by-Step Guide To WooCommerce Quick Order Forms
- How To Make A WooCommerce Bulk Order Form (Easy & Quick)
- 6 Tips To Get The Most Out Of Wholesale Suite’s New Order Form Builder
Conclusion
Wholesale Order Form’s header and footer elements can boost your order form’s functionality and user experience, both of which can encourage customers to make purchases. Thus, you’ll be doing yourself a favor by including them in your wholesale order form.
Today, we discussed the following seven header and footer elements included in our Wholesale Order Form plugin:
- Search Input
- Category Filter
- Search and Clear Buttons
- Product Count
- Form Pagination
- Cart Subtotal
- Add Selected Products to Cart
Furthermore, we walked you through the three steps you need to take to add these header and footer elements to your order form:
- Navigate to the Form Editor page
- Insert header and footer elements into the header and footer sections
- Customize your header and footer elements
Do you have any questions about header and footer elements? Let us know in the comments section below!

