
Offering wholesale customers payment terms sounds simple until you sit down to do it. You need a payment processor connected, a set of terms your buyers can choose at checkout, and some way of knowing the whole thing actually works. A WooCommerce Stripe setup for wholesale has always had a few moving parts, and it’s easy to stop halfway and forget where you left off.
Wholesale Payments 1.0.8 fixes that with a guided WooCommerce Stripe setup that lives right on your Wholesale Suite dashboard. A new Wholesale Payments section in the Get Started card shows you exactly what to do next, ticks each step off on its own as you finish it, and even celebrates your first wholesale payment when it lands.
In this article, we’ll walk through what the new checklist does, who it helps most, and how to complete every step, from connecting Stripe to watching your first payment arrive.
What Is The New Wholesale Payments Setup Checklist?
Wholesale Payments plugin now adds its own section to the Get Started card on Wholesale > Dashboard. It sits alongside the sections for your other Wholesale Suite plugins, so your whole wholesale setup is tracked in one place.
The section has two counted steps and one optional milestone:
- Connect Stripe: link the Stripe account that will process your wholesale payments.
- Create and enable a payment plan: set up at least one plan (e.g., Net 30 or 50% upfront) and turn it on.
- Collect your first payment: an optional milestone that ticks itself when a wholesale customer pays you for the first time.
The progress counter only counts the first two steps, so the section reads “done” as soon as Stripe is connected and a plan is live. The first payment milestone is optional and never holds up your progress because it depends on your customers, not you.
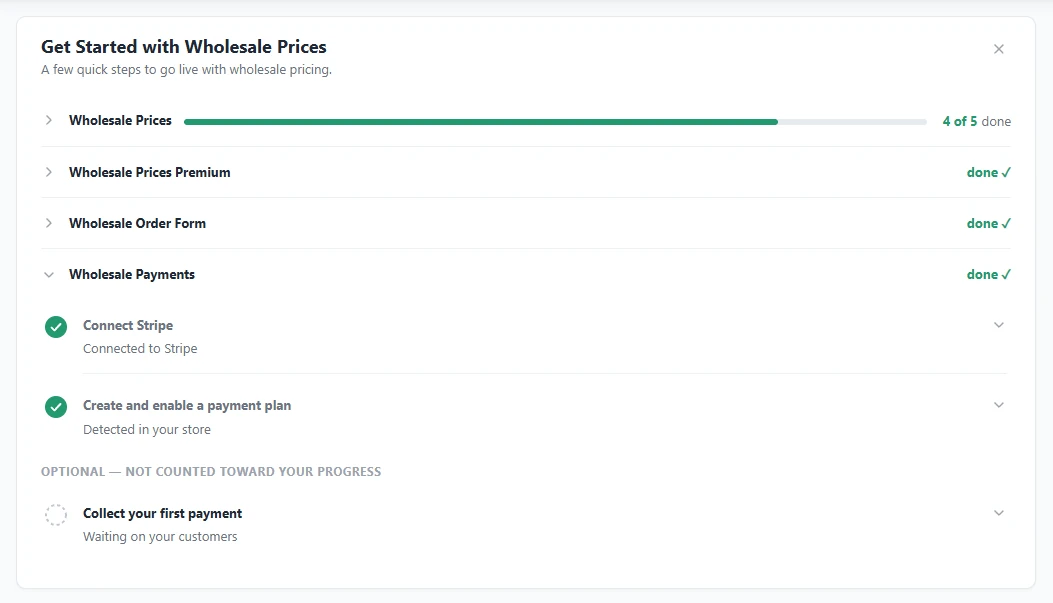
Every step is detected automatically. There’s no “mark as done” button to remember, because the checklist looks at your store and sees whether Stripe is connected and whether an enabled plan exists.
Why A Guided WooCommerce Stripe Setup Matters For Wholesale Stores
Wholesale buyers rarely pay like retail shoppers. Many expect terms like net payment terms, deposits, or split payments, and a store that can’t offer them loses orders to suppliers who can. Getting your WooCommerce Stripe setup finished quickly means you can start offering those terms sooner.
The problem is that setup usually happens in short bursts between other jobs. You start connecting Stripe, get pulled away, and come back days later unsure what’s done. The new checklist remembers for you. If you started connecting Stripe but didn’t finish, the step changes to Resume connecting Stripe, so you pick up where you left off instead of starting over.
It also keeps you honest after setup. The steps reflect your store’s real state, so if Stripe is ever disconnected or you switch off your last enabled plan, the matching step flips back and the card points you to the fix.
Who This Feature Is For
The checklist is most useful for store owners new to Wholesale Payments who want a clear path from install to first payment. It is just as handy if you installed the plugin a while ago and never quite finished configuring it.
It also helps teams. If more than one person manages the store, anyone with dashboard access can see at a glance whether Stripe is connected and whether payment plans are live, without digging through settings screens.
If you’re still comparing options for offering terms, the Store Owner Tips roundup of the best WooCommerce B2B payment and net terms plugins is a good place to see how Wholesale Payments compares.
How To Complete Your WooCommerce Stripe Setup Step By Step
Here is the full WooCommerce Stripe setup using the new checklist. It should take about five minutes once your Stripe account is ready.
Before you start
- Update Wholesale Payments to version 1.0.8 or later.
- Make sure Wholesale Prices is on version 2.3.0 or later, since it provides the Get Started card where the new section appears.
- Have your Stripe login handy. If you already use Stripe with another plugin, you can connect that same account.
Step 1: Open the Get Started card
Go to Wholesale > Dashboard and find the Get Started card at the top of the page. Click Wholesale Payments to expand the section and see your steps. On a fresh install, Connect Stripe is highlighted as the recommended first step.
Step 2: Connect Stripe
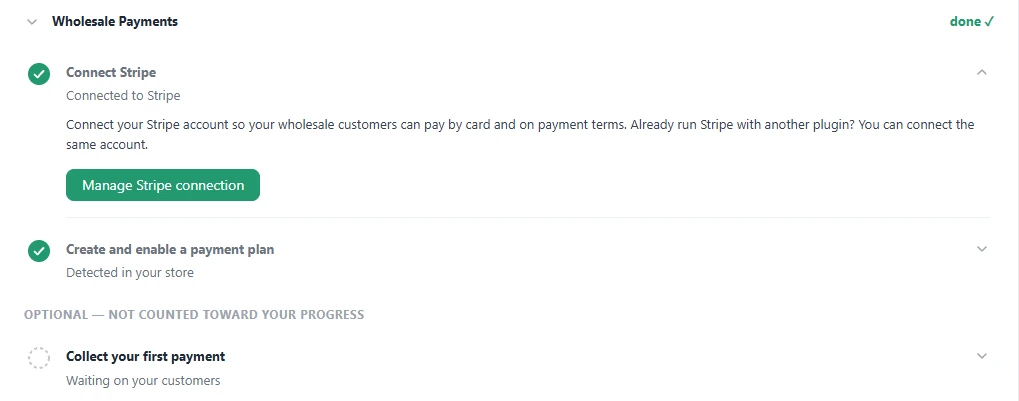
Expand the Connect Stripe step and click its button. It takes you to the Wholesale Payments screen, where you click Connect with Stripe and follow Stripe’s prompts to link your account. When you return, the step ticks itself, and the subtitle changes to “Connected to Stripe”.
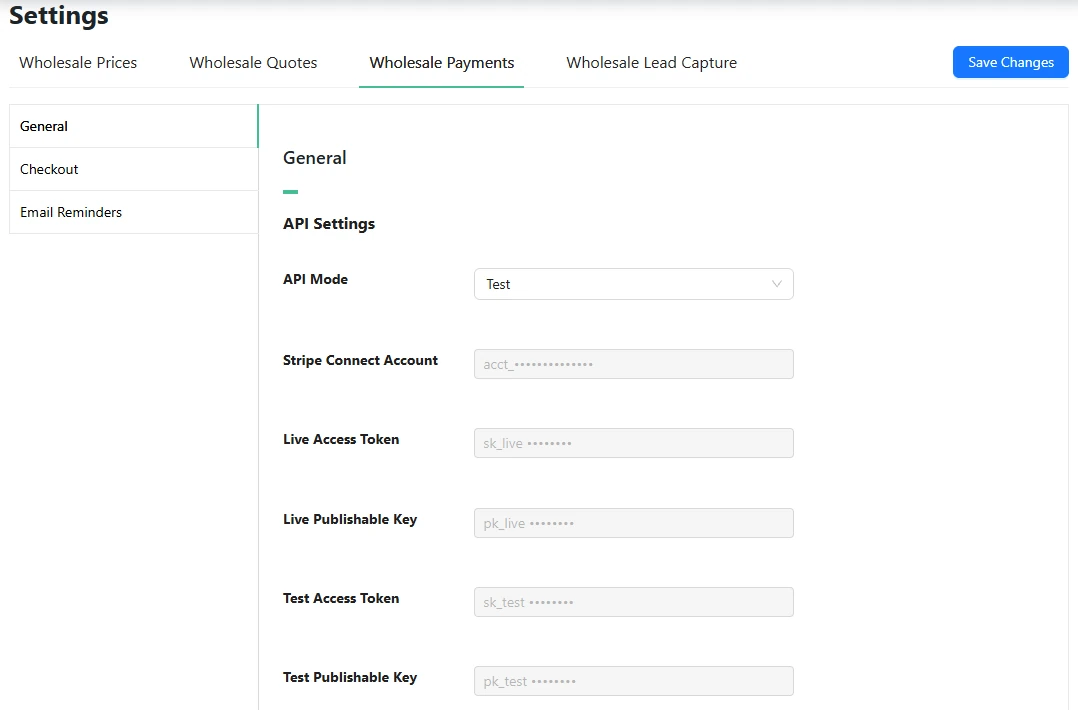
Your connection details are kept under Wholesale > Settings > Wholesale Payments > General. This is where you switch the API mode between Test and Live, run a Test Connection check, or reset the connection if you ever need to link a different account. For a deeper walkthrough of this screen, see our guide on how to set up Stripe for wholesale payments.
Step 3: Create and enable a payment plan
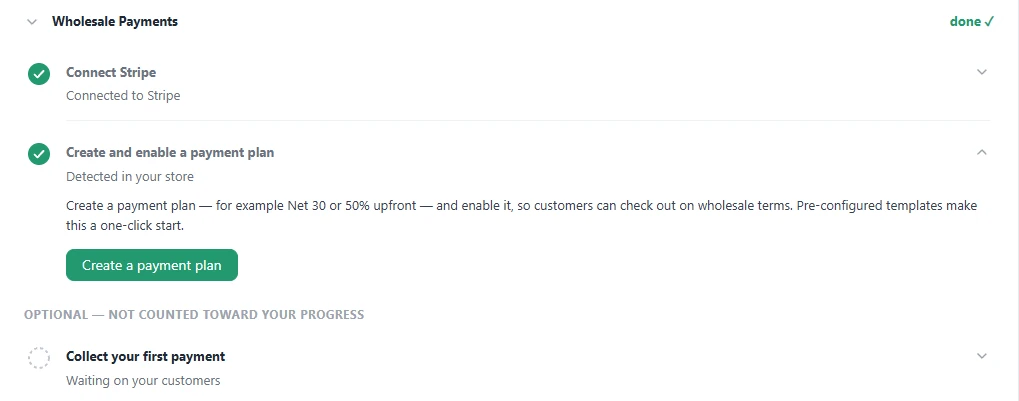
Back on the dashboard, the Create and enable a payment plan step is now current. Expand it and click Create a payment plan to open your payment plans.
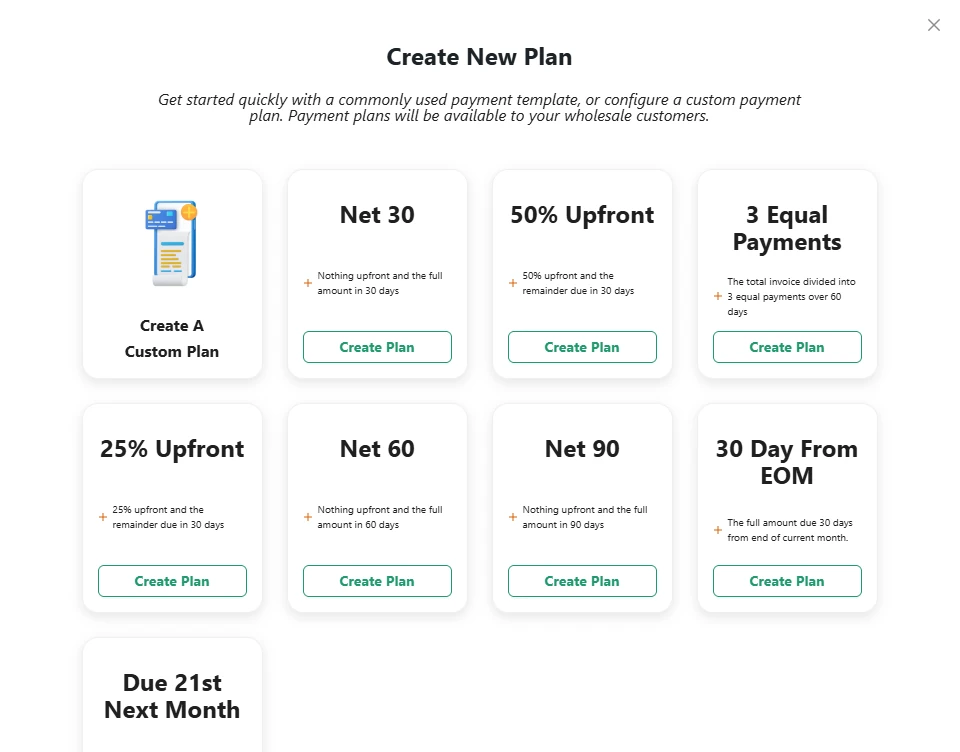
Click Create New Plan to choose a starting point. You can build a custom plan from scratch or start from a template: Net 30, 50% Upfront, 3 Equal Payments, 25% Upfront, Net 60, Net 90, 30 Day From EOM, or Due 21st Next Month. Pick one, adjust it if you need to, and make sure it’s enabled.
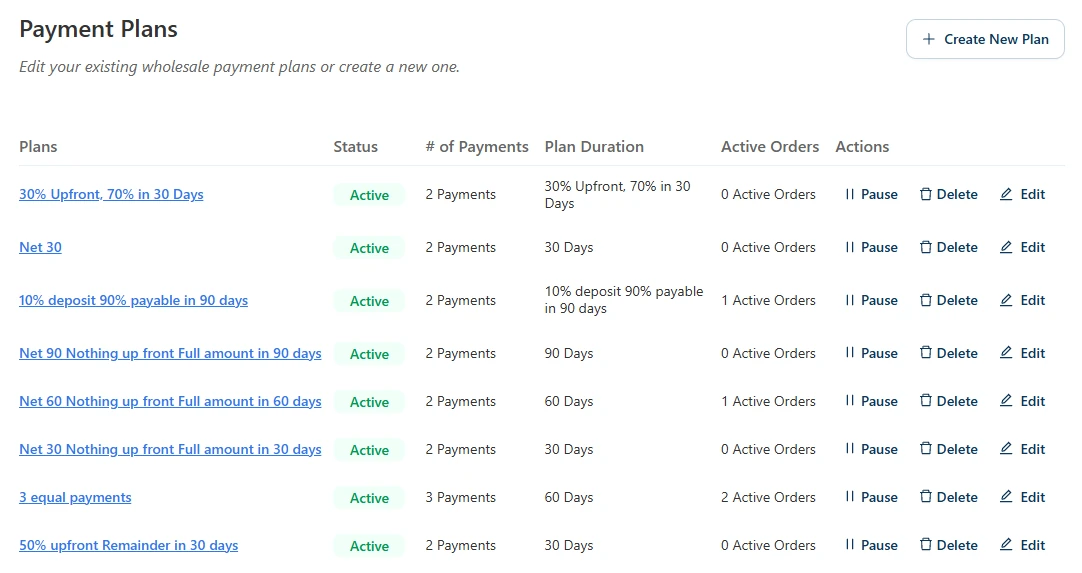
Your new plan appears in the Payment Plans list with an Active status. From here, you can pause, edit, or delete plans at any time. If you want ideas for structuring your terms, our post on WooCommerce payment plans covers the options in more detail.
As soon as one enabled plan exists, the step ticks and the section reads “done”. That completes the counted part of your WooCommerce Stripe setup.
Step 4: Watch for your first payment
The last row, Collect your first payment, waits quietly with the subtitle “Waiting on your customers”. You don’t need to do anything here. When a wholesale customer makes their first real payment, the row ticks itself and stays ticked for good.
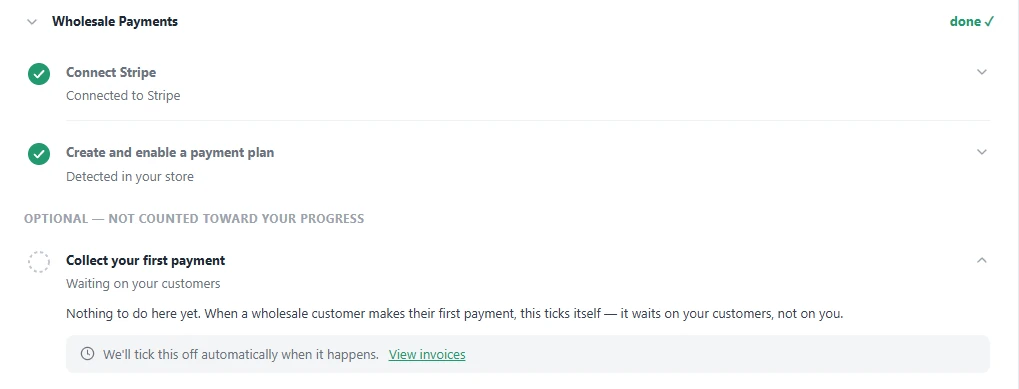
Only live payments count toward this milestone. Payments made while your store is in Stripe’s Test mode are ignored, so running a few test orders during setup won’t use up the celebration before your first real customer pays.
The Emails That Follow Your Progress
Wholesale Payments 1.0.8 also adds two short admin emails that mark your progress. You’ll find both under WooCommerce > Settings > Emails:
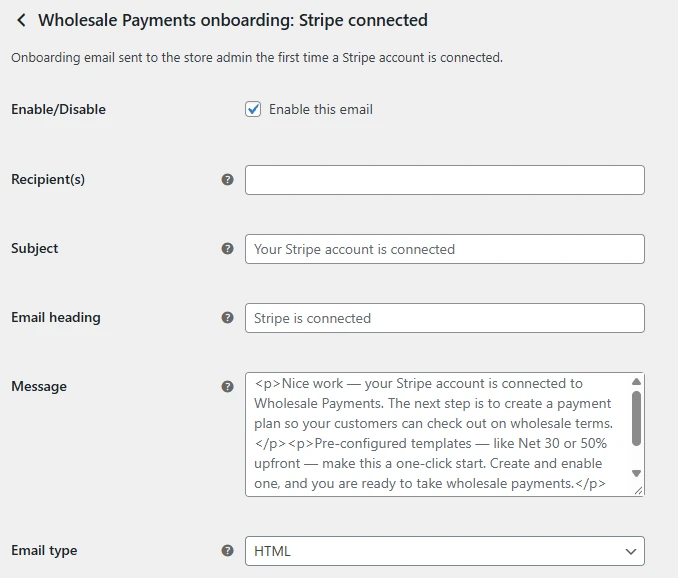
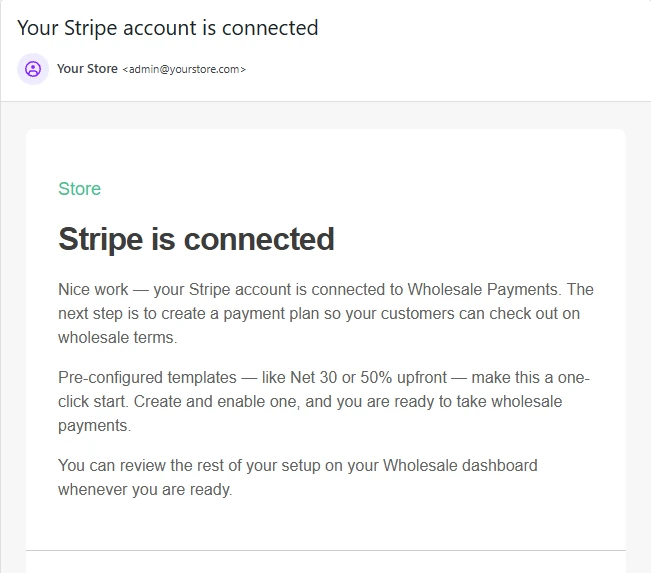
- Wholesale Payments onboarding: Stripe connected is sent the first time you connect your Stripe account. It reminds you that the next step is a payment plan.
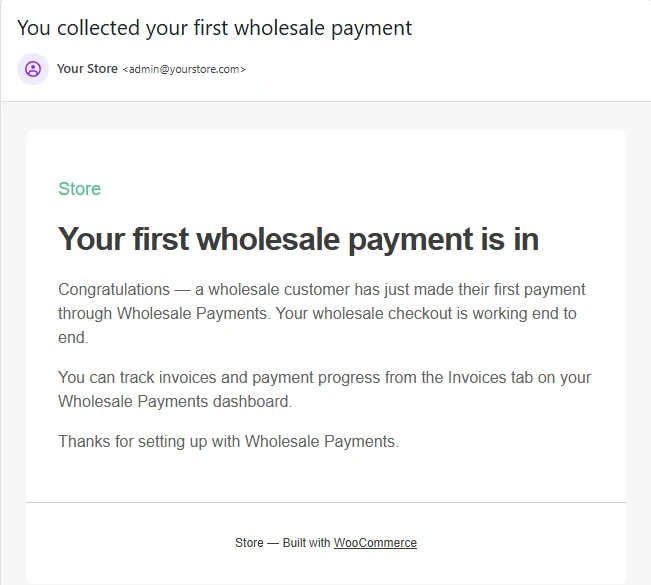
- Wholesale Payments onboarding: first payment collected is sent when your first wholesale payment arrives, confirming your checkout works end to end.
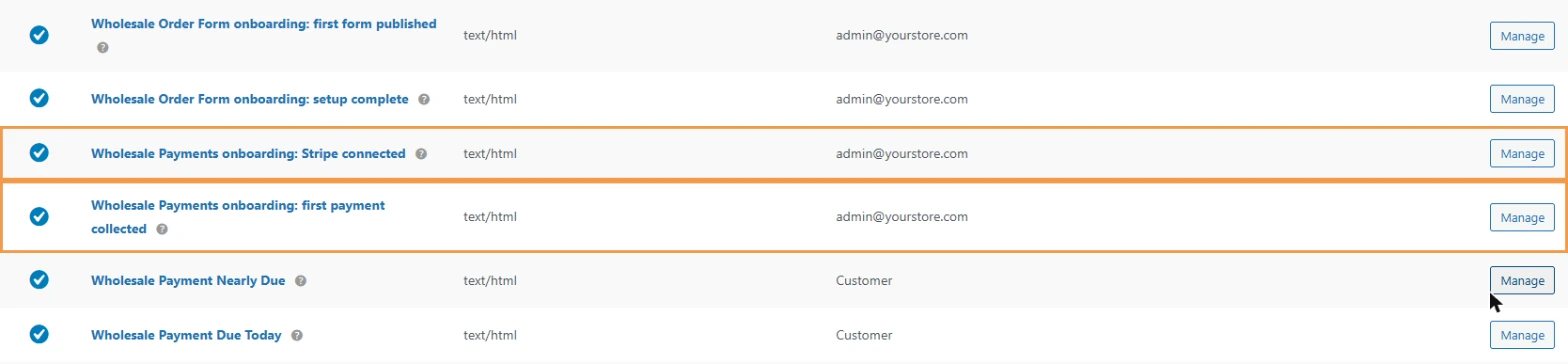
Each email goes to your store’s admin email address and is sent only once. Click Manage next to either one to edit the subject, heading, and message, or untick Enable this email if you’d rather not receive it.
If your store had already connected Stripe or collected payments before you updated, these emails won’t be sent for those past events. Keep in mind that if an email is switched off when its step is reached, it won’t be sent later when you switch it back on.
Find The Checklist In WooCommerce Home Too
You don’t have to remember to visit the Wholesale dashboard. Wholesale Payments also adds a Set up wholesale payments task to the Things to do next list on WooCommerce > Home, with an estimate of about five minutes. Clicking it takes you straight to the Get Started card.
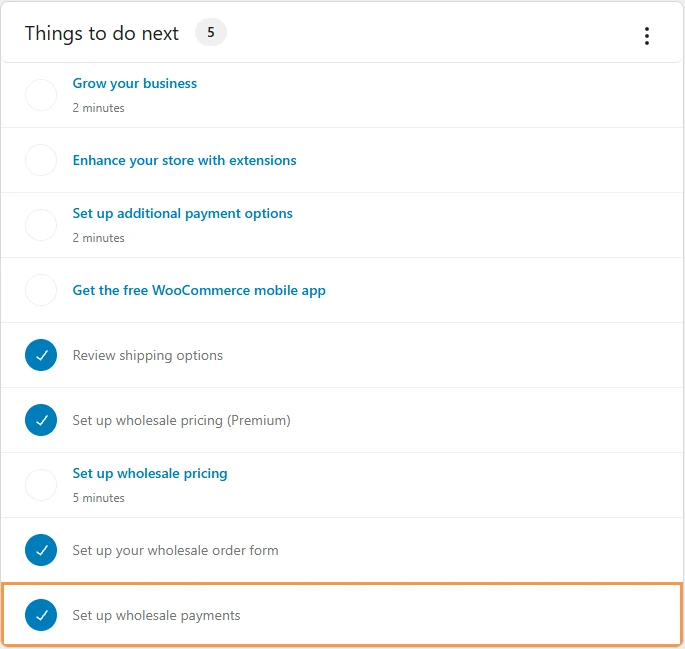
The task is marked complete when you finish both counted steps or dismiss the Get Started card. It works the same way as the order form task added in our recent setup checklist for Wholesale Order Form.
Tips For A Smooth WooCommerce Stripe Setup
A few habits will make setup easier to finish and easier to trust:
- Test before you go live. Keep the API mode on Test while you place a few sample orders. Stripe’s guide to testing payments lists the test cards you can use. Switch to Live once everything looks right.
- Understand your keys. Test and live mode use separate keys. Stripe’s documentation on API keys explains the difference if you’re unsure which mode you’re in.
- Start with one plan. The checklist only needs one enabled plan. Launch with a common option like Net 30, then add more once you see what your buyers choose.
- Turn on reminders. Once plans are live, set up payment reminder emails so customers on terms pay on time.
- Check the card after changes. If you reset your Stripe connection or pause your only plan, the checklist will show it. A green section quickly shows your store can still take wholesale payments.
If the connection step won’t tick after you finish in Stripe, our Stripe connection troubleshooting guide covers the most common causes.
Also New In Wholesale Payments 1.0.8: Itemized Stripe Invoices
Once you complete your WooCommerce Stripe setup, the invoices your customers receive are clearer, too. Previously, a Stripe invoice showed the order as a single lump-sum line. Now, when one payment covers the whole order, such as a Net 30 plan, the Stripe invoice lists each product with its quantity and price, plus separate lines for shipping, fees, discounts, and tax that add up to the order total.
For plans that split the order into several payments, each payment gets its own line, with the item list shown under the first one. There’s nothing to switch on. It applies automatically to new invoices after you update.
The release also includes a long list of fixes to invoices, reminders, and checkout. If you sell through a marketplace instead, our sister brand WC Vendors has a guide to Stripe Connect vendor payouts.
Conclusion
Getting paid on wholesale terms shouldn’t depend on remembering where you left off in a settings screen. With Wholesale Payments 1.0.8, your WooCommerce Stripe setup becomes a short, guided checklist on your Wholesale Suite dashboard: connect Stripe, enable a payment plan, and let the first payment milestone tell you when everything is working.
Because the steps detect your store’s real state, the checklist stays useful long after setup. It shows you right away if Stripe is disconnected or your plans are switched off, and the two onboarding emails keep you posted without any extra work. Update the plugin, open your dashboard, and finish your WooCommerce Stripe setup today.
Here is what we covered in this article:
- What is the new Wholesale Payments setup checklist?
- Why a guided WooCommerce Stripe setup matters for wholesale stores
- Who this feature is for
- How to complete your WooCommerce Stripe setup step by step
- The emails that follow your progress
- Find the checklist in WooCommerce Home too
- Tips for a smooth WooCommerce Stripe setup
- Also new in Wholesale Payments 1.0.8: itemized Stripe invoices
Frequently Asked Questions
Do I need a new Stripe account to use Wholesale Payments?
No. If you already use Stripe with another WooCommerce plugin, you can connect that same account to Wholesale Payments.
Why does my checklist say “done” when I haven’t collected a payment yet?
Only two steps count toward your progress: connecting Stripe and enabling a payment plan. The first payment milestone is optional and ticks itself later, once a wholesale customer pays.
Will test orders tick the first payment milestone?
No. Only live payments count. Payments taken while Wholesale Payments is in Test mode are ignored, so you can test freely during setup.
What happens if I disconnect Stripe after finishing setup?
The Connect Stripe step flips back to unfinished and the card highlights it again. The same happens to the plan step if you no longer have an enabled payment plan.
Can I stop the onboarding emails?
Yes. Go to WooCommerce > Settings > Emails, click Manage next to either Wholesale Payments onboarding email, and untick Enable this email.